This is the more advanced method of creating an audio CD to play on your conventional CD player. Unlike the simple wizard in the Easy Media Creator interface, this task uses Music Disc Creator to create an audio CD. This gives you many more options in creating your CD.
 Select Audio
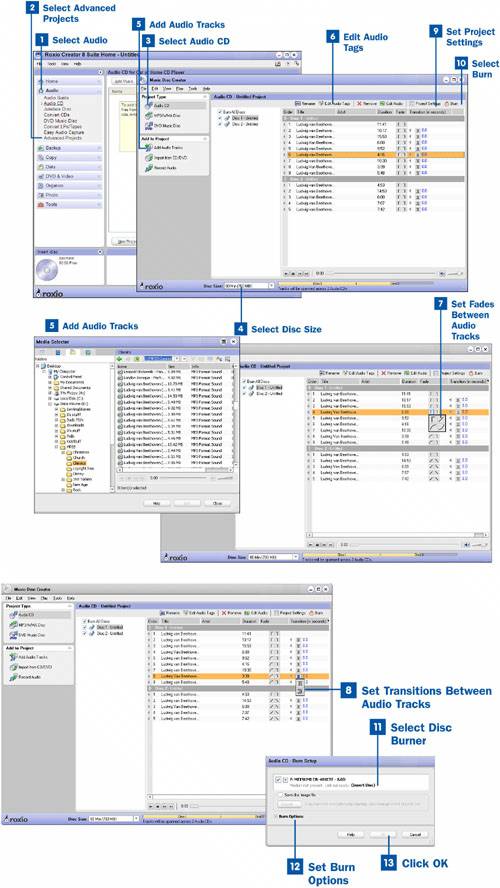
Select Audio in the project pane to open the Audio menu.
 Select Advanced Projects
Select Advanced Projects from the Audio menu to bring up Music Disc Creator.
 Select Audio CD
From within Music Disc Creator select Audio CD. This brings up the Audio CD project window.
 Select Disc Size
After you have started a new disc project, choose the size of the recordable disc you will be using from the Disc Size drop-down menu. The size of the disc is usually printed somewhere on the disc itself.
Selecting the correct size of your disc ensures that the Estimated Free Space status bar (to the right of the Disc Size menu) is correct so you do not add more files to the project than can actually fit on the disc.
 Add Audio Tracks
After you have selected your disc size, you can start adding audio tracks to your project. There are three ways to add audio tracks. The first is to click on Add Audio Tracks to open Media Manager and then find the audio files you want to add. You can select several by holding down the Control key while you click on them. After you have selected the tracks that you want, click OK.
Tip
Another way to import your audio files into your audio project is to drag and drop them from a separate window. You can do this by browsing through Windows for your files and then dragging them to Easy Media Creator. This is an easier method if you have files in several locations to add to your project.
You can also import audio directly into the project by clicking the Import from CD/DVD or Record Audio and then following the instructions listed in  Capture Music Tracks from a CD and
  Capture Audio Using Easy Audio Capture.
 Edit Audio Tags
You can edit the tags of your audio tracks by clicking the Edit Audio Tags button in the taskbar. Follow the steps in  Add Tags to Audio Tracks.
 Set Fades Between Audio Tracks
You can set the fades between two or more of the audio tracks in your project. Select the track or tracks on which you would like to set fades. Click on the left Fade button in the Fade column to determine how the track fades in and the right Fade button to determine the fade out. The preset option (looking like an upside down L) represents no fade. A diagonal line is a standard fade. The diagonal line curved up is a slow fade and curved down is a quick fade. Changing the setting in any one of the selected tracks changes the setting for all.
Tip
You can save your project so you can burn the same CD at any time by clicking Save in the File menu.
 Set Transitions Between Audio Tracks
Select the tracks for which you would like to change the transition settings. Set the transition option and time between tracks by clicking on the Transition icon inside of the Transition column. The preset option is a gap and looks like two brackets backed up to each other. The other option is an overlap. This looks similar to a buckled seat belt. You can choose either option on any of the tracks you have selected and the option is changed in all the tracks. Set the duration of your transition by changing the number to the right of the Transition icons. This sets your duration time in number of seconds.
 Set Project Settings
You can change the name of the disc and artist as well as maximize your volume by clicking the Project Settings icon in the taskbar.
 Select Burn
After you have set the project options, you are ready to burn the disc. Start the burn process by clicking on the Burn button in the taskbar to bring up the Burn Setup window.
 Select Disc Burner
If you have multiple CD/DVD recorders, you need to specify which drive you will be using to burn the disc.
Tip
You also have the option in the Burn Setup window to save an image of the disc you are burning. This enables you to store the disc image as a file to archive, transfer it to another computer, or burn copies later.
 Set Burn Options
After you have selected the disc burner, you can specify options by expanding the Options menu. From the Options menu, you can specify the write speed, number of copies, and other settings.
 Click OK
After you have finished setting the burn options, click OK to burn the disc. After the burn process is completed, the disc is automatically ejected.