Using the Image Slicer
| [ LiB ] |
Using the Image Slicer
Use the Image Slicer to slice a large image into pieces that can then be reassembled on your Web page in an HTML table. To open the Image Slicer, choose F ile > Expor t > I mage Slicer. You'll then see the dialog box for the Image Slicer, with its various tools.
As with the Image Mapper, you can use the Pan tool to move the preview around in the preview window.
To slice your image into evenly spaced rows and columns, choose the Grid tool and click in the preview window. In the Grid Size dialog box, enter the number of rows and columns . After you click OK, you'll see grid lines showing the cells into which your image will be sliced, as shown in Figure 9.19.
Figure 9.19. Slicing an image with Image Slicer.
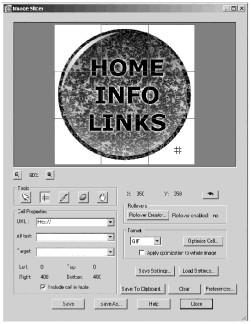
You can readjust the position of the grid lines by dragging on them with the Arrow tool or the Slicer tool. The Slicer can also be used to add cells. In the preview window, drag up or down with the Slicer to make a vertical slice or drag right or left to make a horizontal slice.
You can delete cells with the Eraser tool. Just click on a slice segment with the Eraser to delete a particular segment. (To erase all the grid lines, click the Clear button.)
To make a particular cell clickable, click in the cell with the Arrow tool and then set a URL in the Cell Properties pane. You can also set ALT text and/or a TARGET , if you like.
NOTE
 TIP
TIP
If you want to save your settings for later use on the same image or on another image, click the Save Settings button. To load previously saved settings, click the Load Settings button.
You can optimize the entire set of slices in a single file format or optimize individual slices separately. To optimize the entire set of slices at once, choose the file format that you want in the Format pane and check the Apply optimization to whole image box, and then click the Optimize Cell button, which starts the appropriate optimizer. To optimize an individual cell, select the cell with the Arrow tool, then set the format as you like, and click the Optimize Cell button, being sure that Apply optimization to whole image is not checked.
NOTE
TIP
Image Slicer is handy for large images that contain some areas that are best optimized as GIFs and other areas that are best optimized as JPEGs, such as an image that fades from a landscape on the left to a solid color on the right. Slice the image so that one section contains the landscape, and then optimize this slice as a JPEG. Optimize the solid-colored slice as a GIF.
To save your slices and the HTML file containing the code for the table used to reassemble the slices, click the Save As button. Navigate to the appropriate folder, and enter the name you want for the table's HTML file. By default, each of your slices will have a name that begins with the name of your original image file and that ends with a string of the form _nxm , where n is the row number and m is the column number of the table in which your sliced image is reassembled. If you've previously checked the Prompt for image folder on Save or Save As check box in the Slicer Preferences dialog box (accessed with the Preferences button), you can specify a string different from the name of the original image to use in the names of your slices.
To include the sliced image on your own Web page, copy the table code from the HTML file that Image Slicer created and paste it into the HTML file for your Web page. Or, if your HTML file already exists and you don't want to save a separate HTML file for your sliced image, choose Save To Clipboard , and then paste the HTML code from the clipboard directly into your HTML file. Upload your newly edited HTML file for your page, along with all of the sliced images, to the proper folder(s) on your Web server.
NOTE
 CAUTION
Contrary to what many people believe, slicing your image usually will not decrease download time. In fact, download time is quite likely to increase. For many folks, though, there is a psychological effect: Because they can see parts of the image as the whole thing is loading, it seems like the download time is shorter.
| [ LiB ] |