Plugging in the Hardware
| Now that you've collected your current settings, you are ready to rock and roll...er...plug and unplug things. The first thing to do is to power down the computers on your network, as well as any hubs, switches, or routers, and your cable or DSL modem. You might have to unplug the modem to turn it off because many of these devices don't come with power switches. TIP The port, or socket, for the Ethernet cable on the modem will probably be marked, logically enough, "Ethernet." Ignore the USB socket, which you will also find on many broadband modems, unless you want to plug a USB printer, or other USB device you want to share, in to it. If an Ethernet cable is plugged in to the back of the modem, unplug it. Next, using an Ethernet cable (you'll probably find one provided by the access point manufacturer), connect the cable to the appropriate socket on the access point. This socket will probably be labeled "Internet" or "WAN." (WAN is short for wide area network; one way of looking at the Internet is that it is a great, big WAN.) Now, connect the wired computers and other devices (such as printers) in your network (if you plan to include wired devices) to the appropriate ports on the back of your access point/router, usually numbered 14. TIP If you're not sure which socket to plug in to on your access point, take a look at the pictures of wireless access point connectors in Chapter 12. If your access point/router has a number of wired sockets, the Ethernet ports might simply be numbered. Otherwise, if your access point has routing capability (as most do today), there will probably be at least one Ethernet socket for your wired network. If it is a single Ethernet socket, it might be labeled "Ethernet" or "LAN" (short for local area network). On the Apple Extreme Base Station, the Ethernet out port is designated with a special symbol that looks like two angled brackets with dots in between: < ... >. If there is only one port for your wired devices, or if the number of ports provided on a combo wired-wireless unit is not sufficient, you might have to use a hub, or switch, to add additional Ethernet ports to the wired portion of your network. Don't worry; you can easily find very cheap hubs (or switches) that are fine for this purpose.
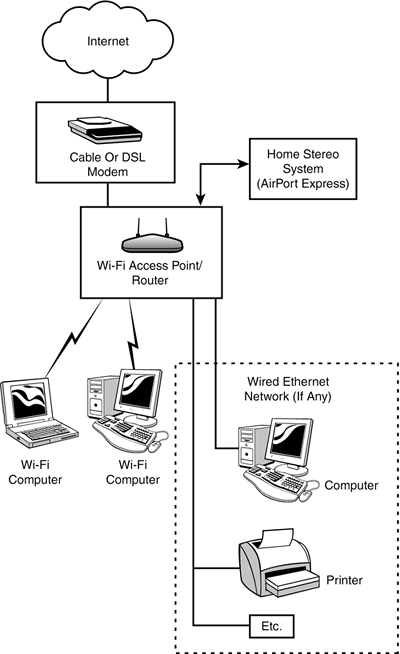
When everything is wired up, it should look like the diagram shown in Figure 13.8. The modem is connected to the Internet; the access point is connected to the modem; and the internal, wired network (if there is one) is connected to the access point. Figure 13.8. The Internet is connected to the modem, which is connected to the access point, which is connected to your wired network (if you have one).
|
EAN: N/A
Pages: 204