Team System Unit Testing
Unit testing is a feature available in the Developer and Tester editions of Visual Studio Team System. In this section, we describe how to create, execute, and manage unit tests.
Unit tests are themselves normal code, identified as unit tests through the use of attributes. Like NUnit 2.0 and later, Team System uses .NET reflection to inspect assemblies to find unit tests.
| Note | Reflection is a mechanism by which details about .NET objects can be discovered at execution time. The System.Reflection assembly contains members that help you identify classes, properties, and methods of any .NET assembly. Reflection even enables you to call methods and access properties of classes. This includes access to private members, a practice that can be useful in unit testing, as you will see later in this chapter. |
You will also use attributes to identify other structures used in your tests and to indicate desired behaviors.
Creating your first unit test
In this section, we'll take a slower approach to creating a unit test than you will in your normal work. This will give you a chance to examine details you could miss using only the built-in features that make unit testing easier. Later in this chapter, you'll look at the faster approaches.
In order to have something to test, create a new C# Class Library project named ExtendedMath. Rename the default Class1.cs to Functions.cs. We'll add code to compute the Fibonacci for a given number. The Fibonacci Sequence, as you may recall, is a series of numbers where each term is the sum of the prior two terms. The first six terms, starting with an input factor of 1, are {1, 1, 2, 3, 5, 8}.
Open Functions.cs and insert the following code:
using System; namespace ExtendedMath { public static class Functions { public static int Fibonacci(int factor) { if (factor < 2) return (factor); int x = Fibonacci(--factor); int y = Fibonacci(--factor); return x + y; } } } You are now ready to create unit tests to verify the Fibonacci implementation. Unit tests are recognized as tests only if they are contained in separate projects called test projects. Test projects can contain any of the test types supported in Team System. Add a test project named ExtendedMathTesting to your solution by adding a new project and selecting the Test Project template. If the test project includes any sample tests for you, such as UnitTest1.cs or ManualTest1.mht, you can safely delete them.
| Important | For full details on creating and customizing test projects, see Chapter 13. |
Because you will be calling objects in your ExendedMath project, make a reference to that class library project from the test project. You may notice that a reference to the Microsoft.VisualStudio.QualityTools.UnitTestFramework.dll assembly has already been made for you. This assembly contains many helpful classes for creating units tests. We'll use many of these throughout this chapter.
As you'll see later in this chapter, Team System supports the generation of basic unit test outlines, but in this section, we'll create them manually to make it easier to understand the core concepts.
Once you have created a new test project, add a new class file (not a unit test; we'll cover that file type later) called FunctionsTest.cs. You will use this class to contain the unit tests for the Functions class. You'll be using unit testing objects from the ExtendedMath project and the UnitTestFramework assembly mentioned earlier, so add using statements at the top so that the class members do not need to be fully qualified:
using ExtendedMath; using Microsoft.VisualStudio.TestTools.UnitTesting;
Identifying unit test classes
To enable Team System to identify a class as potentially containing unit tests, you must assign the TestClass attribute. If you forget to add the TestClass attribute, the unit tests methods in your class will not be recognized.
To indicate that the FunctionsTest class will contain unit tests, add the TestClass attribute to its declaration:
namespace ExtendedMath { [TestClass] public class FunctionsTest { } } Unit tests are required to be hosted within public classes, so don't forget to include the public descriptor for the class. Note also that parentheses after an attribute are optional if you are not passing parameters to the attribute. For example, [TestClass()] and [TestClass] are equivalent.
Identifying unit tests
Having identified the class as a container of unit tests, you're ready to add your first unit test. A unit test method must be public, nonstatic, accept no parameters, and have no return value. To differentiate unit test methods from ordinary methods, they must be decorated with the TestMethod attribute.
Add the following code inside the FunctionsTest class:
[TestMethod] public void FibonacciTest() { }
Unit test success and failure
You have the shell of a unit test, but how do you test? A unit test indicates failure to Team System by throwing an exception. Any test that does not throw an exception is considered to have passed, except in the case of ExpectedException attribute, which we describe later.
The unit testing framework defines the Assert object. This object exposes many members, which are central to creating unit tests. You'll learn more about Assert later in the chapter.
Add the following code to the FibonacciTest:
[TestMethod] public void FibonacciTest() { const int FACTOR = 8; const int EXPECTED = 21; int actual = ExtendedMath.Functions.Fibonacci(FACTOR); Assert.AreEqual(EXPECTED, actual); } This uses the Assert.AreEqual method to compare two values, the value you expect and the value generated by calling the Fibonacci method. If they do not match, an exception will be thrown, causing the test to fail.
When you run tests, you will see the Test Results window. Success is indicated with a green checkmark, failure with a red X. A special result, inconclusive (described later in this chapter), is represented by a question mark.
To see a failing test, change the EXPECTED constant from 21 to 22 and rerun the test. The Test Results window will show the test as failed. The Error Message column provides details about the failure reason. In this case, the Error Message would show the following:
Assert.AreEqual failed. Expected:<22=, Actual:<21=
This indicates that either the expected value is wrong or the implementation of the Fibonacci algorithm is wrong. Fortunately, because unit tests verify a small amount of code, the job of finding the source of bugs is made easier.
Managing and running unit tests
Once you have created a unit test and rebuilt your project, Visual Studio will automatically inspect your projects for unit tests. You can use the Test Manager and Test View windows to work with your tests.
| Important | For full details on test management and related windows, see Chapter 13. |
The easiest way to open these windows is by enabling the Test Tools toolbar and pressing either the Test View or Test Manager buttons. They are also available by selecting Test ![]() Windows.
Windows.
Test View
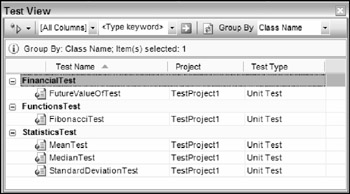
Test View provides a compact view of your tests. It enables you to quickly select and run your tests. You can group tests by name, project, type, class name, and other criteria. Figure 14-2 shows the Test View window.

Figure 14-2
Double-click on any test to navigate to that test's code. To run one or more tests, select them and press the Run Selection button.
Test Manager
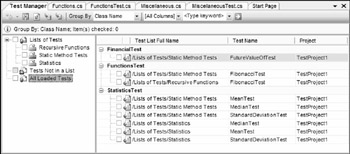
The Test Manager offers all of the features of the Test View window, but provides more options for organization and display of your tests. Figure 14-3 shows the Test Manager.

Figure 14-3
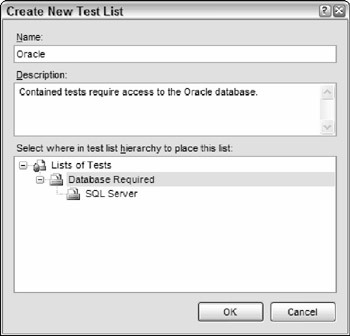
By default, all tests are listed, but you can organize tests into lists. In Test Manager, right-click on the Lists of Tests node on the tree on the left-hand side. Select New Test List and the Create New Test List dialog will appear as shown in Figure 14-4. You can also create a new test list by choosing Test ![]() Create New Test List.
Create New Test List.

Figure 14-4
Give the list a name and optionally a description. You can also place this list within another list. For example, as shown in Figure 14-4, you might have a top-level Database Required list with a sublist of SQL Server, to which a second sublist for Oracle is being added.
Once you have created a list, you can drag tests from the Test Manager list onto it. The list enables you to easily select all related tests for execution by checking the box next to the list name.
You can also group by test properties. First, click the All Loaded Tests node to ensure that all tests are listed. Then, in the Group By drop-down list, scroll to and select Class Name. You will then see your tests in collapsible groups by class name.
If you have many tests, you will find the filtering option useful. With filters, you can limit the list of tests to only those that match text you enter. Next to the Group By list is a Filter Column drop-down and a text box. Enter the text you wish to match in the text box; you can optionally select a column you would like to match against. For example, if you wish to show only tests from a certain class, enter that class name then select Class Name in the Filter Column list. When you press the Apply Filter button, only tests from that class will be displayed. If the Filter Column is set to [All Columns], tests will display if any of their fields contain the text you enter.
Test run configuration
Whenever you run a set of tests, a group of settings apply to that run. Those settings, called the test run configuration, are stored in an XML file with a .testrunconfig extension. A test run configuration is created automatically for every new test project, named localtestrun.testrunconfig.
The settings include items such as the naming structure of your results files, configuration of remote test execution, enabling of code coverage, and specifying additional files to deploy during your tests.
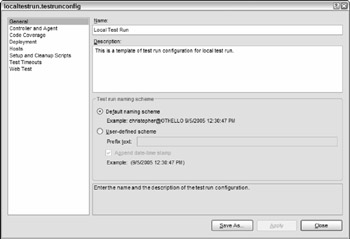
To edit a test run configuration, choose Test ![]() Edit Test Run Configurations, and then choose the configuration you wish to modify. You can also double-click the configuration file in Solution Explorer. Figure 14-5 shows the Test Run Configuration interface.
Edit Test Run Configurations, and then choose the configuration you wish to modify. You can also double-click the configuration file in Solution Explorer. Figure 14-5 shows the Test Run Configuration interface.

Figure 14-5
You may have more than one test run configuration, perhaps to support different execution environments or code coverage settings, but you must select a single configuration as "active" when you run your tests. To set another configuration as active, choose Test ![]() Select Active Test Run Configuration, and then choose the correct configuration.
Select Active Test Run Configuration, and then choose the correct configuration.
The default configuration settings will generally be fine for your initial unit testing. As you begin to require additional unit testing features, you may need to adjust these settings. For example, later in this chapter, we describe how to monitor code coverage with Team System. In that section, you will learn how to use the test run configuration to enable that feature.
Test results
Once you have selected and run one or more unit tests using the Test View or Test Manager windows, you will see the Test Results window. This window displays the status of your test execution, as shown in Figure 14-6.

Figure 14-6
You can see that one of the tests has failed, two have passed, and two are inconclusive. The error message for any nonpassing test is displayed. You can double-click on any test result to see details for that test. You can also right-click on a test result and choose Open Test to navigate to the unit test code.
Notice that the nonpassing tests are checked. This convenient feature enables you to make some changes and then quickly rerun just those tests that have not passed.
Debugging unit tests
Because unit tests are simply methods with special attributes applied to them, they can be debugged just like other code.
Breakpoints can be set anywhere in your code, not just in your unit tests. For example, the FibonacciTest calls into the ExtendedMath.Fibonacci method. You could set a breakpoint in either method and have execution paused when that line of code is reached.
However, setting program execution will not pause at your breakpoints unless you run your unit test in debugging mode. The Test View, Test Results, and Test Manager windows all feature a drop-down arrow next to the Run button. For example, in Test Manager, click on the arrow next to the Run Checked Tests button. You will see a new option, Debug Checked Tests. If you choose this, the selected unit tests will be run in debug mode, pausing execution at any enabled breakpoints, and giving you a chance to evaluate and debug your unit test or implementation code as necessary.
| Note | If you have enabled code coverage for your application, you will see a message indicating that you cannot debug while code coverage is enabled. Click OK and you will continue debugging as normal, but code coverage results will not be available. We describe code coverage later in this chapter. |
Keep in mind that the Run/Debug buttons are "sticky." The last selected mode will continue to be used when the button is pressed until another mode is chosen from the drop-down list.
EAN: 2147483647
Pages: 220