Web Parts
Web Parts provide a portable and customizable means of adding functionality to pages. They can be shared among site collections and farms, allowing them to be reused and adapted easily. Each Web Part is designed to provide a specific function, and they can be combined, connected, and customized to meet a wide variety of needs. You can customize Web Parts as part of branding your site or to give the site a new look and feel. You can design completely new Web Parts via custom code development to meet virtually any requirement. Connecting Web Parts allows you to integrate data from multiple data sources or to display the same data in multiple forms. In addition to being able to customize and connect Web Parts, you can personalize them. Within the constraints of the Web Part code, users can further modify Web Parts to meet their individual preferences. Different users can have personalized views of the same Web Part, on the same page. Web Parts can also be targeted to specific audiences. This allows different audiences to see different combinations of the same Web Parts on the same page. This means that Web Parts exist in four distinct varieties:
-
Shared A Shared Web Part is added to the page in shared view and is visible to all users.
-
Personalized A Personalized Web Part is a Shared Web Part that has been personalized by a particular user.
-
Private A Private Web Part is one that has been added to a user's personal view of a page and is seen only by that user.
As an administrator, you can control who is permitted to alter Shared Web Parts, personalize Web Parts, and add Private Web Parts.
Editing Web Parts
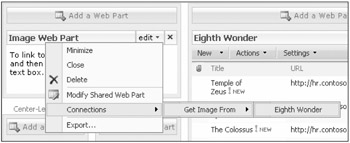
To begin customizing Web Parts, go to the page that the Web Part resides on and select Site Actions > Edit Page. Click Edit on the Web Part you wish to edit and then select Modify Shared Web Part. Although each Web Part has properties specific to its function, several properties are common to most Web Parts. The Appearance, Layout, and Advanced property groups should remain fairly consistent among differing Web Parts and are summarized below. Figure 5-8 shows the menu item, Modify Shared Web Part.
Figure 5-8: To edit a Web Part, select Modify Shared Web Part from the edit menu.
| Note | Developers can elect not to implement some of these properties. Any given Web Part will almost certainly have properties unique to it. |
Appearance
-
Title This changes the title displayed in the Web Part's title bar.
-
Height If you select No, the Web Part automatically sizes to the Web Part zone.
-
Width To set a fixed width for the Web Part, select Yes, and enter a width in centimeters, inches, millimeters, points, picas, or pixels. To have the Web Part adjust to the Web Part zone automatically, select No.
-
Chrome State To display only the Web Part's title bar, select Minimized. To display the full Web Part, select Normal.
-
Chrome Type This feature determines how the Web Part's title and border are displayed.
| Important | Remember that the entire Web Part zone will be resized to accommodate both the widest and highest Web Parts within the zone. |
Layout
-
Hidden If the functionality of a Web Part is needed, but it is visually unnecessary, select Hidden.
-
Direction This feature specifies whether text will be written left-to-right or right-to-left within the Web Part. Different languages use different directions. English is a left-to-right language; Hebrew and many Asian languages are read right-to-left. Select None to use the language direction specified by the language setting of the site. Select Left to Right to display text from left to right; choose Right to Left to display text from right to left. It may be necessary to have differing language directions on a page that contains links to pages written in multiple languages.
-
Zone This determines within which Web Part zone the Web Part is located. Changing the zone changes the location of the Web Part on the page.
-
Zone Index The Zone Index moves the order in which the Web Part is displayed within the zone. You may select zone indices of any value, and the Web Parts are displayed in numerical order. However, any Web Part added to the zone is placed at the top of the Web Part zone. If any Web Part is moved by dragging and dropping, the zone is reordered, beginning with an index of 1.
| Note | Each Web Part in a Web Part zone must have a unique zone index. Therefore, changing the zone index value of one Web Part may affect the values of some or all of the Web Parts in the zone. |
Advanced
-
Allow Minimize Certain Web Parts may need to be prominently displayed. To ensure that the Web Part is not minimized, clear the Allow Minimize check box.
-
Allow Close To guarantee that a Web Part will not be closed, clear the Allow Close check box. To permit a Web Part to be closed, select Allow Close.
-
Allow Hide If you do not wish a Web Part to be hidden, clear the Allow Hide check box. To allow the Web Part to be hidden, select Allow Hide.
-
Allow Zone Change To ensure that the Web Part remains within a single zone, clear the Allow Zone Change check box. If you wish the Web Part to be moveable, select Allow Zone Change.
-
Allow Connections If you would like this Web Part to be able to interact with other Web Parts on the page, select Allow Connections. To isolate this Web Part from connections with other Web Parts, clear the Allow Connections check box.
-
Allow Editing In Personal View To allow Web Part personalization, select Allow Editing In Personal View. To maintain the shared view for all users, clear the Allow Editing In Personal View Web Part.
-
Export Mode If you wish Web Part properties flagged as controlled by the Web Part developer to be exportable, select Export All Data. To protect controlled properties, select Non-Sensitive Data Only.
-
Title URL The specified resource is displayed in a separate browser window when the Web Parts title bar is clicked.
-
Description The description is displayed as a tool tip when the mouse hovers over the title or icon.
-
Help URL Enter an URL that will be displayed when a user clicks on the Web Part's down arrow and selects Help. The help URL is displayed according to the settings specified in the Help Mode property.
-
Help Mode Selecting Modeless opens a separate browser window and allows the user to continue working with the current window. Selecting Modal opens a separate browser window that must be closed before the user can interact with the original window. Choosing Navigate redirects the user to the help information in the current browser window.
-
Catalog Icon Image URL The catalog URL will be associated with the Web Part and displayed when the Web Part is added to a page. Images may be of any size, but large images will be reduced significantly. Experience has shown that images of approximately 32 × 32 pixels are displayed quite clearly.
-
Title Icon Image URL Enter the URL of an image to be displayed in the title bar. The image is sized to fit the title, which means that large images become unrecognizable. Experience has shown that images of approximately 32 × 32 pixels work well.
-
Import Error Message This sets the error message displayed if there is an error importing the Web Part. Consider using this property to direct users to either people or resources that will help them resolve problems with the Web Part.
Connecting Web Parts
Web Parts provide a means of connecting to data sources and integrating information from different data sources without programming. They can be connected to lists, libraries, and to each other to reveal and manipulate data. Connecting Web Parts allows you to present the same data in different forms. For example, a common use of connected Web Parts is to provide a general view in a list, as well as a detailed view of one item in the list. To save space, a general list of users might contain only their names and e-mail addresses, whereas a more detailed view could display all of a single user's information.
To create a Web Part connection, click on the Edit drop-down list and select Connections. There you will see the list of connections that a particular Web Part can make.
Not all Web Parts are capable of making connections, and not all Web Parts support the same types of connections. For instance, the image Web Part is able to make only a single type of connection, Get Image From.
Now consider a Web Part page that contains an image Web Part and a list called Eighth Wonder. The list Eighth Wonder displays two columns: Title and URL. The URL column contains hyperlinks to images. Connecting the Web Parts is as simple as clicking on the Edit drop-down list of the image Web Part and selecting Connections > Get Image From > Eighth Wonder, as shown in Figure 5-9.

Figure 5-9: Select Connections to get the image from the Eighth Wonder list.
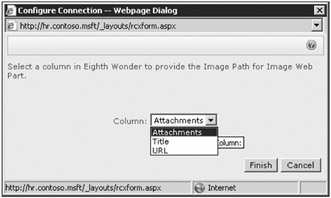
Once you choose a list, you can then select a column in the list from a pop-up dialog, box as shown in Figure 5-10.

Figure 5-10: After selecting a list, you can then select from the column choices.
Specifying URL and clicking Finish complete the process of connecting the image Web Part. Selecting one of the rows in the Eighth Wonder list will display the corresponding image in the image Web Part.
| Caution | You are able to create connections between Web Parts that do not generate an error, but are meaningless. If the Title column of the Eighth Wonder list had been linked to the image Web Part, the image Web Part would have attempted to interpret the Title value as an URL. This would not have caused an error message, but no image would have been displayed. Always check Web Part connections to ensure that they function as expected. |
| Tip | The list and image Web Parts could also have been connected from the list. To do so, go to the list's Edit > Connections > Provide Row To > Image Web Part and select the URL column. |
EAN: 2147483647
Pages: 110