FrontPage Behaviors
| Browser compatibility is an issue with some Behaviors, mainly because of poor support for DHTML in earlier versions of Netscape. I have tested each of the Behaviors in Netscape Navigator 4.5, Netscape Navigator 6.1, Opera 7, and Internet Explorer 5.0 and later. Some Behaviors were also tested in Netscape 7.2. I will share the results of my tests before I discuss each Behavior. However, keep in mind that there is no way to cover every possibility, so make sure that you test your pages before publishing your Web site. The Call Script BehaviorTable 23.1 shows my browser compatibility findings for the Call Script Behavior.
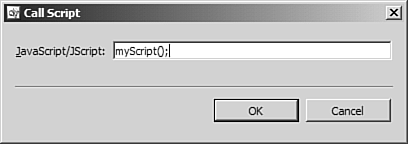
The Call Script Behavior runs a line of script when the event you specify is raised. You will likely want to write some script first and then call it using this Behavior, but you don't have to take that approach. If you have only one line of script to run, you can enter that line in the Call Script dialog and FrontPage will run it when the designated event occurs. Suppose you've written a script called showInfo that you want to display when an image is clicked on your page. To do this with the Call Script Behavior, perform these steps:
NOTE The event defaults to OnClick, but you can choose another event if necessary by choosing the event from the dropdown in the Behaviors task pane.
The Change Property BehaviorTable 23.2 shows my browser compatibility findings for the Change Property Behavior.
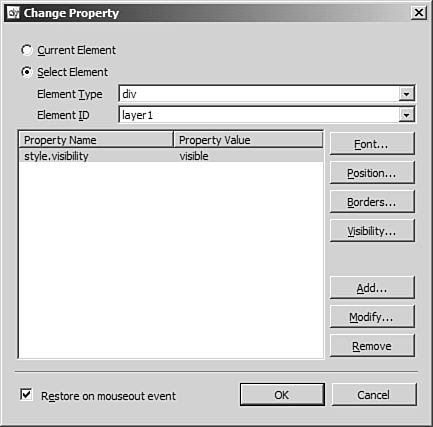
The Change Property Behavior (shown in Figure 23.3) allows you to change any property on any HTML element on your page. (A property is a style that is applied to a particular page element.) The Change Property dialog allows you to configure some default properties such as font styles, borders, visibility, and so on, but you can also change other properties that aren't listed by clicking the Add button in the Change Property dialog. Figure 23.3. The Change Property Behavior is one of the most useful Behaviors for adding interactivity to your Web page.
NOTE The Change Property Behavior will successfully set properties in Netscape 4.5, but many of Netscape 4.5's properties are not the same properties that are set by FrontPage. In order for properties to work correctly with Netscape 4.5, you will likely have to use custom properties within the Change Property Behavior dialog. Using the Change Property Behavior, it is extremely easy to add professional-quality interactivity to your Web site with minimal effort. For example, suppose that you have a series of graphics in a page, and each graphic links to a page of your site. When a user of your site hovers the mouse over each graphic, you want a text description of the link to appear on the page, and when the mouse leaves the graphic, you want the text description to disappear. In previous versions of FrontPage, this type of interactivity would have required significant hand-coding, but with the Change Property Behavior, you can easily implement this functionality without writing a single line of code. TIP The following example will not work in Netscape 4.5 as given because Netscape 4.5 uses a different property for visibility. To change an element's visibility in Netscape 4.5, you have to add a custom property called visibility set it to show to make the item visible and hide to make it hidden. To create an example of interactivity using the Change Property Behavior, perform these steps:
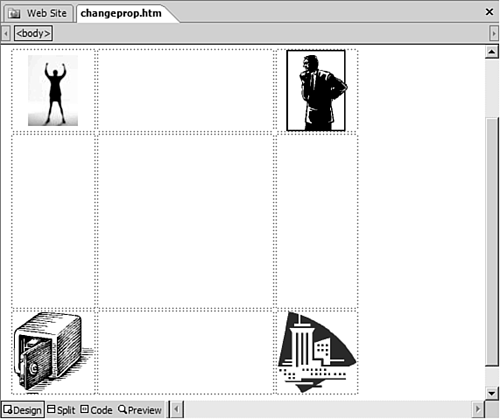
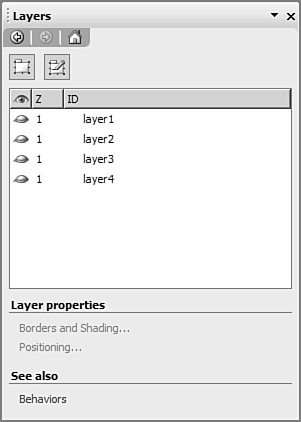
TIP The Visibility property defaults to Inherit, which means that the element will be visible only if the element it is contained within is visible. Complete steps 11 19 for the other images, and add a Change Property Behavior for layer2, layer3, and layer4 just as we did for layer1. Save the page and preview it in your browser or with the Preview tab in FrontPage. You have just created a professional-quality effect with just a few clicks of the mouse. Figure 23.6 shows the completed Change Property dialog box for one of the layers. Figure 23.6. The completed Change Property dialog box shows the property change for layer1.
The Change Property Restore BehaviorTable 23.3 shows my browser compatibility findings for the Change Property Restore Behavior.
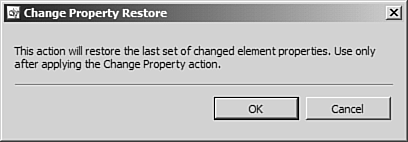
The Change Property Restore Behavior is meant to be used in combination with the Change Property Behavior. It restores the most recent properties changed by the Change Property Behavior to their previous value. (When you selected the Restore on Mouseout Event check box in step 17 of "The Change Property Behavior" section seen previously, FrontPage automatically inserted a Change Property Restore Behavior to restore the property.) No dialog exists for this Behavior. As seen in Figure 23.7, when you insert the Change Property Restore Behavior, FrontPage informs you of what it will do and then adds it to the Behaviors task pane. You can easily determine which properties are being restored by double-clicking the Change Property Behavior listed directly underneath the newly inserted Change Property Restore Behavior. Figure 23.7. The Change Property Restore Behavior requires no user input.
The Check Browser BehaviorTable 23.4 shows my browser compatibility findings for the Check Browser Behavior.
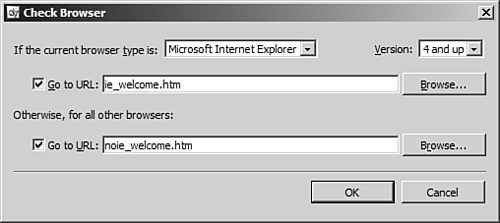
The Check Browser Behavior (shown in Figure 23.8) allows you to easily redirect your site visitors based on which browser and which version of that browser they are using. The Check Browser Behavior can check for versions of Internet Explorer, Netscape Navigator, Opera, AOL, WebTV, AOL TV, and HotJava. However, in my testing, I found that the redirect for Opera did not work at all. I also found that the Netscape 6 redirect works, but you must set it to redirect for version 5 and later. (The reason for this is that Netscape 6 identifies itself as version 5 because it is built on Mozilla 5.0.) Figure 23.8. The Check Browser Behavior allows you to easily detect a user's browser version and redirect her appropriately.
The Check Browser Behavior can be added to a page itself, but it's better to attach it to a particular page element. If you attach it to a page, it is invoked from the OnLoad event of the page, and by the time that event fires, the page has already been rendered. NOTE Many Web developers fail to realize that the OnLoad event for a Web page fires after the page has completely loaded and not before the page loads. This is necessary so that any script that runs in the OnLoad event will have access to all page elements. Unless you are detecting browsers on your site's entry page, it is best to attach the Check Browser Behavior to the OnClick event of a hyperlink that loads a new page. You can then load a particular page depending on the browser that your visitor is using, and the wrong page will never be rendered. If you are detecting browsers on your site's entry page, create an empty page and attach a Check Browser Behavior to the OnLoad event for the page. By doing that, you can ensure that you will not load any elements that will cause errors or malformed rendering in a particular browser. The Check Plug-in BehaviorTable 23.5 shows my browser compatibility findings for the Check Plug-in Behavior.
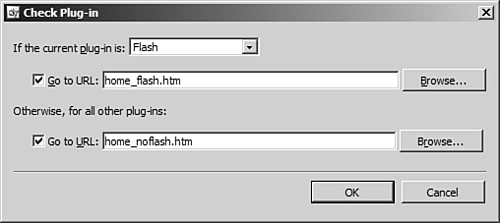
A plug-in can either be an ActiveX control running in Internet Explorer, or a plug-in running in Netscape or another browser. Using the Check Plug-in Behavior (shown in Figure 23.9), you can redirect a user based on whether she has one of the more common plug-ins. The Check Plug-in Behavior is designed to check for the existence of the Macromedia Flash, Apple QuickTime, RealNetworks RealPlayer, Macromedia Shockwave, and Microsoft Windows Media Player. Figure 23.9. The Check Plug-in Behavior makes redirecting users based on browser plug-ins quick and easy.
The Control Properties In Flash BehaviorTable 23.6 shows my browser compatibility findings for the Control Properties in Flash Behavior.
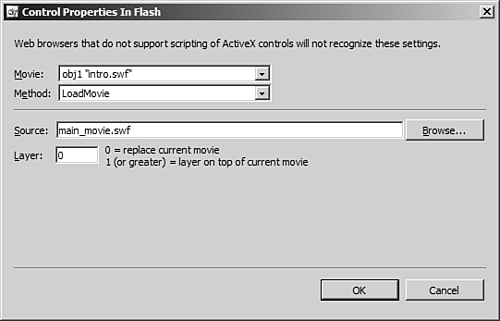
For Web developers using Flash, the Control Properties In Flash Behavior represents a major feature enhancement in FrontPage. This Behavior isn't meant to control basic Flash properties such as width and height of a Flash movie. Instead, it allows you to control the behavior of a Flash movie with script. Using the Control Properties in Flash Behavior, you can control Flash properties such as panning, zooming, and playback of the movie.
NOTE According to Microsoft, the Control Properties In Flash Behavior will work in Internet Explorer 5.0 or later and in Netscape Navigator 6.0 and later. However, the results of my testing indicate that only Internet Explorer 6.0 and later support control of Flash movies using the Control Properties In Flash Behavior. Netscape 6.1 is not supported by Macromedia Flash, but even testing in Netscape 7.2 failed with the Control Properties In Flash Behavior. To invoke the Control Properties In Flash Behavior (shown in Figure 23.10), select Insert, Control Properties In Flash from the Behaviors task pane. Select the Flash movie that you would like to control, and then select the method you would like to use. Figure 23.10. The Control Properties In Flash Behavior is very powerful, but it only works in Internet Explorer 6.0 or later.
For more information on the methods listed in the Control Properties In Flash dialog, see Macromedia's DevNet Flash Development Center at http://www.macromedia.com/devnet/mx/flash/. The Go To URL BehaviorTable 23.7 shows my browser compatibility findings for the Go To URL Behavior.
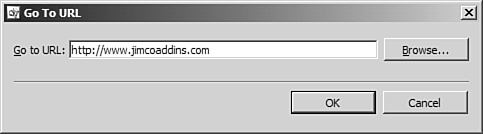
The Go To URL Behavior (shown in Figure 23.11) is a simple Behavior that redirects the user to the specified URL when the event you choose occurs. Figure 23.11. The Go To URL Behavior is a simple Behavior that does just what its name implies.
The Jump Menu BehaviorTable 23.8 shows my browser compatibility findings for the Jump Menu Behavior.
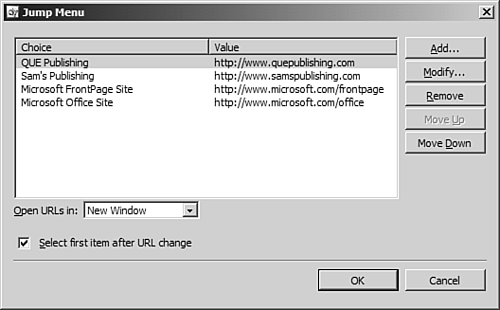
For years, FrontPage users have been asking for a way to make a menu system based off a dropdown list without having to write code. The Jump Menu Behavior answers that call. To create a Jump Menu, select Insert, Jump Menu from the Behaviors task pane to activate the Jump Menu dialog (shown in Figure 23.12). There is no need to select anything first. FrontPage will insert a dropdown list for the Jump Menu at the insertion point's location. Figure 23.12. Items are added to your Jump Menu by specifying the text you want to appear and the URL you want that item to link to.
Click the Add button, and enter the text that you want to appear in the dropdown list in the Choice field and the URL you want that item to link to in the Value. Click OK to add the item to the Jump Menu. After you have added one or more items to your Jump Menu (more than one item is recommended), you can configure that item to open in either the default target for the page or in a new window. By checking the Select First Item After URL Change box, you can force the Jump Menu to return to the first item in the list when clicking the Back button in your browser after jumping to a URL. The Jump Menu Go BehaviorTable 23.9 shows my browser compatibility findings for the Jump Menu Go Behavior.
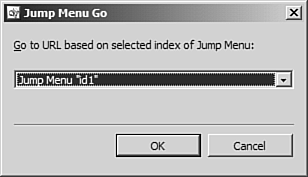
The Jump Menu Go Behavior is designed to be used with the Jump Menu Behavior. In cases in which you don't want your Jump Menu Behavior to jump as soon as a new item is selected in the dropdown list, you can use the Jump Menu Go Behavior as a trigger for the menu. To use the Jump Menu Go Behavior, insert a Jump Menu Behavior and then insert or select an element (such as an image that says "Go!") to use for your trigger. Select Insert, Jump Menu Go from the Behavior task pane and select the Jump Menu from the dropdown as shown in Figure 23.13. Figure 23.13. Using the Jump Menu Go Behavior allows you to create a trigger for your Jump Menu.
After you've done that, however, you have to stop the Jump Menu from jumping as soon as you select an item. The Jump Menu event defaults to onchange, but if you leave the event set to onchange, you won't have the opportunity to use the Jump Menu Go component because the menu will jump as soon as you select an item. To change the Jump Menu so that it doesn't jump when you select a different item, select the Jump Menu's dropdown list, and then select the Jump Menu Behavior in the Behavior task pane. Click the Delete button in the task pane to delete the onchange event from the task pane. (Don't press the Delete key on your keyboard.) This will remove the entire entry for the Jump Menu, but don't worry. After doing this, your Jump Menu Go Behavior will be the trigger for the Jump Menu. The Open Browser Window BehaviorTable 23.10 shows my browser compatibility findings for the Open Browser Window Behavior.
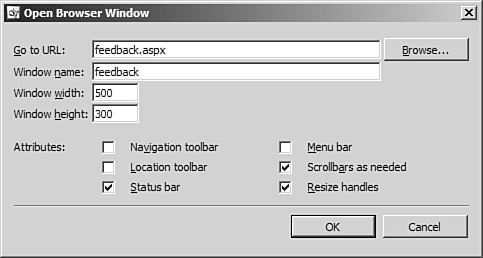
The Open Browser Window Behavior (shown in Figure 23.14) allows you to configure a hyperlink to open in a new browser window. Figure 23.14. Easily create popup windows with specific configurations using the Open Browser Window Behavior.
You can control the following attributes for the new window:
When adding the Open Browser Window Behavior to text, it's most useful to use a Change Property and a Change Property Restore Behavior to change the pointer to a hand when users hover over your link. To implement this, add your Open Browser Window Behavior first. Then add a Change Property Behavior and add your own property by clicking the Add button. Use style.cursor for the Property Name and hand for the Property Value. Make sure that you also check the Restore on Mouseout Event box so that FrontPage will add the Change Property Restore Behavior.
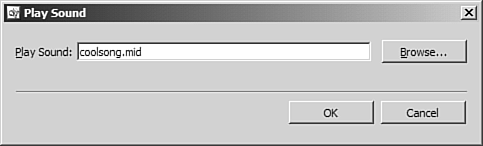
The Play Sound BehaviorTable 23.11 shows my browser compatibility findings for the Play Sound Behavior.
The Play Sound Behavior (shown in Figure 23.15) allows you to play a sound when the selected event is triggered. The Play Sound Behavior supports wav files, midi files, RealAudio files, AIFF sound files, and AU sound files. Figure 23.15. The Play Sound Behavior allows you to play a sound when a particular event is triggered.
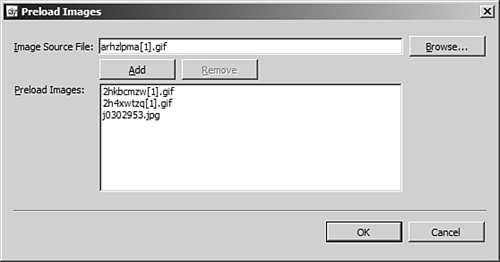
The Preload Images BehaviorTable 23.12 shows my browser compatibility findings for the Preload Images Behavior.
The Preload Images Behavior (shown in Figure 23.16) allows you to preload images when a page initially loads. The most common use of preloading images is when swapping images on a mouse rollover buttons. In these situations, you want the image that displays when the user points to the button to load as soon as the page loads even though it is not initially visible. If you don't preload such images, the user experiences a delay while the image loads the first time she points to the button. Figure 23.16. The Preload Images Behavior makes preloading images a snap.
To preload one or more images, insert the Preload Images Behavior, click the Browse button, browse to your image, and then click OK. After you have selected your image, click the Add button to add it to the Preloaded Images list. You can add as many images as you'd like to the list. CAUTION Be aware that preloading images doesn't make them free as far as bandwidth is concerned. You will still want to keep your image files as small as possible. The Set Text BehaviorThe Set Text Behavior consists of four separate Behaviors. Because each has different compatibility results, I will list browser compatibility for each separately. Set Text of FrameTable 23.13 shows my browser compatibility findings for the Set Text of Frame Behavior.
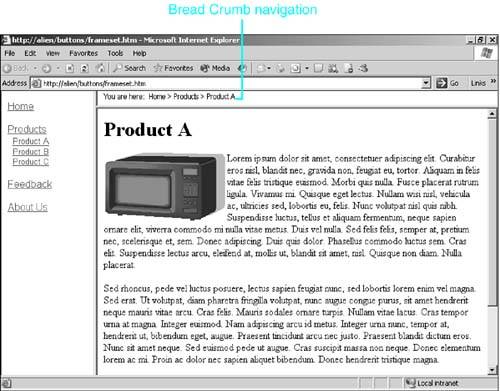
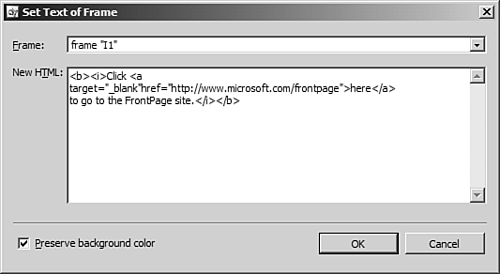
The Set Text of Frame Behavior sets the HTML of the frame you specify when the selected event is triggered. Suppose, for example, that you have a frames page that consists of contents on the left, main content on the right, and a small navigation frame on top of the main content frame. Using the Set Text of Frame Behavior, you can easily implement a bread crumb effect in the navigation frame as shown in Figure 23.17. Figure 23.17. A bread crumb effect is simple with the Set Text of Frame Behavior.
This Behavior will work with inline frames as well for those browsers supporting them. Of the browsers tested for this book, Netscape 4.5 did not work with inline frames, but the Set Text of Frame Behavior worked for framesets in all browsers. To insert the Set Text of Frame Behavior, open a page containing a frame and select the HTML element whose event you want to trigger the Behavior. Select Insert, Set Text, Set Text of Frame from the Behavior task pane. Select the frame into which you would like to enter HTML, enter the HTML code that you would like to appear in the frame, and click OK. If you have set the background color for the frame page or inline frame and you would like it to be preserved, make sure that you check the Preserve background color box prior to clicking OK as seen in Figure 23.18. Otherwise, the background color will revert to the default for the browser you are using. Figure 23.18. The Set Text of Frame Behavior allows you to maintain the current background color after setting the frame's HTML.
Set Text of LayerTable 23.14 shows my browser compatibility findings for the Set Text of Layer Behavior.
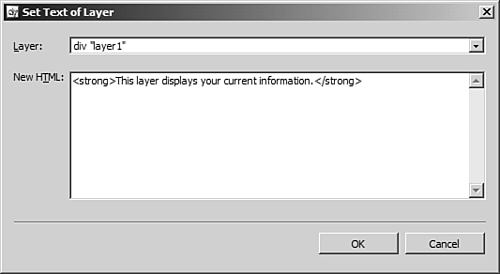
The Set Text of Layer Behavior allows you to specify the HTML to be rendered in the specified layer when the selected event is triggered. The bread crumb effect shown in Figure 23.17 can be implemented using the Set Text of Layer Behavior by using a layer to hold your bread crumb navigation information instead of a frame.
To insert a Set Text of Layer Behavior (shown in Figure 23.19), open a page containing a layer and select the HTML element whose event you want to trigger the Behavior. Select Insert, Set Text, Set Text of Layer, enter the HTML you would like to have rendered in the layer, and click OK. Figure 23.19. The Set Text of Layer Behavior allows you to easily set the HTML used to render contents of a layer.
Set Text of Status BarTable 23.15 shows my browser compatibility findings for the Set Text of Status Bar Behavior.
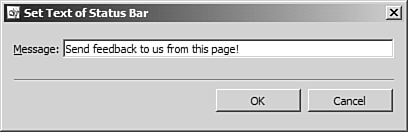
The Set Text of Status Bar Behavior allows you to easily change the text that appears in the status bar at the bottom of the browser window. This can be useful to display messages of interest to visitors of your site. For example, you can use this Behavior to display a descriptive message when hyperlinks are hovered over on your Web page. To insert the Set Text of Status Bar Behavior, select the HTML whose event you want to trigger the Behavior and then select Insert, Set Text, Set Text of Status Bar. Enter the message that you would like displayed in the status bar and then click OK, as shown in Figure 23.20. Figure 23.20. The Set Text of Status Bar Behavior is very simple. Enter your text and click OK.
Set Text of Text FieldTable 23.16 shows my browser compatibility findings for the Set Text of Text Field Behavior.
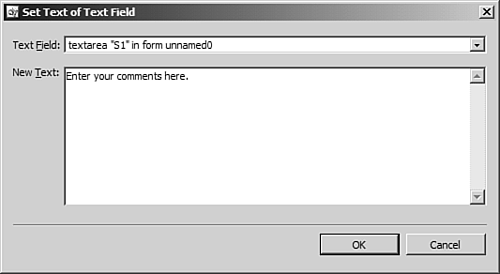
The Set Text of Text Field Behavior (shown in Figure 23.21) sets the text that appears in a TextBox or a TextArea field. This Behavior can be used when you need to set the value for a form field based on a particular event. Figure 23.21. The Set Text of Text Field Behavior sets the text of TextBoxes and TextAreas.
To insert the Set Text of Text Field Behavior, open a page that contains a TextBox or a TextArea field and select Insert, Set Text, Set Text of Text Field. Enter the text you would like to appear in the text field and click OK.
The Swap Image BehaviorTable 23.17 shows my browser compatibility findings for the Swap Image Behavior.
The Swap Image Behavior allows you to swap one image for another when the specified event takes place. The most common use of this Behavior is to create rollover buttons. In fact, when you insert an Interactive Button, FrontPage uses the Swap Image Behavior to implement the interactivity of the button.
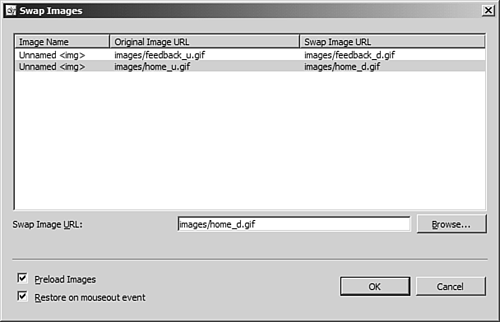
To use the Swap Image Behavior, open a page containing one or more images, select the image you would like to swap, and select Insert, Swap Image from the Behavior task pane. The Swap Images dialog (shown in Figure 23.22) contains a list of all images in the document. The image you selected is highlighted, but you can configure a swap image for as many images as you'd like before clicking OK. Just keep in mind that you are configuring one event, so if you configure a swap image for img1, img2, and img3 and you attach that to the OnMouseOver event for img1, all three images will swap when you roll over img1. Figure 23.22. The Swap Image Behavior makes rollover button creation simple.
It is best to use two images the same size for your rollovers. The Swap Image Behavior will use the image dimensions of the original image for the swap image. If the proportions are different or if FrontPage is forced to resize an image, you are going to get less than optimal results. The Swap Images dialog also provides a check box labeled Preload Images. Checking this box will automatically insert a Preload Images Behavior to preload all the swap images you have configured. Restore on Mouseout Event automatically inserts a Swap Image Restore Behavior, which we will talk about next. The Swap Image Restore BehaviorTable 23.18 shows my browser compatibility findings for the Swap Image Restore Behavior.
The Swap Image Restore Behavior works much like the Change Property Restore Behavior. It restores the images that were swapped in the entry immediately below it in the Behaviors task pane. It is for use only after applying the Swap Image Behavior. This Behavior is automatically inserted if the Restore on Mouseout Event box is checked when configuring a swap image in the Swap Images dialog. |
 For more information on creating and using scripts in your pages,
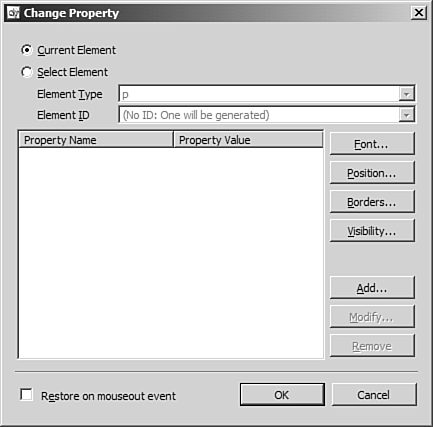
EAN: 2147483647
Pages: 443