| One of my favorite effects to apply to text is to arrange it to flow around images and other objects. This is called text wrap. (If you are familiar with some other programs, you might call this text runaround; but InDesign doesn't give you the runaround.) InDesign gives you many different options for wrapping text around either objects you create in InDesign or imported graphics. To apply a text wrap: 1. | Select the object that you want the text to wrap around. This can be an imported graphic, a text frame, or an unassigned frame.
| 2. | Choose Window > Type & Tables > Text Wrap. This opens the Text Wrap palette  . .
The Text Wrap palette controls the settings for how text flows around an object.  | 3. | Choose one of the following options for how the text should flow around the object  . (See the chart opposite for a visual representation of each text wrap.) . (See the chart opposite for a visual representation of each text wrap.)
The five different text wrap buttons let you choose how the text wraps around objects.  No wrap lets the text flow across the object. Bounding Box flows the text around the bounding box for the object. Object Shape flows the text around the shape of the frame or the shape of the placed graphic. (See the exercise on page 234 for more information on setting the Object Shape text wrap.) Jump Object flows the text to the next available space under the object. Jump to Next Column flows the text to the next column or text frame.
| 4. | Check Invert to force the text to flow inside the object  . .
When the Invert command is turned on, the text wrap causes the text to flow inside, not outside, an object.  | 5. | Enter an amount in the offset fields to control the distance between the text and the object  . .
The text wrap Offset controls allow you to set the distance between the text and a graphic.  Tip The number of available offset fields depends on the type of text wrap you choose. |
Wrap Chosen | Offset available | Results |
|---|
No Wrap | No offset options available. | 
| Bounding Box | Top, bottom, left, and right offset options available. | 
| Object Shape | Top offset option is the only one available. The amount is used as the space around the entire graphic. | 
| Jump Object | Top, bottom, left, and right offset options available. However only the top and bottom offsets affect the text. | 
| Jump to Next Column | Top, bottom, left, and right offset options available. However only the top offset affects the text. | 
|
Tip Unless you change the preference setting (see page 533), lines that wrap below the text wrap object skip to the next available leading increment below the object.
When you choose Object Shape for the text wrap, InDesign lets you set the contour options for that shape. This gives you more control over the shape of the text wrap. To set the text wrap contour options: 1. | Use the Direct Selection tool to select the image.
| 2. | Click the Object Shape text wrap button in the Text Wrap palette.
| 3. | Choose Show Options from the Text Wrap palette menu to display the Contour Options at the bottom of the Text Wrap palette.
| 4. | Use the Contour Options Type menu to choose the type of element that should be used to create the text wrap  : :
The Contour Options Type menu lets you choose what type of element controls the shape of the text wrap.  Bounding Box uses the rectangle that contains the image. Detect Edges uses the differences between the pixels of the image and its background. Alpha Channel lets you choose an embedded alpha channel. Photoshop Path lets you choose an embedded path. Graphic Frame uses the shape of the frame that contains the image. Same As Clipping uses whatever shape has been designated as the clipping path for the image (see page 220).
| 5. | If you choose Alpha Channel or Photoshop Path, use the second pop-up menu to choose a specific channel or path.
| 6. | Check Include Inside Edges to make the text wrap inside any holes in the image, path, or alpha channel  . .
Use the Include Inside Edges option to have text wrap within the edges of the image, such as within the handles of the basket. 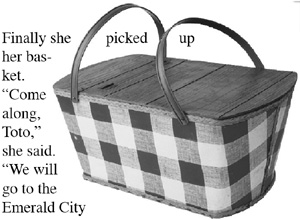 |
A text wrap doesn't have to be around visible objects. You can use an object with no fill or stroke as the shape to wrap text around  . This creates a special effect for text around an image. . This creates a special effect for text around an image.
An example of how an invisible object can be used to create a text wrap.  To wrap text around an invisible object: 1. | Draw an object with no fill or stroke.
| 2. | Set the Text Wrap to Object Shape.
|
Once you set a text wrap, you can still manipulate it so that the text reads more legibly or fits more attractively into the contour of the object. This is called a custom text wrap. To create a custom text wrap: 1. | Use either selection tool to select the object that has the text wrap applied to it.
Tip Apply the Object Shape text set for Graphics Frame (see page 232) to create a simple text wrap without a lot of points. | 2. | Use the Direct Selection tool to move the points on the text wrap path  . .
Use the Direct Selection tool to change the shape of a text wrap path.  Tip You can preview how the text reflows around the text wrap. Press and hold for a moment before you move the point of the text wrap. You can then see the text reflow as you move the point. | 3. | Click the Pen tool between points on the text wrap path to add a new point to the path  . .
The plus sign next to the Pen tool indicates that you can add a point to the text wrap path.  | 4. | Click the Pen tool on a point on the text wrap path to delete the point from the path  . .
Position the Pen tool over a point and click to delete points from a text wrap path.  Tip Hold the Cmd/Ctrl key to access the Direct Selection tool while using the Pen tool. |
You may find that you don't want some text to be affected by a text wrap. For instance, you might want to have the body text in one frame run around an image but have the text label in another frame appear over the image  . That's when you need to direct the text frame to ignore a nearby text wrap. . That's when you need to direct the text frame to ignore a nearby text wrap.
An example of how Ignore Text Wrap keeps the map title from being affected by the text wrap applied to the outline of the state.  To ignore the text wrap: 1. | Select the text frame that contains the text that you don't want affected by the text wrap command.
| 2. | Choose Object > Text Frame Options. This opens the Text Frame Options dialog box  . .
The Ignore Text Wrap checkbox in the Text Frame Options dialog box prevents text from being affected by any text wrap settings.  | 3. | Check Ignore Text Wrap. The text in that frame is unaffected by any objects that have a text wrap applied.
Tip Text wrap is applied even if the object that has the wrap is on a hidden layer. Use the Layer Options dialog box to change this so that hidden layers do not exert a text wrap (see Chapter 11, "Layers," for more information on working with layers). Tip Ordinarily, InDesign's text wrap is applied to text both above and below the object that has the text wrap turned on. Use the text wrap setting in Composition preferences (see page 533) to have the text wrap applied only to text below the object. This is closer to how QuarkXPress applies text wrap. |
|