Special Vector Features in the Suite Applications
| For all their shared history and functionality, the CS2 applications differ significantly when it comes to working with paths. Understanding these differences can help you decide which application to choose when starting a project. Special Vector Tools in IllustratorOver the years, Illustrator gained stature as the premiere application for creating and working with vector objects. Illustrator CS2 has added a powerful pixel-tracing feature called Live Trace, and also a new technique called Live Paint for working with vector paths, which frees you from the burden of working with handles, points, and selection tools. Illustrator has the most sophisticated Pathfinder commands of the CS2 applications for combining vector objects into new shapes. Illustrator also has smart guides that make it much easier to align and control the position of objects. Live Trace CommandWe admit that we tend to call this feature "Streamline in Illustrator," (see "Behind the Scenes: The Sad Demise of Adobe Streamline") but the truth is that the Live Trace feature is much more powerful.
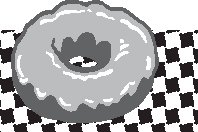
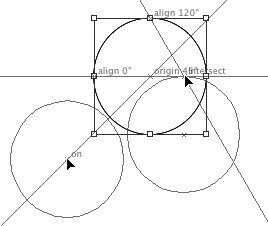
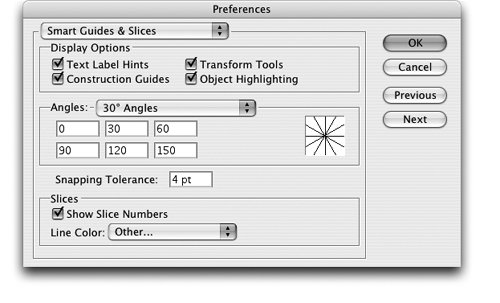
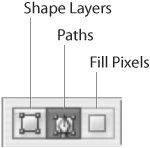
Live Trace allows you to select a placed pixel image and trace it into vector art. But unlike Streamline, which created a "dead" set of paths, Live Trace keeps a link between the artwork and the tracing. With the tracing active, you can go back and tweak the trace settings as desired. Also unlike Streamline, Live Trace Tracing Options give you a lot of control (see Figure 5-16). Experimenting with these settings creates a wide variety of effects (see Figure 5-17). Figure 5-16. Live Trace Tracing Options dialog box in Illustrator CS2, with presets to save settings.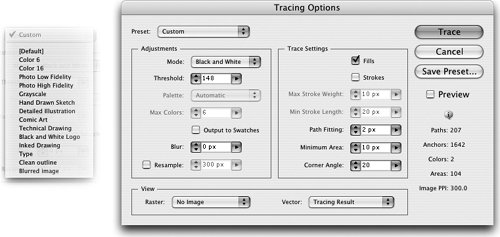 Figure 5-17. Examples of Live Trace transforming pixel art. From left to right: Original photo, single outline tracing, six grayscale tracing, stroke-only tracing. One of Live Trace's best features is that the image used for the tracing is still linked to the original Photoshop file. This means you can open the scan in Photoshop, apply filters to clean up noise and other unwanted elements, and then Illustrator CS2 will automatically update the Live Trace image. This is the sort of synergy that we love in Creative Suite. Live Paint CommandsIllustrator paths have always followed strict rules. When one path overlaps another, the path underneath still keeps its shape. If you want to poke a hole in a path for instance, to see the hole in the donut you need to create a path that will act as the hole, and then use the Compound Path command to see through the hole. Illustrator CS2 introduced a new way of working with paths called Live Paint. With Live Paint you no longer have to use compound paths to create a transparent area inside a path. All you do is select the area where you want the hole to appear and press the Delete key. For an old-time Vectorbabe like Sandee, it's a remarkable thing (see Figure 5-18). Figure 5-18. Example of Live Paint coloring and deleting objects. Live Paint has two special tools: the Live Paint Bucket and the Live Paint Selection tool. Use the Live Paint Bucket to pour colors and swatches onto a path. Use the Live Paint Selection tool to select objects to be modified or deleted. The following illustration shows artwork that we made into a Live Paint group, and then created the hole in the donut by deleting the path in the middle. Smart Guides in IllustratorIn real estate, the most important feature is "location, location, location." In vector drawing it's "precision, precision, precision." That's why Illustrator gets our vote for having the most precise control over creating paths. Most people's first step to working precisely is to drag a ton of guides all over the page. However, Illustrator has a terrific feature called Smart Guides that lets you work precisely, without adding any guides to the page at all. To work with Smart Guides, choose View > Smart Guides. As you work, the smart guides appear or disappear as needed. Smart Guides will appear as small labels that show you when you are close to an anchor point, a path, the center of an object, or a line segment. Smart Guides also show you when you move an object along certain angles (see Figure 5-19). Figure 5-19. Moving object with Smart Guides turned on. Set the type of information shown in the Smart Guides, as well as which angles will be shown, using the Smart Guides preferences (see Figure 5-20). With the Angles option turned on, you can constrain an object to follow the angle as you move or duplicate it. This makes it very easy to work precisely. Figure 5-20. Smart Guide preferences, controlling what information will be displayed by guides. Tip: Photoshop's primitive form of Smart Guides Turn on Photoshop guides by choosing View > Show > Smart Guides. These show only 90° angles without any labels; custom angles can't be added. InDesign has no Smart Guide feature. Special Vector Tools in InDesignInDesign really doesn't have any special vector tools other than the shape tools already mentioned. We doubt that Adobe will put more emphasis on vector drawing in InDesign. That's what Illustrator is for. Special Vector Features in PhotoshopPhotoshop started life as a pixel-editing application. So it took a while before Photoshop even understood the concept of paths, and even then its path features were very elementary. You could create paths to use as clipping objects to make a transparent outline around an image. You could use paths as the contours that could then be filled or stroked with a color. With the advances in Photoshop CS2, there are now many choices for working with vectors in Photoshop. Path ObjectsPhotoshop path objects appear in the Paths palette. These paths don't affect your artwork unless you apply them as clipping paths or as the outlines for fills and strokes. These paths can also be converted into "marching ants" that indicate the selected area of the image. Because they are vector objects, they are resolution-independent; that is, they can be scaled up or down with no loss of information. This means that the path can be copied from a low-resolution version of an image and pasted into a high-resolution version of the file with no need to scale the path. Scaling the vector path up or down doesn't lose any information. The path's size depends on the printing dimensions of the file, not the number of pixels in the image. Use any of the vector-drawing tools to create a new path object. Choose the tool, and then click the Paths control in the Photoshop Options bar (see Figure 5-21). This is important. The same vector-drawing tool can be used to create path objects, pixel areas, or shape layers (see the next section). So you need to choose the correct control before you start using the drawing tool. Figure 5-21. Paths control in the Photoshop Options bar. Shape LayersShape layers are a mixed breed. They are vector containers that are filled with pixel information. The vector containers act as vector masks for the layer. Shape layers are created and modified just like any path in Illustrator or InDesign. Shape layers print as pixels. Creating a shape layer is easy. Choose the Shape Layers path control and start drawing with a vector tool. The shape layer appears automatically in the Layers palette, filled with the current foreground color. The Layers palette displays two icons for shape layers. The Color icon shows the flat color that fills the shape layer. The Preview icon shows the shape of the path that defines the shape layer. Figure 5-22. Shape layer in the Layers palette.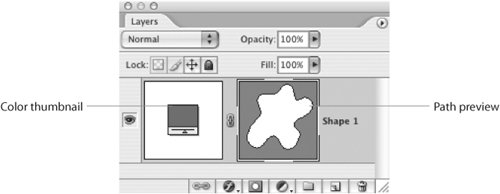 Before Photoshop CS2 added Smart Objects, shape layers were the best way to create artwork that could be scaled up or down in Photoshop without losing pixel information. However, shape layers can only contain one flat color or the colors and gradients applied through Layer Effects. This makes it difficult to use shape layers for intricate artwork. With Smart Objects added to Photoshop CS2, there are fewer reasons to use shape layers. (See the next section for how to create and use Smart Objects.) You can change the color of the shape layer by double-clicking its color thumbnail in the Layers palette. You can also apply any layer effect without losing the path that defines the shape. However, you must first rasterize the shape layer before applying a filter. Photoshop Vector Smart ObjectsSmart Objects are new to Photoshop CS2. Smart Objects work like symbols in Illustrator. Because Smart Objects have more features than just vector drawing, we'll cover them in Chapter 9, "Smart Objects and Intelligent Layouts." Path Tools for PixelsThe final way to work with Photoshop's vector-drawing tools is to choose the Fill Pixels mode. This mode lets you draw with the vector tools and is useful for quickly adding a shape to an image. Rather than create a path or shape layer that can be scaled or modified, this mode converts the area into pixels. You cannot reshape the path later, nor use the Pen tool in this mode. |

EAN: 2147483647
Pages: 192