Moving Paths between Applications
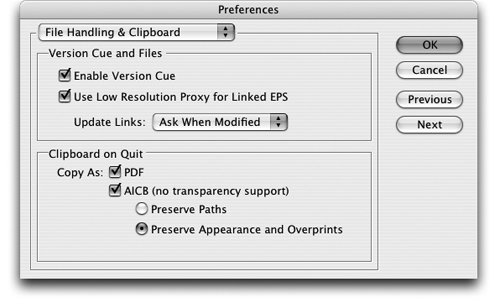
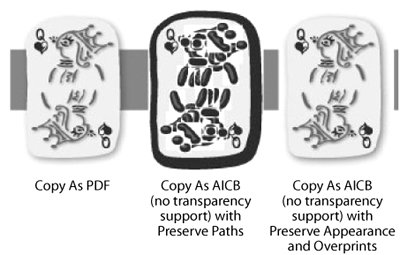
| It wouldn't be a Creative Suite if the vectors in one application couldn't be brought into another. Not only do the applications let you move paths between them, you have choices as to how the information is translated. Transporting Paths Out of IllustratorRecently Sandee was teaching a class and a student asked about the future of Illustrator. He wondered, because InDesign had so many similar features to Illustrator, if eventually anyone would ever need Illustrator. Sandee was appalled; no need for Illustrator in the future! How awful! The reality is that Illustrator is needed more than ever before. Sandee thinks of Illustrator as a little vector hobby shop that you can run over to and craft some intricate vector paths and then bring those paths over to InDesign and Photoshop. Setting the PreferencesAdobe has made it easy to simply copy and paste or drag and drop artwork out of Illustrator and into InDesign or Photoshop. Before you can do so, you need to set the Illustrator preferences correctly. Note The following text uses the terms copy and paste to indicate moving artwork from one program to another. You are not limited to just copy and pasting. For all of these techniques, you can also drag the artwork out of the Illustrator document window and drop it onto the document window of the other application. However, since this requires a lot more screen real estate than either of us has, we are more used to copy and paste. To display the Preferences dialog box, choose Illustrator > Preferences > File Handling & Clipboard (Mac OS) or Edit > Preferences > File Handling & Clipboard (Windows) (see Figure 5-23). The area of concern is the Clipboard On Quit section. Despite the word Quit in the title, these settings also control how artwork is copied to the Clipboard or dragged out of Illustrator. Figure 5-23. Illustrator CS2 default preferences for copying artwork to the clipboard. The Copy As PDF setting means that a PDF graphic will be pasted onto the InDesign page, as seen in Figure 5-24. If this option is the only choice selected, it will create several problems. First, the pasted graphic is uneditable in InDesign. Even worse, this uneditable block of PDF artwork doesn't show up in the Links palette. We shudder at the thought of a production manager looking over the page and wondering from where this mass of PDF came or how to edit it. Figure 5-24. Examples of effect of Illustrator Clipboard preferences on art pasted into InDesign. The AICB (No Transparency Support) option supports the preferred format (Adobe Illustrator Clipboard, or AICB) for moving paths between Illustrator and InDesign, as well as between Illustrator and Macromedia FreeHand. If you want to edit the pasted material, be sure to select this option (in addition to Copy As PDF). Transparency effects, such as drop shadows, glows, and feathers will not be supported in the pasted artwork. However, you can choose between two ways to implement the conversion of objects, to best address how you'd like to deal with any transparent elements after pasting:
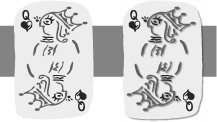
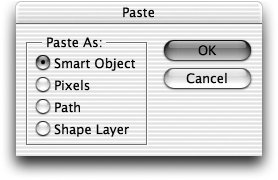
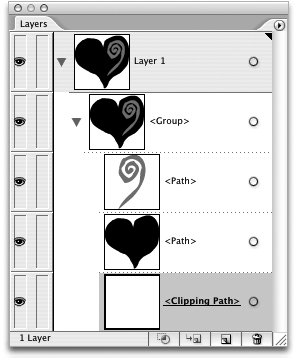
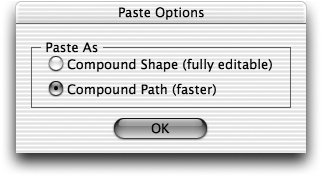
So what should you do if you do want to paste editable paths from Illustrator into InDesign, but still maintain transparency effects? Our solution is to get rid of the effects in Illustrator and apply them in InDesign. For simple effects such as drop shadows and feathers, this is the easiest way to get the best of both possible worlds (see Figure 5-25). Figure 5-25. Examples of effect of Illustrator Clipboard preferences on art pasted into InDesign: Original Illustrator art with no transparency effects (left), and art pasted into InDesign with drop shadow applied in InDesign (right). When there are no transparency effects, blend modes, or overprinting, then there is no meaningful difference between the two flavors of the AICB. What you want to preserve paths is what you'll get. Tip: Pasting Illustrator special effects If you paste ordinary paths with a single fill or stroke, only one object appears in the InDesign file. However, if you have applied any Illustrator special effects to the path, the special effects are expanded into multiple paths in the InDesign file. Because we usually want to use just a simple path in InDesign, we use just one fill without a stroke on the object. That way, it pastes into InDesign as a single object. This object can then be used as the frame for an image or simply a regular design element in InDesign. Pasting Into PhotoshopPasting artwork from Illustrator into Photoshop is a lot simpler than pasting into InDesign. All you have to do is copy the artwork in Illustrator and then move over to Photoshop and paste. The Paste dialog box (see Figure 5-26) appears. This allows you to choose which vector format you want to use. Figure 5-26. Photoshop CS2 Paste dialog box appears when copying artwork from Illustrator when the Illustrator Preferences AICB option is selected. Illustrator preference settings, as described in the previous section, control whether the Paste dialog box appears. If the AICB option is deselected, then the artwork copied from Illustrator will automatically appear pasted in Photoshop as a vector smart object. The other formats for paths, shape layers, and pixels require that you choose one of the AICB options. You can also move vector artwork from Illustrator into Photoshop using the Illustrator Export commands. Moving Paths Out of InDesignWe agree that it is far more likely that you want to get paths from Illustrator into InDesign. However, consider this scenario: you're working in InDesign and have expanded your text into outlines using the Create Outline command. You've fiddled around with the shape of the converted text. You show the result to your client (or boss). Suddenly everyone is very excited. You've done it you've created the new logo design that everyone has been looking for. There's only one problem. How can you get the new logo out of InDesign, a page-layout program, and into Illustrator, where everyone will be more comfortable working with it? Steve sometimes likes to move simple vector objects into Illustrator to work on them because it has a more complete vector toolset than InDesign. Although it is not often needed, fortunately there is a way to get paths out of InDesign and into Illustrator. Copying into IllustratorGetting paths from InDesign to Illustrator requires no preferences to set, nothing to prepare. All you have to do is select the InDesign object, copy, switch to Illustrator, and paste. The file format out of InDesign is PDF, which Illustrator understands perfectly. However, once you get the path into Illustrator, you need to do a little cleanup. Copying and pasting paths from InDesign into Illustrator creates a group that contains the paths for the artwork as well as a rectangular clipping path that was the bounding box of the objects in InDesign (see Figure 5-27). You may have to delete that clipping path to work with the file in Illustrator; doing so won't affect the artwork's appearance. This is a case where expanding the Layers palette display can come in handy. Figure 5-27. Illustrator CS2 expanded Layers palette displaying items copied from InDesign and pasted into Illustrator, including clipping path (bounding box). Copying into PhotoshopWhat happens if you copy from InDesign and paste into Photoshop? Not exactly what you expect. The path is automatically pasted as a Vector Smart Object without any options to paste as pixels, shape layer, or path. If you want to paste InDesign paths into Photoshop as anything but a Vector Smart Object, you need to first paste the paths into Illustrator and then copy and paste from there into Photoshop. Moving Paths Out of PhotoshopIf you need to paste vectors from Photoshop into InDesign or Illustrator, what you get depends on which type of vector object you copy. Copying Shape Layers and PathsShape layers and paths are the two best objects to copy from Photoshop into Illustrator. Simply select the paths or shape layer objects, copy, switch to Illustrator, and then paste. The Paste Options dialog box appears with two choices (see Figure 5-28). Figure 5-28. Illustrator CS2 Paste Options dialog box controls for pasting paths and shape layers from Photoshop into Illustrator. Choose Compound Shape (Fully Editable) to paste the objects with Illustrator Compound Shape commands applied. This option maintains any of the shape options that were applied in Photoshop. Objects that were Photoshop shape layers are converted into Illustrator objects. Although the Compound Shape commands are applied, the paths appear in Illustrator without any fill color. This is because Illustrator does not understand the color applied as part of the shape layer. That's no problem. Simply select the objects and apply a color in Illustrator. If you need to release the Compound Shape, select the objects and choose Release Compound Shape or Expand Compound Shape from the Illustrator Pathfinder palette menu. Choose Compound Path (Faster) to paste the objects as grouped compound paths. Release the group to work with the paths as individual objects. Although they are compound paths, they have not been compounded to each other. Thus the objects won't interact with each other if overlapped. Like the Compound Shape option, the objects appear in Illustrator with no fill. Select the objects to apply any fill or stroke. You would think that it would be very rare to move paths out of Photoshop. However, years ago Sandee discovered a cool technique to create custom "twinkles" or stars that can be applied as strokes in Photoshop (see Figure 5-29). The technique lets you work with the precision of Illustrator transformations, and then return to Photoshop to apply a pixel stroke. This technique demonstrates ultimate cross-product cooperation: moving paths from Photoshop to Illustrator and back. Here are the steps to recreate the effect.
Figure 5-29. Twinkles created by moving and manipulating paths from Photoshop to Illustrator and back to Photoshop. What about moving paths from Photoshop into InDesign? Strangely, there is no direct route. When we try to copy and paste paths, we get an EPS Import: Undefined Error dialog box. Fortunately, it is rather easy to paste from Photoshop into Illustrator and then paste from Illustrator into InDesign. Tip: Add a color to a pasted path in Illustrator Paths that have been pasted from Photoshop into Illustrator lose any fill or stroke. If you then paste that object into InDesign, you will get an error message. Add a color or stroke to the object in Illustrator, and it will paste into InDesign with no problem. Copying Vector Smart ObjectsDon't bother trying. The vectors in Vector Smart Objects are like roaches in those roach traps. Vectors can be pasted into Photoshop as a Smart Object; but they don't come out. If you need to recover the vectors used in a Smart Object, you must use the Smart Object editing command to open the Smart Object in Illustrator (see Chapter 9, "Smart Objects and Intelligent Layouts"). |

EAN: 2147483647
Pages: 192