Vectors in Unexpected Places
| We love surprises. So we also love to find vector controls in various places in Creative Suite. Once you've found these hidden vectors you can use many of the vector modification techniques to change the shape of these paths. Here's a sample of the unexpected places where you can find vectors. The Hidden Vectors in IllustratorVector controls show up in Illustrator in many places. In fact, the only surprise is how many places there are. See Figure 5-30 for examples of these places. Figure 5-30. Some Illustrator CS2 additional vector controls. Mesh, Blend, Warp, and Brush Objects
Converting Type to OutlinesOf course we must mention the vectors that are created when you convert type to outlines. That's part of John Warnock's and Chuck Geschke's original invention to describe fonts using vector artwork. Converting type to outlines simply exposes the points that were used to create the font. Once you have converted the type to outlines you can apply commands that don't work with editable text.
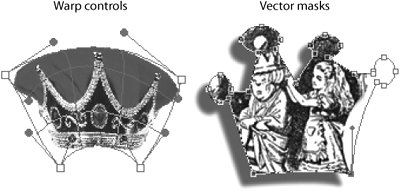
One place where we were disappointed to find no vector controls in Illustrator is in the bounding box applied to symbol sets. This is the rectangle that defines the area created when you spray symbols using the Symbol Sprayer tool. When you select the rectangle, you see four anchor points. But those anchor points are completely frozen they can't be moved independently, nor can you extend any Bézier handles to make them smooth points or curves. Sigh! What fun we would have if we could. The Hidden Vectors in InDesignInDesign has a wealth of places where you can find vector controls as well as a special command to convert vector paths into frames. See Figure 5-31 for examples of these types of objects. Figure 5-31. Some InDesign CS2 hidden vector controls. Clipping Paths and Text WrapsThe clipping paths in InDesign are vector paths. When you create a clipping path by choosing Object > Clipping Paths, you are adding a vector shape around your image. Whether you're choosing a clipping path created in Photoshop or using the Detect Edges option to have InDesign create one, you have access to that path. This vector shape can be modified with any of the pen tools. Even better, however, you can use the Pencil, Eraser, or Smooth tool to modify the shape of the path. We find this very helpful when the clipping path has far too many points. A few passes with the Smooth tool over the path deletes just enough points to make it acceptably smooth. Changes to a Photoshop clipping path are stored in the InDesign file and don't affect the path in the Photoshop file. Similarly, all the text wraps applied to objects are actually vector paths. You can modify these vector paths with the Pen tool, the path modification tools, or even the Pencil and Smooth tools. The Create Outlines CommandLike Illustrator, the InDesign Create Outlines command converts type into its PostScript vector outlines. But the InDesign and Illustrator commands for converting type to outlines differ significantly. Unlike Illustrator, InDesign allows for the conversion of selected type within a text frame. The type is converted as an inline graphic that travels with the text flow. As an alternative, you can select the entire frame that contains the InDesign type and convert it to outlines; this creates frames that are no longer part of the text flow. The latter approach is similar to how Illustrator converts type to outlines. The Secret InDesign Vector CommandYet another place we have found hidden vectors in InDesign is a secret command that converts a clipping path to a frame. Start with a clipping path that has been applied to an object. Perhaps it is the clipping path that was created from an alpha channel in Photoshop, or from the Detect Edges command in InDesign. Select the image that contains the clipping path; Control/right-click and choose Convert Clipping Path To Frame from the context menu. The clipping path is converted into an InDesign frame that can be used to hold an image, text, or a color. And, of course, that frame is controlled by vectors and anchor points. The reason we call this a secret command is that most context menu commands can be found somewhere else in the program on a menu, a palette, or somewhere. This command is only found in the context menu. So don't go telling everyone else about it. Let's keep it our little secret. The Hidden Vectors in PhotoshopWhile not as robust as all the hidden vectors in Illustrator, Photoshop provides a few vector controls in unexpected places. See Figure 5-32 for examples of these types of paths. Figure 5-32. Some Photoshop CS2 additional vector controls. You can warp images using the Edit > Transform > Warp command. The bounding box that appears contains rudimentary Bézier controls. The four points on the corners of the box have Bézier handles that can be moved to change the warping applied to the image. A grid similar to the ones in the Illustrator mesh tools lets you warp the interior of the image. However, none of these controls can be modified using any of the pen tools, nor can points on the grid be added or deleted. It's a very primitive version of vector controls. Strangely, however, Photoshop has no vector controls for the warp commands you can apply to text. We figure this is because editable text can't have the more sophisticated warp applied to it. Working on an editable text layer, warp text by clicking the Create Warp Text button on the Options bar. To apply the kind of warp made with the Transform > Warp command, you must convert your editable text to an ordinary layer and then apply the Warp command. Vector masks can be applied to image layers. Similar to shape layers, these vector masks are applied to ordinary image layers. This makes it possible to use vectors to mask out areas of an image. To create a vector mask, create a path and then select the layer to which you want to apply the mask. Choose Layer > Vector Mask > Current Path. This converts the path to a vector mask applied to that layer. |


EAN: 2147483647
Pages: 192