Displaying Text and Images in a Window
Our next example introduces a framework for building GUI applications. This framework uses several concepts that you will see in many of our GUI applications. This is our first example in which the application appears in its own window. Most windows you will create are an instance of class JFrame or a subclass of JFrame. JFrame provides the basic attributes and behaviors of a windowa title bar at the top of the window, and buttons to minimize, maximize and close the window. Since an application's GUI is typically specific to the application, most of our examples will consist of two classesa subclass of JFrame that helps us demonstrate new GUI concepts and an application class in which main creates and displays the application's primary window.
Labeling GUI Components
A typical GUI consists of many components. In a large GUI, it can be difficult to identify the purpose of every component unless the GUI designer provides text instructions or information stating the purpose of each component. Such text is known as a label and is created with class JLabela subclass of JComponent. A JLabel displays a single line of read-only text, an image, or both text and an image. Applications rarely change a label's contents after creating it.
Look-and-Feel Observation 11.5
 |
Text in a JLabel normally uses sentence-style capitalization. |
The application of Fig. 11.6 and Fig. 11.7 demonstrates several JLabel features and presents the framework we use in most of our GUI examples. We did not highlight the code in this example since most of it is new. [Note: There are many more features for each GUI component than we can cover in our examples. To learn the complete details of each GUI component, visit its page in the online documentation. For class JLabel, visit java.sun.com/j2se/5.0/docs/api/javax/swing/JLabel.html.]
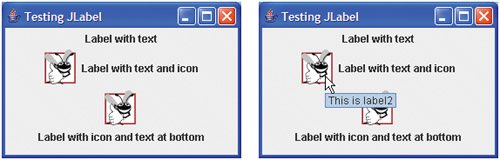
Figure 11.6. JLabels with text and icons.
(This item is displayed on page 519 in the print version)
 1 // Fig. 11.6: LabelFrame.java
 2 // Demonstrating the JLabel class.
 3 import java.awt.FlowLayout; // specifies how components are arranged
 4 import javax.swing.JFrame; // provides basic window features
 5 import javax.swing.JLabel; // displays text and images
 6 import javax.swing.SwingConstants; // common constants used with Swing
 7 import javax.swing.Icon; // interface used to manipulate images
 8 import javax.swing.ImageIcon; // loads images
 9
10 public class LabelFrame extends JFrame
11 {
12 private JLabel label1; // JLabel with just text
13 private JLabel label2; // JLabel constructed with text and icon
14 private JLabel label3; // JLabel with added text and icon
15
16 // LabelFrame constructor adds JLabels to JFrame
17 public LabelFrame()
18 {
19 super( "Testing JLabel" );
20 setLayout( new FlowLayout() ); // set frame layout
21
22 // JLabel constructor with a string argument
23 label1 = new JLabel( "Label with text" );
24 label1.setToolTipText( "This is label1" );
25 add( label1 ); // add label1 to JFrame
26
27 // JLabel constructor with string, Icon and alignment arguments
28 Icon bug = new ImageIcon( getClass().getResource( "bug1.gif" ) );
29 label2 = new JLabel( "Label with text and icon", bug,
30 SwingConstants.LEFT );
31 label2.setToolTipText( "This is label2" );
32 add( label2 ); // add label2 to JFrame
33
34 label3 = new JLabel(); // JLabel constructor no arguments
35 label3.setText( "Label with icon and text at bottom" );
36 label3.setIcon( bug ); // add icon to JLabel
37 label3.setHorizontalTextPosition( SwingConstants.CENTER );
38 label3.setVerticalTextPosition( SwingConstants.BOTTOM );
39 label3.setToolTipText( "This is label3" );
40 add( label3 ); // add label3 to JFrame
41 } // end LabelFrame constructor
42 } // end class LabelFrame
|
Figure 11.7. Test class for LabelFrame.
(This item is displayed on page 520 in the print version)
 1 // Fig. 11.7: LabelTest.java
 2 // Testing LabelFrame.
 3 import javax.swing.JFrame;
 4
 5 public class LabelTest
 6 {
 7 public static void main( String args[] )
 8 {
 9 LabelFrame labelFrame = new LabelFrame(); // create LabelFrame
10 labelFrame.setDefaultCloseOperation( JFrame.EXIT_ON_CLOSE );
11 labelFrame.setSize( 275, 180 ); // set frame size
12 labelFrame.setVisible( true ); // display frame
13 } // end main
14 } // end class LabelTest
|
Class LabelFrame (Fig. 11.6) is a subclass of JFrame. We will use an instance of class LabelFrame to display a window containing three JLabels. Lines 38 import the classes used in class LabelFrame. The class extends JFrame to inherit the features of a window. Lines 1214 declare the three JLabel instance variables, each of which is instantiated in the LabelFrame constructor (lines 1741). Typically, the JFrame subclass's constructor builds the GUI that is displayed in the window when the application executes. Line 19 invokes superclass JFrame's constructor with the argument "Testing JLabel".JFrame's constructor uses this String to specify the text in the window's title bar.
Specifying the Layout
When building a GUI, each GUI component must be attached to a container, such as a window created with a JFrame. Also, you typically must decide where to position each GUI component. This is known as specifying the layout of the GUI components. As you will learn at the end of this chapter and in Chapter 22, Java provides several layout managers that can help you position components.
Many integrated development environments provide GUI design tools in which you can specify the exact size and location of a component in a visual manner by using the mouse, then the IDE will generate the GUI code for you. Though such IDEs can greatly simplify GUI creation, they are each different in capability.
To ensure that the code in this book can be used with any IDE, we did not use an IDE to create our GUI code. For this reason, we take advantage of Java's various layout managers in our GUI examples. One such layout manager is FlowLayout in which GUI components are placed on a container from left to right in the order in which they are attached to the container by the program. When there is no more room to fit components left to right, components continue to display left to right on the next line. If the container is resized, a FlowLayout reflows (i.e., rearranges) the components to accommodate the new width of the container, possibly with fewer or more rows of GUI components. Line 20 specifies that the layout of the LabelFrame should be a FlowLayout. Method setLayout is inherited into class LabelFrame indirectly from class Container. The argument to the method must be an object of a class that implements the LayoutManager interface, such as an object of class FlowLayout. In this case, we create a new FlowLayout object and pass its reference as the argument to setLayout.
Creating and Attaching label1
Now that we have specified the layout for the window, we can begin creating and attaching GUI components to the window. Line 23 creates a JLabel object and passes the String "Label with text" to the constructor. The JLabel displays this text when the JLabel appears on the screen as part of the application's GUI. Line 24 uses method setToolTipText (inherited by JLabel from JComponent) to specify the tool tip that is displayed when the user positions the mouse cursor over the JLabel in the GUI. You can see a sample tool tip in the second screen capture of Fig. 11.7. When you execute this application, try positioning the mouse over each JLabel to see its tool tip. Line 25 attaches label1 to the LabelFrame by passing label1 to the add method, which is inherited indirectly from class Container.
Common Programming Error 11.1
 |
If you do not explicitly add a GUI component to a container, the GUI component will not be displayed when the container appears on the screen. |
Look-and-Feel Observation 11.6
|
Use tool tips to add descriptive text to your GUI components. This text helps the user determine the GUI component's purpose in the user interface. |
Creating and Attaching label2
Icons are a popular way to enhance the look-and-feel of an application and are also commonly used to indicate functionality. For examples, most of today's VCRs and DVD players use the same icon to play a tape or DVD. Several Swing components can display images. An icon is normally specified with an Icon argument to a constructor or to the component's setIcon method. An Icon is an object of any class that implements interface Icon (package javax.swing). One such class is ImageIcon (package javax.swing), which supports several image formats, including Graphics Interchange Format (GIF), Portable Network Graphics (PNG) and Joint Photographic Experts Group (JPEG). File names for each of these types end with .gif, .png or .jpg (or .jpeg), respectively. We discuss images in more detail in Chapter 21, Multimedia: Applets and Applications.
Line 28 declares an ImageIcon object. The file bug1.gif contains the image to load and store in the ImageIcon object. (This image is included in the directory for this example on the CD that accompanies this book) The ImageIcon object is assigned to Icon reference bug. Remember, class ImageIcon implements interface Icon; an ImageIcon is an Icon.
In line 28, the expression getClass().getResource( "bug1.gif" ) invokes method getClass (inherited from class Object) to retrieve a reference to the Class object that represents the LabelFrame class declaration. That reference is then used to invoke Class method getResource, which returns the location of the image as a URL. The ImageIcon constructor uses the URL to locate the image then loads it into memory. As we discussed in Chapter 1, the JVM loads class declarations into memory, using a class loader. The class loader knows where each class it loads is located on disk. Method geTResource uses the Class object's class loader to determine the location of a resource, such as an image file. In this example, the image file is stored in the same location as the LabelFrame.class file. The techniques described here enable an application to load image files from locations that are relative to LabelFrame's.class file on disk.
A JLabel can display an Icon. Lines 2930 use another JLabel constructor to create a JLabel that displays the text "Label with text and icon" and the Icon bug created in line 28. The last constructor argument indicates that the label's contents are left justified, or left aligned (i.e., the icon and text are at the left side of the label's area on the screen). Interface SwingConstants (package javax.swing) declares a set of common integer constants (such as SwingConstants.LEFT) that are used with many Swing components. By default, the text appears to the right of the image when a label contains both text and an image. Note that the horizontal and vertical alignments of a JLabel can be set with methods setHorizontalAlignment and setVerticalAlignment, respectively. Line 31 specifies the tool-tip text for label2, and line 32 adds label2 to the JFrame.
Creating and Attaching label3
Class JLabel provides many methods to change a label's appearance after the label has been instantiated. Line 34 creates a JLabel and invokes its no-argument constructor. Such a label initially has no text or Icon. Line 35 uses JLabel method setText to set the text displayed on the label. The corresponding method getText retrieves the current text displayed on a label. Line 36 uses JLabel method setIcon to specify the Icon to display on the label. The corresponding method getIcon retrieves the current Icon displayed on a label. Lines 3738 use JLabel methods setHorizontalTextPosition and setVerticalTextPosition to specify the text position in the label. In this case, the text will be centered horizontally and will appear at the bottom of the label. Thus, the Icon will appear above the text. The horizontal-position constants in SwingConstants are LEFT, CENTER and RIGHT (Fig. 11.8). The vertical-position constants in SwingConstants are TOP, CENTER and BOTTOM (Fig. 11.8). Line 39 sets the tool-tip text for label3. Line 40 adds label3 to the JFrame.
|
Constant |
Description |
|---|---|
|
Horizontal-position constants |
|
|
SwingConstants.LEFT |
Place text on the left. |
|
SwingConstants.CENTER |
Place text in the center. |
|
SwingConstants.RIGHT |
Place text on the right. |
|
Vertical-position constants |
|
|
SwingConstants.TOP |
Place text at the top. |
|
SwingConstants.CENTER |
Place text in the center. |
|
SwingConstants.BOTTOM |
Place text at the bottom. |
Creating and Displaying a LabelFrame Window
Class LabelTest (Fig. 11.7) creates an object of class LabelFrame (line 9), then specifies the default close operation for the window. By default, closing a window simply hides the window. However, when the user closes the LabelFrame window, we would like the application to terminate. Line 10 invokes LabelFrame's setDefaultCloseOperation method (inherited from class JFrame) with constant JFrame.EXIT_ON_CLOSE as the argument to indicate that the program should terminate when the window is closed by the user. This line is important. Without it the application will not terminate when the user closes the window. Next, line 11 invokes LabelFrame's setSize method to specify the width and height of the window. Finally, line 12 invokes LabelFrame's setVisible method with the argument true to display the window on the screen. Try resizing the window to see how the FlowLayout changes the JLabel positions as the window width changes.
Introduction to Computers, the Internet and the World Wide Web
- Introduction
- What Is a Computer?
- Computer Organization
- Early Operating Systems
- Personal, Distributed and Client/Server Computing
- The Internet and the World Wide Web
- Machine Languages, Assembly Languages and High-Level Languages
- History of C and C++
- History of Java
- Java Class Libraries
- FORTRAN, COBOL, Pascal and Ada
- BASIC, Visual Basic, Visual C++, C# and .NET
- Typical Java Development Environment
- Notes about Java and Java How to Program, Sixth Edition
- Test-Driving a Java Application
- Software Engineering Case Study: Introduction to Object Technology and the UML (Required)
- Wrap-Up
- Web Resources
- Summary
- Terminology
- Self-Review Exercises
- Exercises
Introduction to Java Applications
- Introduction
- First Program in Java: Printing a Line of Text
- Modifying Our First Java Program
- Displaying Text with printf
- Another Java Application: Adding Integers
- Memory Concepts
- Arithmetic
- Decision Making: Equality and Relational Operators
- (Optional) Software Engineering Case Study: Examining the Requirements Document
- Wrap-Up
- Summary
- Terminology
- Self-Review Exercises
- Exercises
Introduction to Classes and Objects
- Introduction
- Classes, Objects, Methods and Instance Variables
- Declaring a Class with a Method and Instantiating an Object of a Class
- Declaring a Method with a Parameter
- Instance Variables, set Methods and get Methods
- Primitive Types vs. Reference Types
- Initializing Objects with Constructors
- Floating-Point Numbers and Type double
- (Optional) GUI and Graphics Case Study: Using Dialog Boxes
- (Optional) Software Engineering Case Study: Identifying the Classes in a Requirements Document
- Wrap-Up
- Summary
- Terminology
- Self-Review Exercises
- Exercises
Control Statements: Part I
- Introduction
- Algorithms
- Pseudocode
- Control Structures
- if Single-Selection Statement
- if...else Double-Selection Statement
- while Repetition Statement
- Formulating Algorithms: Counter-Controlled Repetition
- Formulating Algorithms: Sentinel-Controlled Repetition
- Formulating Algorithms: Nested Control Statements
- Compound Assignment Operators
- Increment and Decrement Operators
- Primitive Types
- (Optional) GUI and Graphics Case Study: Creating Simple Drawings
- (Optional) Software Engineering Case Study: Identifying Class Attributes
- Wrap-Up
- Summary
- Terminology
- Self-Review Exercises
- Exercises
Control Statements: Part 2
- Introduction
- Essentials of Counter-Controlled Repetition
- for Repetition Statement
- Examples Using the for Statement
- do...while Repetition Statement
- switch Multiple-Selection Statement
- break and continue Statements
- Logical Operators
- Structured Programming Summary
- (Optional) GUI and Graphics Case Study: Drawing Rectangles and Ovals
- (Optional) Software Engineering Case Study: Identifying Objects States and Activities
- Wrap-Up
- Summary
- Terminology
- Self-Review Exercises
- Exercises
Methods: A Deeper Look
- Introduction
- Program Modules in Java
- static Methods, static Fields and Class Math
- Declaring Methods with Multiple Parameters
- Notes on Declaring and Using Methods
- Method Call Stack and Activation Records
- Argument Promotion and Casting
- Java API Packages
- Case Study: Random-Number Generation
- Case Study: A Game of Chance (Introducing Enumerations)
- Scope of Declarations
- Method Overloading
- (Optional) GUI and Graphics Case Study: Colors and Filled Shapes
- (Optional) Software Engineering Case Study: Identifying Class Operations
- Wrap-Up
- Summary
- Terminology
- Self-Review Exercises
- Exercises
Arrays
- Introduction
- Arrays
- Declaring and Creating Arrays
- Examples Using Arrays
- Case Study: Card Shuffling and Dealing Simulation
- Enhanced for Statement
- Passing Arrays to Methods
- Case Study: Class GradeBook Using an Array to Store Grades
- Multidimensional Arrays
- Case Study: Class GradeBook Using a Two-Dimensional Array
- Variable-Length Argument Lists
- Using Command-Line Arguments
- (Optional) GUI and Graphics Case Study: Drawing Arcs
- (Optional) Software Engineering Case Study: Collaboration Among Objects
- Wrap-Up
- Summary
- Terminology
- Self-Review Exercises
- Exercises
- Special Section: Building Your Own Computer
Classes and Objects: A Deeper Look
- Introduction
- Time Class Case Study
- Controlling Access to Members
- Referring to the Current Objects Members with the this Reference
- Time Class Case Study: Overloaded Constructors
- Default and No-Argument Constructors
- Notes on Set and Get Methods
- Composition
- Enumerations
- Garbage Collection and Method finalize
- static Class Members
- static Import
- final Instance Variables
- Software Reusability
- Data Abstraction and Encapsulation
- Time Class Case Study: Creating Packages
- Package Access
- (Optional) GUI and Graphics Case Study: Using Objects with Graphics
- (Optional) Software Engineering Case Study: Starting to Program the Classes of the ATM System
- Wrap-Up
- Summary
- Terminology
- Self-Review Exercises
- Exercises
Object-Oriented Programming: Inheritance
- Introduction
- Superclasses and Subclasses
- protected Members
- Relationship between Superclasses and Subclasses
- Constructors in Subclasses
- Software Engineering with Inheritance
- Object Class
- (Optional) GUI and Graphics Case Study: Displaying Text and Images Using Labels
- Wrap-Up
- Summary
- Terminology
- Self-Review Exercises
- Exercises
Object-Oriented Programming: Polymorphism
- Introduction
- Polymorphism Examples
- Demonstrating Polymorphic Behavior
- Abstract Classes and Methods
- Case Study: Payroll System Using Polymorphism
- final Methods and Classes
- Case Study: Creating and Using Interfaces
- (Optional) GUI and Graphics Case Study: Drawing with Polymorphism
- (Optional) Software Engineering Case Study: Incorporating Inheritance into the ATM System
- Wrap-Up
- Summary
- Terminology
- Self-Review Exercises
- Exercises
GUI Components: Part 1
- Introduction
- Simple GUI-Based Input/Output with JOptionPane
- Overview of Swing Components
- Displaying Text and Images in a Window
- Text Fields and an Introduction to Event Handling with Nested Classes
- Common GUI Event Types and Listener Interfaces
- How Event Handling Works
- JButton
- Buttons that Maintain State
- JComboBox and Using an Anonymous Inner Class for Event Handling
- JList
- Multiple-Selection Lists
- Mouse Event Handling
- Adapter Classes
- JPanel Subclass for Drawing with the Mouse
- Key-Event Handling
- Layout Managers
- Using Panels to Manage More Complex Layouts
- JTextArea
- Wrap-Up
- Summary
- Terminology
- Self-Review Exercises
- Exercises
Graphics and Java 2D™
- Introduction
- Graphics Contexts and Graphics Objects
- Color Control
- Font Control
- Drawing Lines, Rectangles and Ovals
- Drawing Arcs
- Drawing Polygons and Polylines
- Java 2D API
- Wrap-Up
- Summary
- Terminology
- Self-Review Exercises
- Exercises
Exception Handling
- Introduction
- Exception-Handling Overview
- Example: Divide By Zero Without Exception Handling
- Example: Handling ArithmeticExceptions and InputMismatchExceptions
- When to Use Exception Handling
- Java Exception Hierarchy
- finally block
- Stack Unwinding
- printStackTrace, getStackTrace and getMessage
- Chained Exceptions
- Declaring New Exception Types
- Preconditions and Postconditions
- Assertions
- Wrap-Up
- Summary
- Terminology
- Self-Review Exercises
- Exercises
Files and Streams
- Introduction
- Data Hierarchy
- Files and Streams
- Class File
- Sequential-Access Text Files
- Object Serialization
- Random-Access Files
- Additional java.io Classes
- Opening Files with JFileChooser
- Wrap-Up
- Summary
- Terminology
- Self-Review Exercises
- Exercises
Recursion
- Introduction
- Recursion Concepts
- Example Using Recursion: Factorials
- Example Using Recursion: Fibonacci Series
- Recursion and the Method Call Stack
- Recursion vs. Iteration
- String Permutations
- Towers of Hanoi
- Fractals
- Recursive Backtracking
- Wrap-Up
- Internet and Web Resources
- Summary
- Terminology
- Self-Review Exercises
- Exercises
Searching and Sorting
- Introduction
- Searching Algorithms
- Sorting Algorithms
- Invariants
- Wrap-up
- Summary
- Terminology
- Self-Review Exercises
- Exercises
Data Structures
- Introduction
- Type-Wrapper Classes for Primitive Types
- Autoboxing and Auto-Unboxing
- Self-Referential Classes
- Dynamic Memory Allocation
- Linked Lists
- Stacks
- Queues
- Trees
- Wrap-Up
- Summary
- Terminology
- Self-Review Exercises
- Exercises
- Special Section: Building Your Own Compiler
Generics
- Introduction
- Motivation for Generic Methods
- Generic Methods: Implementation and Compile-Time Translation
- Additional Compile-Time Translation Issues: Methods That Use a Type Parameter as the Return Type
- Overloading Generic Methods
- Generic Classes
- Raw Types
- Wildcards in Methods That Accept Type Parameters
- Generics and Inheritance: Notes
- Wrap-Up
- Internet and Web Resources
- Summary
- Terminology
- Self-Review Exercises
- Exercises
Collections
- Introduction
- Collections Overview
- Class Arrays
- Interface Collection and Class Collections
- Lists
- Collections Algorithms
- Stack Class of Package java.util
- Class PriorityQueue and Interface Queue
- Sets
- Maps
- Properties Class
- Synchronized Collections
- Unmodifiable Collections
- Abstract Implementations
- Wrap-Up
- Summary
- Terminology
- Self-Review Exercises
- Exercises
Introduction to Java Applets
- Introduction
- Sample Applets Provided with the JDK
- Simple Java Applet: Drawing a String
- Applet Life-Cycle Methods
- Initializing an Instance Variable with Method init
- Sandbox Security Model
- Internet and Web Resources
- Wrap-Up
- Summary
- Terminology
- Self-Review Exercises
- Exercises
Multimedia: Applets and Applications
- Introduction
- Loading, Displaying and Scaling Images
- Animating a Series of Images
- Image Maps
- Loading and Playing Audio Clips
- Playing Video and Other Media with Java Media Framework
- Wrap-Up
- Internet and Web Resources
- Summary
- Terminology
- Self-Review Exercises
- Exercises
- Special Section: Challenging Multimedia Projects
GUI Components: Part 2
- Introduction
- JSlider
- Windows: Additional Notes
- Using Menus with Frames
- JPopupMenu
- Pluggable Look-and-Feel
- JDesktopPane and JInternalFrame
- JTabbedPane
- Layout Managers: BoxLayout and GridBagLayout
- Wrap-Up
- Summary
- Terminology
- Self-Review Exercises
- Exercises
Multithreading
- Introduction
- Thread States: Life Cycle of a Thread
- Thread Priorities and Thread Scheduling
- Creating and Executing Threads
- Thread Synchronization
- Producer/Consumer Relationship without Synchronization
- Producer/Consumer Relationship with Synchronization
- Producer/Consumer Relationship: Circular Buffer
- Producer/Consumer Relationship: ArrayBlockingQueue
- Multithreading with GUI
- Other Classes and Interfaces in java.util.concurrent
- Monitors and Monitor Locks
- Wrap-Up
- Summary
- Terminology
- Self-Review Exercises
- Exercises
Networking
- Introduction
- Manipulating URLs
- Reading a File on a Web Server
- Establishing a Simple Server Using Stream Sockets
- Establishing a Simple Client Using Stream Sockets
- Client/Server Interaction with Stream Socket Connections
- Connectionless Client/Server Interaction with Datagrams
- Client/Server Tic-Tac-Toe Using a Multithreaded Server
- Security and the Network
- Case Study: DeitelMessenger Server and Client
- Wrap-Up
- Summary
- Terminology
- Self-Review Exercises
- Exercises
Accessing Databases with JDBC
- Introduction
- Relational Databases
- Relational Database Overview: The books Database
- SQL
- Instructions to install MySQL and MySQL Connector/J
- Instructions on Setting MySQL User Account
- Creating Database books in MySQL
- Manipulating Databases with JDBC
- Stored Procedures
- RowSet Interface
- Wrap-Up
- Internet and Web Resources
- Recommended Readings
- Summary
- Terminology
- Self-Review Exercises
- Exercises
Servlets
- Introduction
- Servlet Overview and Architecture
- Setting Up the Apache Tomcat Server
- Handling HTTP get Requests
- Handling HTTP get Requests Containing Data
- Handling HTTP post Requests
- Redirecting Requests to Other Resources
- Multitier Applications: Using JDBC from a Servlet
- Welcome Files
- Wrap-Up
- Internet and Web Resources
- Summary
- Terminology
- Self-Review Exercises
- Exercises
JavaServer Pages (JSP)
- Introduction
- JavaServer Pages Overview
- First JSP Example
- Implicit Objects
- Scripting
- Standard Actions
- Directives
- Case Study: Guest Book
- Wrap-Up
- Internet and Web Resources
- Summary
- Terminology
- Self-Review Exercises
- Exercises
Formatted Output
- Introduction
- Streams
- Formatting Output with printf
- Printing Integers
- Printing Floating-Point Numbers
- Printing Strings and Characters
- Printing Dates and Times
- Other Conversion Characters
- Printing with Field Widths and Precisions
- Using Flags in the printf Format String
- Printing with Argument Indices
- Printing Literals and Escape Sequences
- Formatting Output with Class Formatter
- Wrap-Up
- Summary
- Terminology
- Self-Review Exercises
- Exercises
Strings, Characters and Regular Expressions
- Introduction
- Fundamentals of Characters and Strings
- Class String
- Class StringBuffer
- Class Character
- Class StringTokenizer
- Regular Expressions, Class Pattern and Class Matcher
- Wrap-Up
- Summary
- Terminology
- Self-Review Exercises
- Exercises
- Special Section: Advanced String-Manipulation Exercises
- Special Section: Challenging String-Manipulation Projects
Appendix A. Operator Precedence Chart
Appendix B. ASCII Character Set
Appendix C. Keywords and Reserved Words
Appendix D. Primitive Types
Appendix E. (On CD) Number Systems
Appendix F. (On CD) Unicode®
Appendix G. Using the Java API Documentation
Appendix H. (On CD) Creating Documentation with javadoc
Appendix I. (On CD) Bit Manipulation
Appendix J. (On CD) ATM Case Study Code
Appendix K. (On CD) Labeled break and continue Statements
Appendix L. (On CD) UML 2: Additional Diagram Types
Appendix M. (On CD) Design Patterns
Appendix N. Using the Debugger
Inside Back Cover
EAN: 2147483647
Pages: 615
