Project 2. Trading Cards This is a fun and easy project. So easy in fact that you might have been approached by a photographer at your child's football practice hoping to sell you a package of photos including a trading card. Kids love these, but the photographer has to make a profit and you might pay $20 for the package. The good news is that, unlike a decade ago, you might have equipment that rivals that of the photographer. It's time to put your digital darkroom to work. 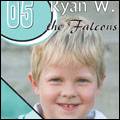 You can approach this in a number of ways. I'd start by shooting some of the practices or games and then, with the kids still in their uniforms, shoot a couple of close-up portraits. Don't be afraid to try setting something up, like a shot at the net. You'll often find that kids can be real hams and you'll get some great material for the project. I'll be creating a fairly simple stats card with some shapes, line, and text, but you can get as creative as you want. You can see in Figure 5.8 that this photo is mostly good, but I do see a small speck of something in the upper-left corner that I'd like to fix. Here's what I did to solve the problem. Figure 5.8. The young sportsman. 
1. | If you're following along with this image (Young Man R.tif) from the website or if your image has a similar problem, select the Clone Brush and make sure the brush size is right. The brush should cover the spot completely. I used a size of 32 to get rid of the small spot in this image.
| 2. | Hold down the Shift key and right-click in the image near, but not too near, the spot you want removed. You should be about one or two brush widths away from the spot. Try to select a spot with the same colors and textures as the area around the spot you're trying to remove.
| 3. | Click over the spot to remove it. That's it! And you thought that was going to be hard, right? Repeat as necessary to get rid of all the unwanted blemishes. Figure 5.9 shows the image ready to go.
Figure 5.9. Be gone spot! 
|
Make sure you don't get overzealous with the Clone Brush and start removing freckles and so forth. The odd pimple is fair game, but we want to keep the realism for the trading cards. Don't worry, though, you'll get plenty of opportunity to put your digital cosmetic surgery skills to the test. You could, for example, refer to Chapter 1 or 2 if you've just jumped in here. There are a number of fun projects there that will help you hone your cloning abilities.
Adding Some Shapes Now that the spot problem has been handled, it's time to get started on creating the trading card. Again, I'll keep this fairly simple and you can follow along or go as wild as time and skill permits. To add a simple shape to the image, but with a bit of an elegant wrinkle, we'll duplicate the shape and set the top one to have no fill and the bottom one to have a fill. However, we'll keep the bottom layer's Opacity set low to let the photograph show through. Here's how. 4. | Click and hold down the icon in the upper-left corner of the Layers palette. Select New Vector Layer to create a vector layer for the shape.
| 5. | Repeat this process, but select New Layer Group. I named this group Shapes.
| 6. | Activate the vector layer. Select the Rectangle tool and then set the Foreground and Stroke Properties to black and the Background and Fill Properties to a color that will go well with the image and the trading card design you have in mind. I chose a nice sky blue.
| 7. | Click and drag from near the left of the image, about halfway down, to way off the image to the right. We want the shape to be large because we're going to rotate it.
| 8. | Select the Pick tool; you'll see the corners of the shape and its center point (see Figure 5.10).
Figure 5.10. Picking the shape so we can maneuver it into place. 
Move the cursor around the end of the handle of the center point until you see it change into two semicircular arrows chasing each otheryou'll know it when you see it. Click and drag the cursor until the shape is rotated into place (see Figure 5.11). Note that you can release the mouse, move the shape, and then hunt for the rotation area as needed.
Figure 5.11. Rotate the shape into place. 
| 9. | Right-click the vector shape's layer in the Layers palette and select Duplicate from the menu to duplicate the shape.
| 10. | Activate the original vector layer by clicking it in the Layers palette; then set its Opacity to about 30.
| 11. | Activate the layer with the new copy of the vector shape and then click the plus sign to the left of the layer. Next, click the shape layer to activate it.
| 12. | Double-click the shape in the image to bring up the Vector Property dialog box. Set the Fill to None by removing the check mark, and set the stroke width to 25. You should have something that resembles Figure 5.12.
Figure 5.12. Set the properties of the two shapes to get a more elegant design. 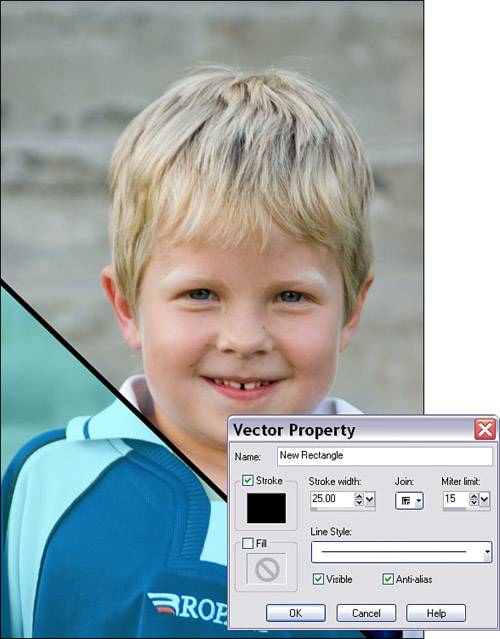
Having the superimposed shapes is a little more sophisticated than simply using a solid shape, and it will still give us something to place the type against later so that it will be more readable. In fact, if you find that the type is too hard to read against the shape, you can always double-click the shape and reset its opacity a little higher.
|
Adding Another Shape for the Number We'll add another shape to one of the corners that will hold the player's number. This time we'll use an ellipse and rotate it a little, too. 13. | Select the Ellipse tool. You'll find it together with the Rectangle tool if you click and hold over the small arrow icon to the right of the tool's icon in the toolbar.
| 14. | In the Materials palette, set the foreground color to black and the background color to something similar to the blue you used for the rectangle.
| 15. | Set the mode to Draw Ellipse, and then click and drag to create an ellipse in the upper-left corner of the image. Don't be afraid to drag outside the image. You should have something that resembles Figure 5.13.
Figure 5.13. Add an oval shape. 
| 16. | As before, duplicate the layer. This time, though, use the Pick tool to increase the size of the lowest shape.
| 17. | Change the colors of the lowest shape to light blue for the stroke and white for the fill.
With the two ovals in place, you should have something similar to Figure 5.14.
Figure 5.14. We're ready for the type. 
|
Adding the Player's Name and Number All that's left is to add some text. We'll use the Type tool to add the player's name, number, and team name along with a couple of vital stats such as married status...you know, the important stuff. 18. | Click the uppermost layer group in the Layers palette and then add a new vector layer for the type. This is necessary because Paint Shop Pro would otherwise assume that you want the text applied to the shape in the existing vector layer.
| 19. | With the type layer created, create a new layer group to hold it. I know, I know, it's almost like a pocket for a pocket but I just like to compartmentalize the layers in my images. Doing so makes it easier to work on them in the future. Trust me, you'll see.
| 20. | Select the Text tool and enter the player's number, using a font that you like or something that resembles the team's format, if you have it. I'm using Playbill BT for the number. Note that I'll be sticking with the blue and white color scheme, too. You can see the result of adding the number in Figure 5.15.
Figure 5.15. Adding the player's number. 
| 21. | With the numbers in place, I decided to add a drop shadow to the number. After selecting Effects, 3D Effects, Drop Shadow, the software warned me that I had to change the type to a raster layer. I agreed and added the drop shadow.
| 22. | Finally, use the Text tool to add the rest of the information. The final result, which is pretty cool if I do say so myself, is shown in Figure 5.16.
Figure 5.16. The finished trading card, ready to print. 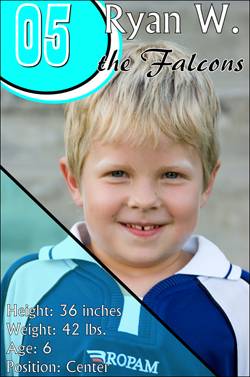
| 23. | All you need to do at this point is resize the image, make sure you save a copy first, and print it on card stock.
Create one of these for each of the kids on the team, and you'll get an idea of why the other guy wanted $20 for the packages. All kidding aside, though, have some fun with this project and see what you can come up with. Maybe you could dig out some of your own cards and see what the cards looked like back when you were collecting. Nostalgia can be good.
|
|