MIDI Menu Options
| [ LiB ] |
MIDI Menu Options
The MIDI menu is divided into five sections. The first one allows you to open different types of editing windows . The second one was discussed previously in this chapter and relates to quantizing. The fourth section relates mostly to the logical editor functions which are described in Appendix C. The last section is basically a MIDI reset function, which acts as a panic button on a MIDI patch bay, sending out All Notes Off and Reset Controllers messages on all MIDI output ports and channels. You can use this when you experience stuck notes after recording, playing, or editing a track. This leaves us with the central section, which relates to MIDI-specific functions.
Transpose
The Transpose option in the MIDI menu allows you to transpose selected MIDI events. Unlike the Transpose field in the Inspector area, this option changes the MIDI note numbers . In other words, after you transpose MIDI events using this option, you actually see the transposition in the different MIDI Editors. You can also use this option when you want to transpose only a certain number of events in a part or on a track rather than transposing an entire track using the track parameter setting or a MIDI effect.
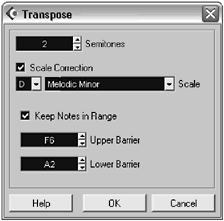
Another difference between the Transpose option found in the MIDI menu and the one found in the Track Parameter section in the Inspector area is that you can define a lower and upper barrier for your transposition. When doing so, you tell Cubase that notes above or below a certain value are outside of the desired transposed range possibility, so Cubase transposes the notes that are outside this range in a way that makes them fit inside the range. This is done by octave-shifting these notes. If you look at the example in Figure 11.4, you will notice that a two-semitone transposition will occur and that the Keep Notes in Range option is checked. This makes it possible to set a note value in the upper and lower barrier fields. If the events you want to transpose contain a G6, for example, this note is transposed one octave down, then two semitones up, resulting in an A5 rather than an A6.
Figure 11.4. The MIDI menu Transpose dialog box.
How To
To transpose selected events using the MIDI Transpose option:
-
Select the MIDI part, parts , or events inside a MIDI part you want to transpose.
-
From the MIDI menu, select the Transpose option.
-
In the Transpose dialog box (see Figure 11.4), set the number of semitones you want to transpose by using the up or down arrows on the right of the field. If you have a mouse with a scroll wheel, you can click on the number in the field and scroll your wheel up to increase or scroll your wheel down to decrease the value of semitones.
-
If you want to keep the notes within a specific range, check the appropriate check box option, and then set the lower and higher barrier range. Note that if your range is too narrow, some notes will not be transposed with the correct pitch.
-
Click OK to apply your changes.
MIDI Merge In Loop
Now let's say you've applied different MIDI effects to a track as inserts or sends; you've also assigned different track parameter values to a MIDI part. When trying to edit certain details, you realize that the details you want to edit are played in real time by the various settings you have assigned to this track. If you want to merge these effects with the MIDI track and create a new version of the MIDI events that contains an editable set of MIDI parameters based on the result of the MIDI effects and parameters you've assigned, you can use the Merge In Loop option found in the MIDI menu. Here's an example: You've recorded a piano accompaniment and played certain chords. After recording these chords, you've applied the Track FX MIDI effect using a different scale. When listening back to your new chord coloring, you like the result, but you'd like to change a note in one of the chords so that it fits better with the rest of the arrangement. But because this is a real-time effect, you can't really change a note that you didn't play to begin with. That's when the merge MIDI In Loop option comes in handy. You will probably also want to merge the realtime MIDI effects with the recorded events before exporting MIDI parts to MIDI files so that you can use them in another application.
How To
To use the merge MIDI In Loop option:
-
Start by identifying the MIDI events you want to merge. This can be a MIDI part on one track or several MIDI parts on several tracks over several channels.
-
After you've identified what you want to merge (or freeze), set the left and right locators to include this content.
-
Mute any other MIDI track you don't want to include in this process.
-
If you want to keep the original content intact, create a new MIDI track.
-
If you have chosen to create a new MIDI track for the merged destination, select it in the Track List area; otherwise , select the desired destination track (this might be the same track as the original content).
-
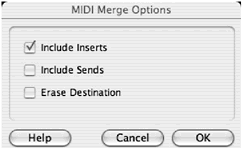
From the MIDI menu, select the Merge MIDI In Loop option. The MIDI Merge Options dialog box appears as displayed in Figure 11.5.
Figure 11.5. The MIDI Merge Options dialog box.
-
You have three options to enable or disable. The Include Inserts and Include Sends options convert any MIDI messages generated by effects into editable MIDI messages in the new merged part. If you have selected a track that already contains MIDI events as a destination track, you can choose to erase this content by checking the Erase Destination option. If you do not check this option and there is already a part on the destination track, a new part appears on top of it.
-
Click OK after setting your options.
Dissolve Parts
Let's say you have a MIDI file that you want to import into Cubase. You do so by using the Import MIDI File option (described later in this chapter), only to realize that it contains only one track with all the different channel information and events on this single track. If you look at the example in Figure 11.6, the first track named "Original" contains MIDI events on three distinct channels. After applying the Dissolve function, three additional tracks appear below with the appropriate MIDI channel, program change, and corresponding MIDI events for each channel.
Figure 11.6. The first track has been dissolved into three tracks.

Similarly, you might record a drum pattern in cycle mode using the LM-7 VSTi drum, adding instruments to your pattern every time the cycle begins to get a full pattern. This is probably the simplest way of doing a drum pattern. But after all your instruments are recorded, they are all contained in the same part. If you want to assign a different MIDI effect on the snare drum, this could only be done if each instrument was played on a different channel. Because your drum is already recorded, you can use the Dissolve Part and select the Separate Pitches option instead of the Separate Channels option. In Figure 11.7, the first track corresponds to the original drum loop. The following tracks represent each pitch (in this case, an instrument of the drum kit). By assigning each instrument on a different channel, you can assign different MIDI effects to each piece of the drum kit while still using only one instance of the VSTi. This also allows you to render each MIDI track as a separate audio track so that each drum instrument can be treated independently.
Figure 11.7. An example of a dissolve by separating pitches.

How To
To dissolve a MIDI part:
-
Select the MIDI part you want to dissolve.
-
In the MIDI menu, select the Dissolve Part option.
-
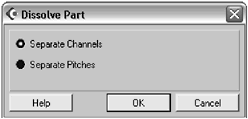
If you have more than one MIDI channel embedded in the selected part, Cubase offers you two choices: Separate Channels or Separate Pitches (see Figure 11.8). Select the appropriate option. On the other hand, if there is only one MIDI channel in the selected part, you can only separate pitches.
Figure 11.8. The Dissolve Part dialog box.
-
Click OK to continue.
Note that the original track is automatically muted after being dissolved.
O-Note Conversion
The concept of O-Note is directly related to drum maps; this function only becomes active when a MIDI part associated with a drum-mapped MIDI track is selected. Drum maps use three specific note names to identify a drum instrument: the pitch, the I-note (input note), and the O-note (output note). The pitch is associated with a drum instrument and cannot be modified. So a C1 can be associated with a kick drum, for example. The I-note is the note you play on your MIDI keyboard interface to trigger a specific instrument. In practice, playing a C1 note should trigger a kick drum because that's what is loaded. The O-note is the note sent out by the drum map. In theory, the I-note and the O-note are usually the same.
Why all these note names? Well, sometimes, you might want to reorganize which note triggers which instrument in order to lay out the drum kit more efficiently on your keyboard. This can make it easier, for example, to play a drum part on notes you are accustomed to using. That's when you start playing with the drum mapping, changing the I-note and O-note values. As long as your MIDI part plays this drum, you are fine, but if you want to convert this to a non drum-mapped track in order to export your file as a MIDI file, you need to convert the drum map appropriately so that the sound you hear corresponds to the output note played by the drum map. And that's when you need to use the O-note Conversion tool. This basically converts the MIDI note number values into whatever O-note mapping you have made, allowing you to play the part as a regular MIDI track while still hearing the appropriate sounds played by the drum kit it was meant for.
How To
To perform an O-note conversion:
-
Select the MIDI part(s) associated with your drum map that you want to convert.
-
From the MIDI menu, select the O-Note Conversion option.
-
A warning message might appear; click Yes if you want to proceed anyway or Cancel if you are not sure this is what you want to do.
About MIDI Functions
The MIDI functions in the MIDI menu play a similar role to the MIDI track parameters. However, there are different reasons that would motivate you to use a MIDI function rather than a setting in the track parameters. For example, track parameters affect all events (parts) on a given track, whereas MIDI functions can be applied to selected parts in the Project window or selected events in a MIDI Editor window. Another example is that parameter settings do not show up in the MIDI Editor, whereas MIDI functions actually change the appropriate value in the MIDI message, making it visible in the MIDI Editor. In other words, if you want to try things out before committing to them, you can use the track parameters, but when you want to affect or change the MIDI events permanently, you are better off using the MIDI functions found in the MIDI menu.
In the MIDI Functions option found in the MIDI menu, you will find a submenu containing various functions. Most of these functions are self explanatory. For example, Delete Doubles deletes any MIDI events that are doubled (two notes playing at the same time and at the same pitch). Some of these functions display a dialog box, whereas others perform their task without needing additional input.
How To
To use a MIDI function:
-
In the Project window, select the parts you want to edit using the MIDI function, or double-click the MIDI part and select the events you want to edit if you don't want to affect all the events in the part.
-
From the MIDI menu, select the MIDI Functions option and then the appropriate MIDI function you want to apply.
-
Change the values needed in the dialog box if one shows up and click OK to complete; otherwise, the function is automatically applied.
| [ LiB ] |