Sample Editor
| [ LiB ] |
Sample Editor
The Sample Editor is the default editor associated with audio events and regions. It allows you to perform many types of editing tasks in a nondestructive environment. It is in this editor that you can create regions within an event or process an event by using offline processes and effects. You also use the Sample Editor to work with hitpoints.
Hitpoints are special markers that you can add to an audio event, which allow you to create audio slices representing individual beats in the event. After you have created slices from hitpoints, you can use the event in the project and change the tempo of this project without affecting its pitch, or use the timing of the audio event to determine the tempo of a project. You can also use this timing to create a groove map that can be applied to other audio or MIDI events through the Quantize Setup panel.
Sample Editor Areas
The Sample Editor is divided into two areas (see Figure 9.10): the Sample Display area (on the left in the figure) and the Region Display area (on the right in the same figure). It also displays a number of bars similar to the other editors: the toolbar, the Sample Overview bar, the Status bar, the ruler, and the Level Scale bar.
Figure 9.10. The Sample Editor window.
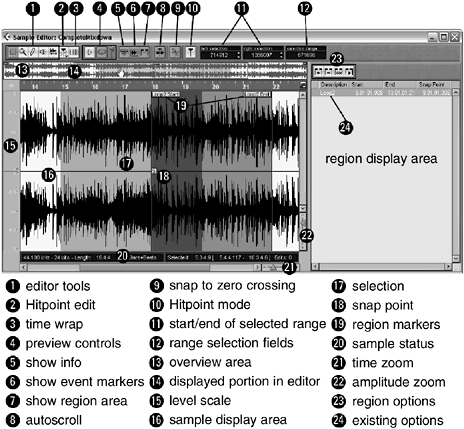
The first five buttons in the toolbar are used to perform different operations in the editor, such as selecting a range, zooming in or out, editing the waveform, performing audio playback, or scrubbing. We'll discuss these tools later on as we talk about the operations available in this window. Following the sample editing tools is the Hitpoint Editing tool, which is a multifunction tool button allowing you to edit hitpoints when you are in Hitpoint mode.
The Play and Loop buttons have the same properties as in the Pool window. The small fader next to the Loop tool allows you to control the preview level when playing an event inside the sample editor. Note that this level does not affect the level of an event in the project window.
The Show Info button will display information below the waveform display area about the clip or event being edited. You can change the ruler format affecting the type of values represented in this bar by selecting a different format in the Ruler Format menu or where the current format is displayed in the info bar itself. The button to the right of the Show Info button allows you to show or hide the audio event's boundaries if this event is used in the project window. Clips found in the Pool that have not been used in the project window (therefore, no actual event has been created) will cause the Sample Editor to not display this button. When you open an event by double-clicking on it in the project window, this Show Event Borders button will appear in the toolbar. If, on the other hand, you load an event by double-clicking on it from the Pool window, this button will not be visible. When visible, you can use the special event border markers to alter the start and end points of an event inside the Audio Part Editor. The last button in this trio allows you to show or hide the regions' management portion of the Sample Editor window. This area will display information on regions currently associated with an audio clip or event, as well as allow you to create, remove, rename, select, edit, or preview regions.
How To
To edit the start and end of an event in the Sample Editor:
-
In the toolbar, activate the event border display.
-
Select the Range Selection tool in the toolbar.
-
Click the start or end event point marker and drag it in the desired direction. For example, moving the start point to the right shortens the event and moving it to the left lengthens it. Note that you can't extend these markers beyond the limit of the audio clip the event refers to.
Changing these markers also affects the event as it appears in the project window.
Using the Show Regions button reveals the region area as shown in Figure 9.10 and also displays region markers if there are any. This area allows you to create a region from a selection in the Sample Display area, remove an existing region, select the highlighted region in the Sample Display area, and play the highlighted region. If the Region Display area is not visible, you can use the Show Region Display Area button in the toolbar of this window. Unless you have recorded audio in Cycle mode with the Create Region option, events do not normally contain any regions when recorded or imported. It is through editing options or preference settings that regions are created, or, as we see later in this chapter, through the Sample Editor's Region Display option buttons.
The Autoscroll button, located by default to the right of the Show Regions button, has the same property as it does in the project window.
The Snap to Zero Crossing button will force any selection you make to move to the nearest zero crossing. Enabling this function is a useful way of making sure that regions you create or process will not begin or end with a portion of the audio not crossing at zero percent amplitude (silence). This helps in preventing clicks, pops, and other audio glitches from occurring due to jumps in audio amplitudes at the beginning or end of a region. You will find more on this later in this chapter.
The next button and the subsequent fields in the toolbar are related to hitpoints, which are described later in this chapter.
The Overview area displays a thumbnail view of the current event loaded in the Sample Editor. You can have only one event loaded in this editor at a time, so this overview displays only one event or several regions defined in this event.
The Sample Display area displays one or two channels of audio, depending on the event's configuration (mono or stereo). With Cubase SX, the Sample Editor will also display surround formats with up to six channels. The waveforms are displayed around a zero axis at the center of each waveform and displayed in the level scale on the left of this area. Each lane splits the waveform in two halfway lines above and below the zero axis line. You can customize the elements displayed in this area by right-clicking (PC)/Ctrl-clicking (Mac) in the Sample Editor, selecting the Elements option at the bottom of the context menu, and checking or deselecting elements found in this submenu. You can also change the level scale representation from percentage to dB display, or decide to hide the level scale altogether by right-clicking (PC)/Ctrl-clicking (Mac) in the level scale area itself (at the top, to the left of the ruler bar) and choosing the appropriate option in this context menu.
Basic Editing Functions
It goes without saying that the Sample Editor allows you to cut, copy, and paste audio data inside the Sample Editor. These basic editing functions are similar to any other type of application. For example, cutting and pasting audio can be summed up in four basic steps:
-
Select what you want using the Range Selection tool.
-
Apply the desired function, such as Cut or Copy, from the Edit menu.
-
Position the cursor to place the content of the clipboard if you want to paste what you have just cut or copied .
-
Paste the content using the paste command in the Edit menu [Ctrl+V (PC)/
 +V (Mac) are the default key commands].
You can also insert silence within an existing audio clip. This might be useful when you want to add pauses between specific audio content.
How To
To add silence in an audio event:
-
With the Range Selection tool selected, drag a selection box over the area where you want to add silence.
-
Adjust the start and end point if needed by dragging the edge of the selection.
-
Select Edit > Range > Insert Silence [this is also available in the editor's context menu or by pressing Ctrl+Shift+E(PC)/
 +Shift+E(Mac)].
Working with Regions
Regions allow you to define portions within an audio event that you can reuse several times in a project. For example, you could create regions from a 16-bar groove played by a drummer , naming each region appropriately: intro, beat, break, fill, ending. Then you can drag the region from the Region Display area in the Sample Editor into the project window, just as you did when dragging objects from the pool into the project window.
How To
To create a new region:
-
With the Range Selection tool, click and drag over the area in the Sample Editor that you want to include in the new region. At this point, you don't need to be precise.
-
When you have a good idea of the range, right-click(PC)/Ctrl-click (Mac) and select Zoom > Zoom to Selection. This allows you to view your selection close up. Note that the selection appears in a light teal color , whereas a selected region appears as a darker shade of teal because a region is usually displayed in a darker shade of gray.
-
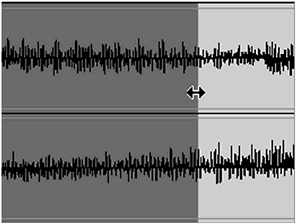
You can edit the start or end of your selection to fine-tune the region by clicking and dragging the edges of your selection. When our cursor becomes a double-headed arrow (occurs when the cursor crosses one of the selection's edges), you can modify the selection without losing the selection (see Figure 9.11).
Figure 9.11. Fine-tune your selection by dragging the edges when the Range Selection tool displays a double-headed arrow.
-
Enable the Loop button and click the Play Preview button in the toolbar to hear the selection. Make any necessary modifications to your selection.
-
When you are satisfied with the selection, enable the Region Display area if you haven't done so already.
-
Click the Add button.
-
Type in a name in the Name field for your new selection.
NOTE
 USING THE SNAP TO ZERO OPTION
When you are making a selection, it is a good practice to keep the Snap to Zero Crossing button enabled. This option makes sure the amplitude of the audio signal is at its lowest possible value (zero percent or minus infinity when displayed in dB), reducing the chances that glitches might occur during playback due to an abrupt change in amplitude. When this option is enabled, you will notice that your selection might skip over areas in the Sample Display area because Cubase cannot find a proper zero crossing in that portion of the audio.
How To
To modify an existing region:
-
Click in the column to the left of the region you want to edit in the Region Display area. This column does not have a name, but allows you to move the Sample Display area to the area of this region.
-
Click the Select button. The region's start and end markers appear.
-
Right-click(PC)/Ctrl-click(Mac) and select Zoom > Zoom Selection to center the selection in the display area.
-
With the Range Selection tool, drag the region's start or end point to the new desired location.
You can also change the start and end location numerically by changing the values manually in the Start and End columns in the Region Display area.
How To
To add a region to a project from the Sample Editor:
-
Click in the empty column to the left of the Description column in the Region Display area and drag the region to the desired location in the project window.
About the Snap Point
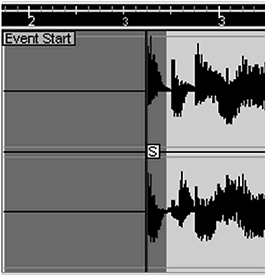
The snap point is to audio what the Note On time is to quantizing. Because audio events or regions don't necessarily begin at a specific quantize value, you can change the location of the sensitive area that is used to snap to the current quantize grid. This is called the snap point and is displayed as a blue line with an S in a box found in its center. In Figure 9.12, you can see that the event begins earlier, but the actual audio occurs later in time. If this corresponds to a strong rhythmic division, you can move the snap point to this location. When moving the event on the track in the project window or in the Audio Part Editor, the object snaps to the grid using this location rather than the event start position. If you don't change this, by default, the snap point is placed at the event start point.
Figure 9.12. Example of an audio event's snap point.
How To
To edit the snap point's position:
-
Open the event or region in the Sample Editor.
-
Make sure the audio event elements are visible in the window. If not, select Elements > Audio Events from the editor's context menu.
-
Zoom to view the current snap point and the place where you want to place it.
-
For more precision, you can use the Scrub tool or the Play tool to find the exact place where the snap point should go.
-
Click and drag the S (in the box on the snap point line) and move it to the appropriate location.
Working with Hitpoints
In Cubase, the main purpose of hitpoints is to define individual beats in a rhythmic part and use the location of these special markers to slice up this part into separate beats, replacing a single audio event by a series of audio slices in an audio part.
Let's take a look at Figure 9.13 as an example. Here, we have the same drum beat played in three different ways. Although there are four representations of this beat in the figure, the original beat never changes speed when played at different project tempo values. It stays constant and the number of bars it covers at different tempo values varies because the number of bars passing when the tempo is higher also increases . The upper portion of both pairs represents the sliced version of the same beat. As you can see, in both cases, the part ends at the beginning of Bar 2, whereas in the original version, it ends after Bar 2 when played slower and before when played faster.
Figure 9.13. Using sliced parts instead of original audio at various project speeds.
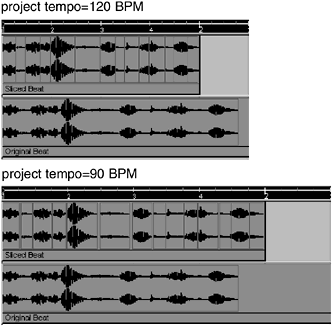
The same drum beat has been placed on two tracks: in the upper track, a sliced version of the beat and on the lower track, the original version. A screenshot was taken while the project was set at 120 BPM (upper couple of tracks) and another at 90 BPM (lower couple of tracks). Notice how the sliced version in both tempos ends at the beginning of Bar 2, whereas the original content spreads across Bar 2 when the tempo is at 120 BPM and doesn't reach Bar 2 when the tempo is set at 90 BPM. That's because slicing up the beats creates a snap point at the beginning of each, which follows the beat position in the bar/beat grid.
Another useful way of using hitpoints is when you have an audio segment for which you want to determine the exact speed. Because hitpoints allow you to identify beats within an audio sample, it also calculates the tempo value automatically after you tell Cubase how many bars and beats are included in the selection.
Using hitpoints works best with audio content with strong attacks. You can still get tempo values out of sustained material, but the result this produces when you change the pitch can be disappointing.
Creating Hitpoints
The best way and main purpose of working with hitpoints is to load a drum beat or rhythmic content in the Sample Editor. Hitpoints are created in Cubase by detecting attack transients that are characteristics of beats in an audio file. Thankfully, you don't need to do all of the calculations alone. This said, to get the best results, you will need to fine-tune the results you get from Cubase and also make sure that your audio content is appropriate for hitpoints. For example, audio with well-defined drum beats with high peaks and low valleys works better than sustained material. Also, drum beats that have lots of effects, such as reverb or delay, will be harder to slice accurately.
How To
To create hitpoints:
-
Open the audio event to which you want to add hitpoints in the Sample Editor. You can open an event from the pool or the project window. If the event is inside a part, this opens the Audio Part Editor; double-click on the event from the Audio Part Editor to open it in the Sample Editor.
-
If the area in which you want to create hitpoints for is shorter than the event itself, start by selecting a range that defines a clear, loop-friendly beat, such as a one, two, or more bar segment.
-
Preview the selection by enabling the Loop option and clicking Play in the Sample Editor.
-
Adjust the start and end position of the selection if you have created one; otherwise , you don't need to adjust any selection.
NOTE
 FIGURING OUT THE LENGTH OF A LOOP
 Try counting how many bars and beats are in your selected looped segment, if you can feel the beat subdivision; for example, the HiHat might play sixteenth notes. You can use this as your hitpoint quantize value later. It will also be helpful in telling Cubase how many bars and beats are in the loop.
-
Enable the Hitpoint mode from the window's Toolbar button. If this is the first time you enable this button with the current audio event inside the Sample Editor, Cubase will ask you a few questions on the audio content.
-
Check the Use level scan (detect normalized) because this will improve the chances of getting an accurate slicing of your audio loop.
-
Check the Adjust Loop if you can help Cubase find the appropriate hitpoints by entering the information in the fields below. If you are not sure about the values that need to be entered in these fields, skip to Step 11.
-
Set the Maximum number of bars value. The Maximum bars represents the number of bars you counted in the loop selected. If, on the other hand, you want to use only the first bar in a four-bar loop, for example, setting a maximum bars to "1" will tell Cubase you want to create slices only for the first bar.
NOTE
 CREATING GROOVE QUANTIZE TEMPLATES
 You can create Groove Quantize templates from the timing information Cubase extracts from a sliced audio loop. You can then apply this Groove Quantize template to other audio or MIDI events. This said, to create a Groove, you can use only 1-bar drum patterns. If your audio content is longer than one bar, you should enter 1 in the maximum bar number, making sure that the groove you are trying to capture as a template is in that first bar. If not, you should select the bar you are targeting for the Groove Quantize.
-
Set the beats value from the drop-down menu. This does not affect the bar count, but rather which beat subdivision will remain as hitpoint slices. You can change this value later on if you are not sure, but chances are, the 1/16 value will work in most cases. With smaller beat subdivisions, you will get more slices, and vice versa.
-
The Minimum and Maximum BPM fields will help Cubase determine the right tempo. The smaller the range, the more precise this approximation will be.
-
Click on the Process button. Cubase will calculate the hitpoints for your audio segment, adding them along with the waveform display. The spacing between each hitpoint depends on the settings you included earlier, the sound itself as well as the beat subdivision value. The ruler also displays a special selection corresponding to the maximum bar length you set in Step 8 (see Figure 9.14).
Figure 9.14. The hitpoint fields on the Sample Editor toolbar appear when the Hitpoint mode is enabled.

-
If there are too few hitpoints for the number of beats in your looped segment, increase the hitpoint sensitivity slider value by sliding it to the right. Move this slider slowly until you've reached a satisfactory number of hitpoints. On the other hand, if you have too many hitpoints, move the slider to the left to reduce the number of hitpoints.
At this point, it is possible that each portion found between hitpoints represents a beat perfectly . Clicking on the Speaker button will allow you to hear the sound between two hitpoints individually by clicking anywhere between these two hitpoints. If each portion sounds like a beat without clicks or noticeable glitches at the beginning or the end, you are ready to create audio slices or a Groove Quantize template from the hitpoint's locations. However, in most cases, you will need to fine-tune the hitpoints before you do so.
Editing Hitpoints
You can move, erase, or create new hitpoints manually when in Hitpoint mode. The best way to move a hitpoint to an appropriate location or to create a new one is to zoom into the audio display area in order to properly position your hitpoint. When you preview a slice, it is important that each slice (space between two hitpoints) contains only one "hit," such as a kick, snare , or combination of instruments on the same beat subdivision. It is also important that the end of the slice does not end in a glitch. This is usually the case when the next hitpoint arrives just after the next sound has started, picking up that sound's attack transients at the end of the slice.
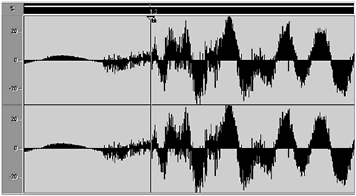
If you look at the example in Figure 9.15, you will notice that the hitpoint occurs directly on the beat. The instrument will probably sound like it does also because its peak is heard around this area as well, but as you can also notice, the attack begins before the hitpoint location. This causes the previous slice to play the beginning of the attack for the next slice, resulting in a glitch-like sound at the end of the slice. Moving the hitpoint a bit to the left, in this case, prevents this glitch from happening even if it means placing the hitpoint slightly before the quantize value. This only adds to the feel of the beat itself. We see how you can create a groove map later on, using the hitpoint locations as the template for this groove.
Figure 9.15. The hitpoint is placed at a quantize value, but the sound begins before the quantize value.
How To
To move a hitpoint:
-
Enable the Snap to Zero Crossing button on the toolbar. This will restrain your movement to areas in the audio where the audio is silenced, reducing the risk of clicks and glitches at slice edges.
-
Zoom into the area you want to edit.
-
Select the Move Snap button from the Hitpoint tool. This button has three functions: Disable, Lock, and Move. Note that you can also move the hitpoint by using any other tool, except the Draw tool, by clicking and dragging inside the little triangular -shaped handle at the top of each hitpoint.
-
Click the hitpoint's handle and drag it to the desired location.
-
After you are satisfied with the location of this hitpoint, you can lock it.
-
Repeat this operation for other hitpoints, if necessary.
Locked hitpoints can be moved, but they remain visible if you choose to change the sensitivity slider later.
In some cases the current hitpoint sensitivity slider works well, but it skips specific points where an attack hit can be heard. When this is the case, you can add hitpoints manually.
How To
To insert a hitpoint manually:
-
Enable the Snap to Zero Crossing button on the toolbar.
-
Zoom into the area you want to edit.
-
Select the Draw tool from the toolbar.
-
Click at the location at which you want to add a hitpoint. If you hold your mouse button down as you add the hitpoint, you can position it exactly where you want it if the original location isn't exact.
On the other hand, sometimes there are too many hitpoints around a certain area. That's when you need to manually remove a hitpoint. Here's how you do this.
How To
To remove hitpoints:
-
In the Hitpoints tool, select the Disable Hitpoints option.
-
Click the hitpoints you want to remove (disable).
Now that you have created hitpoints and fine- tuned their locations, as well as made sure all the hitpoints correspond to actual attack hits, you need to create either slices or a groove quantize template. Hitpoints by themselves only mark where the slices or quantize values should be. They also help in telling you what the original tempo of the selected segment is in the Sample Editor's toolbar. Besides that, hitpoints will have no effect on the audio file later on if you decide to change the tempo of the project.
Creating and Using Audio Slices
After you've created hitpoints and are satisfied that each hit in your drum loop or rhythmic content is identified correctly with a hitpoint, you need to create the audio slices that will be used in the project window. Slices are similar to small regions, but are not handled as regions by Cubase in the sense that a sliced event does not display a number of corresponding regions in the pool as does an event with regions, as described earlier in the "Working with Regions" section.
How To
To create audio slices:
-
This requires that you have previously created hitpoints and have properly positioned your hitpoints in the selected audio event.
-
While the Hitpoint mode is still active, select Advanced > Create Audio Slices from the Audio menu (or the editor's context menu).
To use the sliced loop, you can drag a sliced object from the Pool window to an Audio track in the project window. When you place a sliced event on an Audio track, an audio part is automatically created with the corresponding slices inside this part. From this point on, when you want to edit the slices in the part, the Audio Part Editor opens. This allows you to move the slices around in the part, apply a different quantize setting, or reorganize your loop to create variations of it.
After you've placed a sliced event on a track, you might notice that changing the tempo to a value lower than the original tempo of the loop might create audible gaps between each slice. You can solve this problem by using the Close Gaps function available in the Advanced submenu of the Audio menu. This function can also be used in other instances; however, this is probably the best use for it. As Figure 9.16 displays, the small gaps that occur between each slice are removed after Cubase time stretches each slice to compensate for the missing audio content. Note that extensive use of this over large gaps alters the sound quality of your audio content, so you should use this function on small gaps only.
Figure 9.16. A before and after look at how the Close Gap function affects slices.

How To
To close gaps between slices in a part:
-
Select the audio part(s) in the Audio Part editor.
-
From the Audio menu, select the Advanced > Close Gaps option.
Creating and Using Groove Maps
When creating hitpoints in a drum loop, you are placing markers where important beats and beat subdivisions occur in this loop. By doing so, you are, in essence, creating a rhythmic blueprint that holds the rhythmic feel of your loop and this can be applied to other audio or MIDI events through the Quantize Setup panel. This rhythmic extraction is called a Groove Map or Groove Quantize .
How To
To convert hitpoints into a groove map:
-
Create hitpoints in an audio loop as described earlier in this chapter.
-
When satisfied with the result, from the Advanced submenu found in the Audio menu, select the Create Groove Quantize option.
Note that this works better if you use at least one slice per eighth -note; otherwise, your map will be very coarse and will only affect events on beats.
How To
To apply a groove map to events:
-
Select the events you want to quantize. This can be in the project window, the MIDI Editor, or the Audio Part Editor.
-
Press the default Shift+Q key command to bring up the Quantize Setup panel, or select Quantize Setup from the MIDI menu.
-
Click the Presets drop-down menu and select the corresponding quantize groove. By default, the groove map is given the name of the event used to create it. You can, however, rename it by selecting the preset, double-clicking on the name in the Preset field, and typing a new name for it.
You see how the events will be quantized by looking at the quantize preview display in the center of the Quantize Setup panel.
| [ LiB ] |