The Pool
| [ LiB ] |
The Pool
The Pool is the audio and video file managing window, and it is similar to Windows Explorer or Apple Launcher (see Figure 9.1). All references to audio clips that were recorded or imported into a project are represented in the pool. Each project has its own pool, which can be saved separately and have its contents imported into another project. You may also open more than one pool in a single project, allowing you to share pool resources between projects. The pool also allows you to view your audio clip references (called events ) and corresponding regions . You can use the pool to monitor, update, and manage these references.
Figure 9.1. The Pool window.
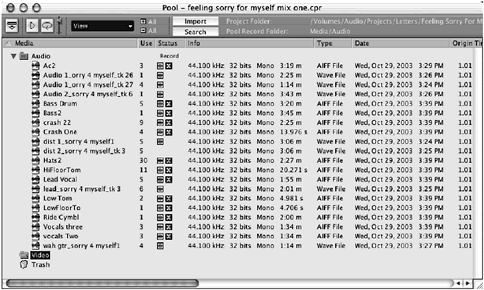
You will find three default folders in the pool: the Audio, Video, and Trash folders. You can create any number of additional subfolders within these folders, but you can't rename or delete them.
There are many ways to access the Pool window as seen in Chapter 2. The simplest method is to use the Open Pool button on the project window's toolbar.
The Pool Areas
The pool is divided into two main areas: the toolbar and the main display area. A third, less obvious but very important, area of the pool is its menu options, found under the Pool menu and through a right-click (PC)/Ctrl-click (Mac). Most of the operations other than monitoring audio objects are done through this menu.
To the left of the toolbar is the Information bar button. Enabling this button reveals the Information bar at the bottom of the pool where you will find the current status information of your pool.
The two buttons to the right of the Information bar button can be used to hear a selected event or region found in the Media column below. The Play button starts playing the file and the Loop button ( next to it) loops the playback. To stop the playback, you can click the Play button again.
The View field allows you to select which column is displayed in the pool below. There are a total of nine information columns available. Adding a check next to a name (by selecting it in the View drop-down menu) adds this row to the columns displayed in the pool. Selecting the Hide All option hides every column to the right of the Media column.
Next to the View field are two little buttons displaying plus (+) All or minus (-) All. As in Windows Explorer or Apple Launcher, this allows you to expand the tree found under the Media column. When a plus sign appears to the left of an object, it means that there are other objects inside this one. This could be regions inside an event, events inside a folder, or objects inside one of the three default folders if you've minimized the displayed content using the minus all button.
The Import button allows you to import media files from your hard disk into the pool. You can use this button to import any media format supported by Cubase.
How To
To import media files into the pool:
-
Click the Import button in the pool.
-
Browse the hard disk to find the location of the file you want to import. After a file is selected, you can preview it by using the Play button found below the File Display area in the Import Options dialog box.
-
Select the file and click the Open button to import it to the current pool.
-
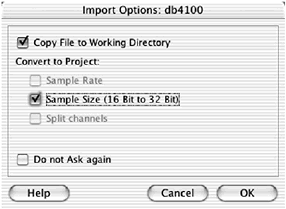
If the file you want to import is not currently in the Audio folder of your project, Cubase prompts you to select different import options (see Figure 9.2). If the file you want to import does not correspond to the current project sample rate and bit depth, you are asked if you want to convert these files. Remember that in order to use a file in your project, it has to have the same sample rate as this project. On the other hand, you can have different word lengths (number of bits used by each sample).
Figure 9.2. The Import Options dialog box.
-
Click OK when you have finished making your selections. This adds the current file or files to your pool.
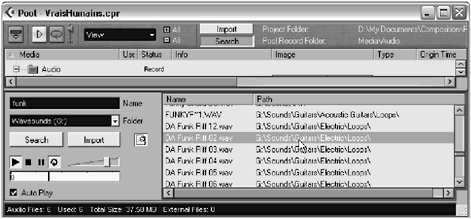
The Search button, found below the Import button, allows you to search the content of hard disks to find files you might want to import in your project. Clicking this button opens the Search panel at the bottom of the pool. This interface is similar to any search tool on your computer. It allows you to enter a name of a file you want to search for or use wildcard characters to find multiple files containing specific strings of characters (see the example in Figure 9.3).
Figure 9.3. The Search panel found in the pool when the Search function is activated.
How To
To search for files you want to import:
-
Click the Search button in the Pool's toolbar.
-
In the Name field of the Search panel, type in the name of the file you want to find. You can use wildcard characters to widen your search criteria.
-
In the Folder field, select the drive or drives you want to look in or select a specific path to look in at the bottom of the drop-down menu.
-
Click the Search button. The search results appear in the list to the right.
-
Check the Auto Play check box if you want to automatically preview the files found by the search. To preview a file, select it in the list. If the Auto Play option is not activated, you can click the Play button below the Search button in this panel. You can also adjust the level of the preview by using the preview level fader.
-
To import the selected file or files, click the Import button.
-
Cubase brings up the same Import Options dialog box as when you use the Import button in the toolbar. Make the necessary selections and click OK to import the files to your pool.
To the right of the Import and Search buttons, you can see the project folder's path and its associated Pool Record folder. By default, the Pool Record folder is found inside the project folder and is called Audio . This allows you to easily create a backup file of your project, including the media files associated with it.
Directly below the toolbar, above the columns, you will find column headers for each column in the pool. You can use the column headers to sort the information the column holds by clicking on the header. This adds a little arrow pointing up or down depending on the sorting order, next to the column's header, indicating that this column is used for sorting purposes. You can also use the column headers to change the columns' order by dragging the header horizontally to a new location. The header is inserted to the right of the column found on the left edge of the header's border when you drag it.
Understanding the Information
The Media column displays the names and types of media used in the project, as well as folders that you might have created inside the pool to organize your media files. You will find three types of icons displayed next to the name (see Figure 9.4); these represent an event object, a region object, and a sliced event object. Region objects are positioned under the event object it refers to. You can click on the plus sign to expand an event object to reveal its defined regions.
Figure 9.4. Icons associated with different objects in the Pool window.

How To
To rename objects in the pool:
-
Select the object you want to rename. A light blue box appears around it.
-
Click again to make the blue box change into a frame as shown in Figure 9.5.
Figure 9.5. Renaming an object in the Pool window.

-
Type in the new name for the object.
The Used column displays the number of times the object in the row appears in the project. In other words, how many times you've used it. Objects that aren't used in the project have no value in this column. You will notice that used sliced objects are incremented by the number of slices found in the object every time you repeat, copy, or duplicate the corresponding part in the project window. For example, if your drum loop is divided into eight slices, the Used column displays sixteen if you used this object twice in the project (thus creating two parts ), even if these are shared copies of the same object.
The Status column offers information on the status of the objects inside your pool. The following table describes each icon's meaning in this column.
Table 9.1. Understanding the Status column's icons
| Icon | Its Meaning |
|---|---|
| | Represents the content found in the pool's record folder; found next to the Audio folder. If you create a folder in the pool, you can click in the Status column next to this folder to make this the new record folder. Subsequent recordings appear under this folder. This does not create a new folder on your hard disk, but helps you manage the appearance of your files in the pool. For example, you could create a folder for a vocal session called "Vocals." By clicking in the Status column next to this folder, the record moves next to it, and all recordings made from this point on appear in this pool folder. |
| | Represents events that have been recorded since the last time you opened the project, making it easy to find newly recorded material. |
| | Represents events that are not located in the pool record folder. These events might have been imported from another location on your hard disk. This occurs when you have not selected the Copy to Project Folder option when importing them. In other words, if you were to save your project's folders, these files would not be included, unless you use the Prepare Archive function described later. |
| | Represents events that have been processed offline. In other words, there are some references made to both the original clip and the portions that have been processed and saved in the Fades or Edits subfolders found in your project's folder. |
| | Represents files that have not been found when loading the project. You can use the Find Missing File function to scan these missing files. This is explained later in this chapter. |
| | Represents files that have been processed in some way by using offline processes or effects and for which some of the processed portions have been lost or misplaced. Cubase displays this indication in the Status column when it can reconstruct the missing portions. |
How To
To create a folder in the pool:
-
In the Pool window, select the Audio or Video folder or another existing folder, depending on where you want your new folder to appear.
-
Right-click (PC)/Ctrl-click (Mac) and select the Create Folder option. You can also find the same option in the Pool menu.
-
Name your folder appropriately.
The Info column displays one of two things: either the file format and length details or a region's start and end locations.
The Image column displays a graphical representation of the event or the region within the event's boundaries. You will notice that all the events have the same length; however, Regions are represented as a proportion of this length. You can quickly preview the content of an object by clicking on its image representation.
How To
To preview an audio object using the Image column in the Pool window:
-
To begin playback, click anywhere in the image. Playback occurs from the point you clicked until the end of the object or until you stop the playback.
-
To skip to another portion of the same object, click approximately where you want to hear in the display before the preview ends.
-
To stop the playback, click beside the Image column next to the image, or click the Play Preview button in the toolbar.
-
To loop the playback, click the Loop button in the toolbar. The object loops from the point where you click in the image to the end or until you stop the playback.
The Path column displays the path to the original clips (audio files) on your hard disk. Note that processed files refer to a different file, but this is not displayed in the path. This measure is taken to ensure that you don't even have to think about the fact that additional files are created when you process a portion of the audio by using an offline process (not real time).
The Date column tells you when the clip was originally created.
The Origin Time column corresponds to the original position in time where this object was placed or recorded in the project. You can change this time directly in the column. Doing so may become useful because you can use the origin time or the locator time as a point of insertion when using the Insert Into Project option found in the Pool menu (or context menu). This function allows you to insert a selected object at the origin or cursor location.
How To
To insert an object at its origin time or cursor location in the project:
-
Select the Audio track in which you want to insert the object in the project window. If you want to insert the object by using the cursor location, position the play cursor at the desired location.
-
In the Pool window, adjust the origin time value appropriately by typing the new value in the object's row or by using your mouse's scroll wheel to adjust the values for the time. You don't need to adjust the origin time if you are using the cursor location option.
-
Select the Insert Into Project > At Origin or At Cursor option in the Pool menu.
The Reel Name column represents the physical name given to a reel or tape from which the media was originally captured when you are working with imported OMF files, as this information may be included as part of the file format. If you are not using imported OMF files, you will not need to concern yourself with the Reel Name column.
Pool Functions
Generally speaking, the pool is not something you worry about or use the most at the beginning of a project. When your project is taking shape, you will probably also want your pool to take shape by organizing it and using it as an effective "pool" of audio/video source material.
We've already discussed certain managing functions related to the pool through the creation of folders in which to put additional media objects, or renaming existing objects. Let's take a look at other typical pool functions.
Dealing with Missing Files
When you save your project and reload it later, Cubase may not be able to find files it used in this project. You might have deleted them by mistake, or intentionally deleted them because you didn't need them anymore, but forgot to update your pool before saving it, so the reference to a missing file still exists. This section discusses different situations that can occur and how to deal with them.
When references to files are found, but the files themselves are not found in the specified folder (as might occur if you moved the files since you last saved your project, or if you renamed the files outside Cubase), you can use the Find Missing Files option from the Pool menu. Missing files are identified with a question mark in the Status column.
How To
To find missing files in the pool:
-
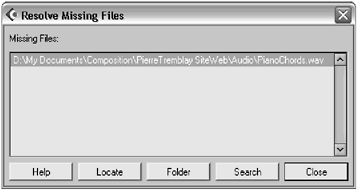
From the Pool menu, select Find Missing Files. The Resolve Missing Files dialog box appears (see Figure 9.6).
Figure 9.6. The Resolve Missing Files dialog box
-
If you want to locate the files yourself, click the Locate button. If, on the other hand, you want Cubase to attempt to find them, click the Search button. If you want Cubase to look for them in a specific folder, click the Folder button and choose the desired folder.
-
Depending on the option selected in Step 2, you are offered different solutions or results. However, if you have chosen the Search option, a new dialog box appears, allowing you to change the name of the file you are looking for. This might be helpful if you remember renaming the file after saving it with the project. Simply enter the new name in the appropriate field and then click the Start button to begin the search process.
-
If the search successfully found the missing files, you need to select the file you want from the list displayed and accept it by clicking the Accept button. This updates the link to the file in your pool.
In the event that a file is missing, even after a search (or you don't want Cubase to keep referring to a file because you've erased it anyway), you can use the Remove Missing Files option from the Pool menu. This affects any object in the pool with a question mark in the Status column.
In some cases, a portion of a file that has been processed might become corrupt or missing, just like any other file. But because this represents a portion of an audio clip that's been processed, the actual settings or processing history is saved with the project file and available through the Offline Process History dialog box. Because this processing history is saved, you can reconstruct the missing portion of the processed audio clip by using the Reconstruct option in the Pool menu (see Figure 9.7). Cubase tries to reconstruct the processed portion using the original clip and the settings available in the Offline Process History dialog box. For this option to be enabled, the Status column of the object needs to display the word "reconstructible."
Figure 9.7. Cubase indicates clips for which portions of processed events are missing by displaying the word "reconstructible" in the Status column.

Optimizing the Pool
Many of the pool-related functions allow you to optimize the content of the clips it holds. When you are working on a big project, the pool can quickly get crowded and overwhelming. When you are editing, you don't want to worry about how the pool looks and how much space is used by your pool, until you start running short on space or get tired of looking for sounds in a pool that contains many useless audio clips at this point in the project.
We've already discussed how you can create folders to organize your clips. You can also drag and drop objects inside a folder to organize your files. When you delete events or Regions from the pool, they often end up in the Trash folder. This means that the files are still using space on your computer. You can use the Empty Trash option in the Pool menu to free up some of that hard disk real estate. When using this function, Cubase prompts you once again to make sure you really want to erase the files from the hard disk or only remove them from the pool (see Figure 9.8). If you choose to erase the files, you cannot get them back because this function can't be undone. This is one of the only ways from within Cubase that you can erase audio clips from your disk.
Figure 9.8. Cubase offers you a last chance to keep the files on the computer or completely erase them from your hard disk.

Besides the trash you've collected, there might be some files that were used at the beginning, but aren't being used any longer. If you don't need them, you can use the Remove Unused Media option in the Pool menu. This time, you are prompted to choose if you want to remove these files from the pool completely (the files are still on your hard disk) or just send them to the Trash folder. Note that if you remove them from the pool and don't need them, these files still take up space on your computer. It is, therefore, recommended that you always use the Trash folder as a transitional stage when optimizing your pool. When you are finished, empty the trash.
When you record a long segment that includes useless audio, you can create Regions, resize, or split the events in the project window to hide unneeded portions. However, this does not remove them from your hard disk. The Minimize File option in the Pool menu looks at your current project and produces new files (audio clips) for the audio portions of the selected object that are used in the project. This effectively removes unused portions from the original file on the hard disk and initializes the offline process history for this file. Before using this option, it might be advisable to consider another option available in Cubase that allows you to minimize the file sizes of all audio clips for your project. This can be achieved by using the Save Project To New Folder option in the File menu. This option allows you to save all the files referenced in a project, as well as the project file itself, to a new folder, minimizing the space used by the project. However, by doing this, you still have the original content in the original folder where you began the project. If you want to revert to this project at a later date, the files will still be there.
How To
To minimize file sizes in your project:
-
Select the files you want to minimize in the Pool window.
-
Choose the Minimize File option from the Pool menu.
-
When completed, Cubase prompts you to save the project so that the new file references take effect. Click the Save button.
Archiving and Exporting a Pool
When you want to save a backup of your project or use it in another studio, it is important that you have access to all the files that are used in the project. Saving the project using the Save command updates the project file, but chances are, you might have files that are in different folders or on hard disks inside your computer. When using the Prepare Archive option in the Pool menu or in the Pool's context menu, Cubase makes a copy of all the audio clips used in your project to the audio project folder, and it allows you to freeze all offline processes you might have applied to an audio file, which prevents you from having to copy the content of the Edit folder onto a backup disk. After this operation is completed, you can simply copy the project file, its Audio folder, and any video file referenced in the project to a backup CD, for example.
How To
To prepare a project for backup:
-
Select the Remove Unused Media option from the Pool menu.
-
Click the Trash button when prompted to choose between trashing and removing from the pool.
-
Select the Empty Trash option from the Pool menu.
-
Click the Erase button when prompted once again. This removes whatever files are not used in your project and erases them from your drive.
-
Select the Prepare Archive option from the Pool menu.
-
Because this is a backup, you can either opt to freeze the edits or not. If you choose not to, make sure to include the Edit folder on your backup media inside the project's folder.
-
Save the project file.
-
When you are ready to back up your files, be sure to include the project file, its Audio subfolder, and the video files you might have used with the project on the backup medium.
If you are in the final stages of a project and want to save a final version of the project files, you can do so by repeating the previous steps with the addition of a couple more steps to save only the necessary material. Before heading on to Step 3 from the previous list, you can use the Conform Files option from the Pool menu to change all audio files in your project. This converts all of your files to the current sample rate and word length set for your project. You can use the Minimize Files option, as described earlier, to reduce each file to the size it's actually used for in the project. Then proceed until Step 7 and use the Save Project To New Folder option in the File menu instead.
When working between projects, you might want to use the pool from one project in another project. This is possible through the use of the Export and Import Pool options, allowing you to save the status of objects in the pool and retrieve them from another project. Note that the pool itself does not contain the audio files because these are located in the Audio folder. But you can save the references, Regions, slices, and other pool-specific settings. Exporting a pool offers a great way to store drum loops and sound effects that have been edited. Whenever you want to use these sounds later on, all you need to do is import the pool into your current project.
How To
To export or import a pool:
-
Prepare your pool by making sure all your files conform to the project's format, removing or searching for missing links, and emptying the trash.
-
From the Pool menu, select the Export Pool option.
-
Type a name for your pool.
-
Click the Save button.
-
To import the saved pool inside another project, select Import Pool from the Pool menu.
Pool Interaction
Beyond the inner pool functions, you can also use the pool to drag events from it into the project window as shown in Figure 9.9. When you drag an object from the pool into the project window, the location of this object depends on two variables :
-
The snap and quantize grid settings
-
The position of the snap point inside the audio event or Region; because the snap point can be anywhere in the event, the event snaps the snap point to the closest grid line in the project window
Figure 9.9. Dragging a region from the pool into an Audio track in the project.
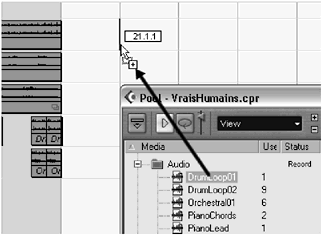
The location displayed above the cursor as you move the selected object over a track indicates the position at which the snap point or start point of this object will be placed (depending on the variables mentioned). When the blue line next to the cursor and location display the desired location, simply drop the object into place.
When you drag an object from the pool to the project window's event display area, below the last track, an Audio track corresponding to the event's configuration will be automatically created. For example, dragging a mono event will create a mono track while a stereo event will create a stereo track. However, if an existing event already exists on a track, make sure it has the same configuration as the event you are inserting. Although you will still hear a mono event on a stereo track and vice versa, controlling the amplitude and pan of this event might produce unexpected results.
You can also create a new audio file from a region in the Pool window by highlighting this region and then selecting the Bounce Selection option in the Audio menu. This prompts you to choose an appropriate folder for the new file. After you save, it is added to your pool as a new event.
Offline Processes in the Pool
When you apply any type of offline process (from the process, VST, or DirectX plug-ins) to an object inside the pool, this processing affects the entire object. For example, if you apply a delay effect to a region, the whole region is affected. If you want to apply a process to a portion of a region, use the Sample Editor instead. Offline processes in the Pool window can be viewed in the Offline Process History panel found in the Audio menu, as is the case with processes applied in the project window or Sample Editor.
How To
To apply an offline process to an object from the Pool window:
-
Select the object in the Media column.
-
From the Audio menu, select the desired process you want to apply.
-
Make the appropriate setting in the process' dialog box.
-
Click the process button.
| [ LiB ] |