Lesson 17: Modeling Lightning and an Electric Discharge
|
| < Day Day Up > |
|
In this lesson we will create simple electrical effects. There are several plug-ins that enable the creation of rather realistic and beautiful effects of this type. In this lesson, however, we suggest that you create these effects using only 3ds max's built-in tools.
Modeling Lightning
-
Go to the Front viewport and create a tree-like broken line (open polygon) that resembles chained lightning (Fig. 17.1, a):
-
Main menu à Create à Shapes à Line
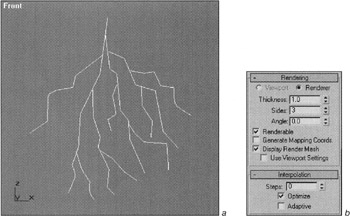
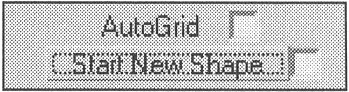
Figure 17.1: Geometry of the lightning (a) and its parameters (b)Tip To avoid subsequent joining of your lines, clear the Start New Shape checkbox in control panel.
-
-
Set the parameters as shown in Fig. 17.1, b.
Tip Make the curve renderable. Set the parameters in such a way as to make the line thin. Then select the Display Render Mesh checkbox. This is necessary because later we are going to apply the modifiers for editing mesh objects.
-
Apply the Slice modifier.
-
Position the modifier's gizmo at an angle normal for a thunderbolt (Fig. 17.2, a):
-
Right-click menu à Sub-object à Slice Plane
-
Right-click menu à Rotate
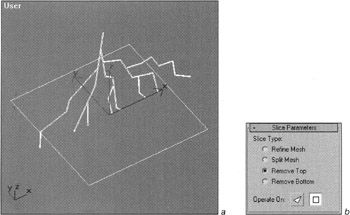
Figure 17.2: Positioning the Slice modifier's gizmo (a) and its parameters (b) -
-
Configure the modifier parameters to "cut off" the lower part of the bolt (Fig. 17.2, b).
Try to move the modifier's gizmo up and down. As you can see, the lightning "grows." That's the effect we need.
Now, before we proceed with animation, let's create some materials and adjust the settings.
-
Open the material editor by pressing the <M> key.
-
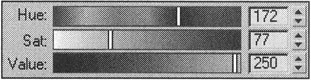
Create a bright-blue, self-illuminating material (Fig. 17.3).
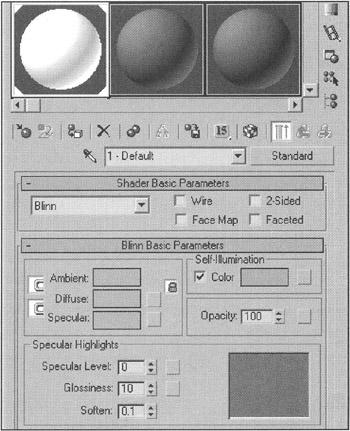
Figure 17.3: Material parameters for the lightning
| Tip | Set the bright-blue color for the Ambient, Diffuse, Specular, and Self-Illumination channels. You could merely set the Self-Illumination parameter to 100%, but doing this would make to the discharge non-uniform. Specify any number but zero for the effects channel (for example, 15). You'll use this setting to specify the illumination area (Material editor à Material Effect Channel). |
Now adjust the Glow parameter. We recommend that you do this in the Perspective viewport of the camera. (You need to create a camera, if you haven't done so already.)
Glow effects in 3ds max can be created by two methods: through rendering effects or through the Video Post module effect. We recommend that you use both methods.
-
Open the effects and add the Lens Effects to the scene:
-
Main menu à Rendering à Effects à … à Add à Lens Effects
-
-
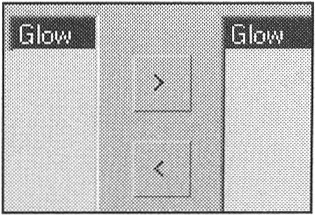
Select Glow from the list of effects and activate it by clicking the ">" button.
In Lesson 5, you created an effect for imitating the glow of the solar corona. The process of adjusting the lightning glow is similar, with a single exception — now we need to create a glow that will follow the object's shape. To do this, set the glow parameters as shown in Fig. 17.4.
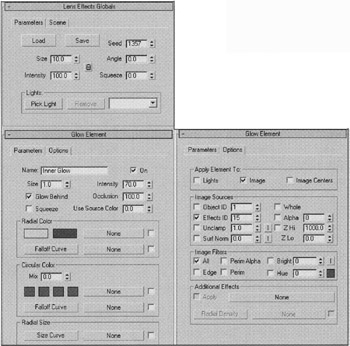
Figure 17.4: Parameters of the Inner Glow
| Note | We have renamed the effect Inner Glow. Later in this chapter we will explain why we did so. To make the glow follow the lightning shape, set the Image checkbox in the Apply Element To group. Make the value of the Effects ID parameter equal to the value of the similar parameter for the lightning material. Set the glow size so it produces a slight blur. To do this, set the Size parameters in the Lens Effects Globals and Glow Element rollouts. The first color in the Radial Color group must be bright blue. |
Thus, you have set the parameters. However, a single Glow element isn't sufficient. If the object has glowing contours, the parameters from the Radial Color, Circular Color, and Radial Size don't work (with the exception of the first color in the Radial Color group). Consequently, you'll have to create Glow elements of various sizes and intensities. You can create them yourself or use our settings that we have created. You can find our settings in the ![]() electric bolt.lzv file on the companion CD-ROM in the Lessons\Lesson17\plugcfg\ folder if you press the Load button in the Lens Effects Globals rollout. If you have created your own settings, don't forget to save them for the future use.
electric bolt.lzv file on the companion CD-ROM in the Lessons\Lesson17\plugcfg\ folder if you press the Load button in the Lens Effects Globals rollout. If you have created your own settings, don't forget to save them for the future use.
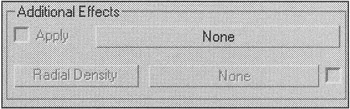
| Note | You can create additional effects by applying a texture to the transparency channel of one of the effects from the Additional Effects group an the Options tab. Try to do this and understand its working principles. We can add only one comment: A texture applied using this method works as a transparency mask. Its colors are ignored. |
Now you can animate the Slice modifier's gizmo. We doubt that you will encounter any problems doing so. To view the results of our work, open the ![]() lesson17 (lightning - effects).max file, which can be found on the companion CD-ROM in the Lessons\Lessonl7\scenes folder. The rendering results are in the Lessons\ Lesson17\Images\lesson17 (lightning - effects).avi file.
lesson17 (lightning - effects).max file, which can be found on the companion CD-ROM in the Lessons\Lessonl7\scenes folder. The rendering results are in the Lessons\ Lesson17\Images\lesson17 (lightning - effects).avi file.
Now try to do the same task using the Video Post module.
-
Turn off all effects:
-
Main menu à Rendering à Effects à clear the Active checkbox
-
-
Open Video Post:
-
Main menu à Rendering à Video Post
-
-
Create the rendering sequence (Fig. 17.5):
-
Video Post à Add Scene Event à viewport (Camera01 or Perspective)
-
Video Post à Add Image Effect Event à Lens Effect Glow
-
Video Post à Add Image Output Event à select a file
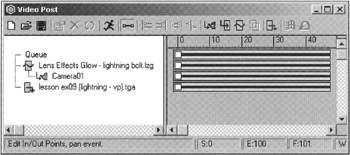
Figure 17.5: Rendering sequence in the Video Post window
-
-
Adjust the Glow parameters for a stunning effect (Fig. 17.6).
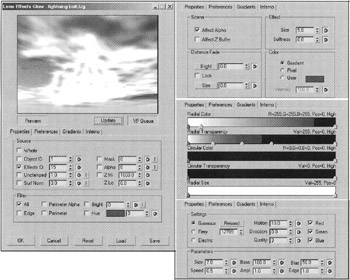
Figure 17.6: Lens Effects Glow parameters
| Tip | Make the value of the Effects ID parameter equal that of the similar parameter for the lightning material. At color settings, select Gradient (Preferences à Color) and adjust the color and transparency gradients. Set the Inferno effect on all color channels to make it partially influence all other Glow elements. |
| Tip | You can see a preview of the effect by clicking the VP Queue and Preview buttons. |
We have saved our settings, which you can download from the Lessons\Lesson17\plugcfg\lightning bolt.lzg file on the companion CD-ROM. If you like your settings better, save them for the future use.
-
Now, render the sequence by clicking the Execute Sequence button and specifying a segment duration of 20–25 frames.
To view the results of our work, open the lesson17 (lightning — video-post).max file by pressing the Load button. Rendering results are in the Lessons\ Lesson17\images\lesson17 (lightning - vpost).avi file.
|
| < Day Day Up > |
|
EAN: N/A
Pages: 136