Lesson 16: Modeling a Human Head
|
| < Day Day Up > |
|
This lesson deals with the most complicated and interesting task of 3D graphics: human head modeling. It should be mentioned that this considerable task gives software developers no rest because of its complexity and the wish of many artists (the term is deliberate, for we ourselves are to some extent adherents of new technologies) to create convincing characters quickly. Lately, a whole range of the software has appeared that simplifies the process; Poser, FaceGen Modeller, and Head Designer are but a few of the offerings. The names convey nothing, do they? Scarcely so. We think that you probably have encountered them more than once before and could not help admiring the results obtained. Indeed, it is rather tempting to work with a true image of the human head by changing a dozen of options. (No kidding — a parametric head in the FaceGen Modeller package is described using about forty main and thirty optional parameters!)
So why, year in and year out, are virtual galleries supplemented with various characters that feature heads and bodies created in multi-purpose 3D packages, such as 3ds max or Maya? The explanation is simple. Specialized packages (those named above as well as half-dozen unlisted ones) are good and often inexpensive compared to multi-purpose packages. As a rule, they also are either direct plug-ins to multi-purpose packages or can convert models into common formats. But they do have drawbacks — sometimes substantial.
First, a model obtained with the help of a specialized generator is not optimized and contains many "redundant" polygons. This is not a disaster, for geometry optimizers are available. For example, there are two optimization modules integrated in 3ds max. One of them — MultiRes — implements one of the most progressive methods of optimization, leaving the texture coordinates intact. Unfortunately, it is painstaking to edit such a model.
Second, any model obtained by means of a generator bears the traits of the base "blank" because most generators change the proportions of an "average" model. What's more, as a rule, such blank features have a pronounced "national identity". A face of any nationality bears common signs of humanity, but few people would take into account all of the shades and variation within one source model. All of these considerations relate to a realistic head, but what if a character is fantastic? It seems that nothing prevents us from touching up the model… Yes, something does! The source topology of the model prevents us from redoing it as we like.
And the last, but not the least, argument: Did you ever think that someone produced these "blanks"? If so, why not create your own template for a further series of characters? This way, you know where and what should be amended to get the necessary result. The benefits of the approach are evident: This is your model, and you can do whatever you like with it.
Hopefully, we have persuaded you that creating your own model of a head is not only interesting, but also useful. So, let's try!
This lesson is based on a method introduced by Arild Wiro Anfinnsen, better known as simply Wiro (http://www.secondreality.ch). Wiro kindly permitted us to make use of some steps that will allow you to create a model of a head quickly and with high quality.
To model the head of a human being, not a monster, it is desirable to have files with projections for comparison. These can be sketches or photos of a real head, even your own. You can load them as described in Lesson 15. When preparing this lesson, we used our own photos, and some similarities came out.
-
Start by creating a box (Box), built approximately by the sizes of the projections' images and segmented as shown in Fig. 16.1, a.
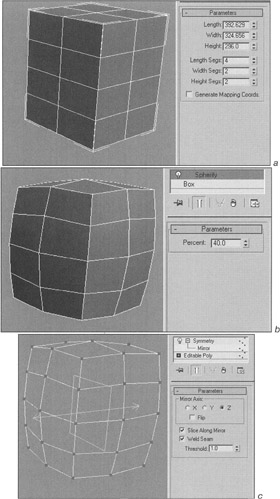
Figure 16.1: Blank of a head -
Streamline your box by applying the Spherify modifier (Fig. 16.1, b):
-
Main menu à Modifiers à Parametric Deformers à Spherify
-
-
Convert the object to the polygonal object type (Editable Poly):
-
Context menu à Convert to à Convert to Editable Poly
-
-
On the front view, select and remove the vertices from one side, leaving the "half". Apply the Symmetry modifier and make the adjustment so you can see the final model while editing one side (Fig. 16.1, c):
-
Main menu à Modifiers à Mesh Editing à Symmetry
-
-
Go down the stack and press the Show End Result On/Off Toggle button.
-
Working on the vertices' level, put the model into the head shape (without nose or other protruding parts) (Fig. 16.2, a).
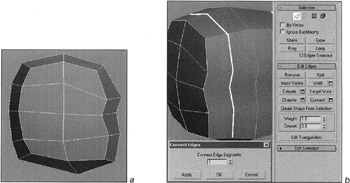
Figure 16.2, a and b: Creating eye sockets and the upper jaw -
Add the edges across the center of the eyes and lachrymal glands. Use ring selection of the edges (Ring) and edge connection (Connect), with subsequent movement of the vertices (Fig. 16.2, b and c).
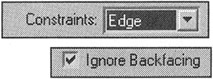
Tip When moving the edges, it is convenient to use the constraint (Constraints to Edge). Also use the Ignore Backfacing mode.
-
Make eye sockets (Fig. 16.2, d) and additional edges in the shape of the upper jaw (Fig. 16.2, e) using the same tools.

Figure 16.2, c—e: Creating eye sockets and the upper jaw -
Complete the eye sockets using the Insert Vertex and Create commands for the edges.
-
To create the blanks for the eyelids, join the edges of the eye sockets twice by circles (Fig. 16.3, a). Then move the vertices.
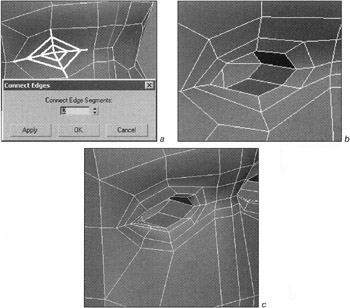
Figure 16.3: Eye modeling -
Make the hollows for the eyes using the Extrude command for the polygons (Fig. 16.3, b).
-
Form the eyelids (Fig. 16.3, c) by dividing the edges around the eyes again and moving the vertices.
Tip To have eyelids of the correct shape, you can make the eye-spheres and insert them into the eye sockets.
-
Make the nose. The Hinge From Edge command for polygons will be of use (Fig. 16.4, a). Remove the polygon formed close to the symmetry line. Move the vertex to the symmetry line.
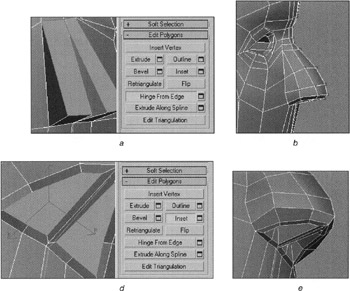
Figure 16.4: Nose modeling -
Obtain the desired shape of the nose by complicating the mesh and moving the vertices (Fig. 16.4, b).
-
The Inset and Bevel commands for polygons will help you to create the nostrils (Fig. 16.4, c and d).
-
Technology similar to that employed for the eyes' creation is used for the mouth (Fig. 16.5, a — c). The option for converting the edges' selection into the vertices is of great help:
-
Context menu à Convert to Vertex
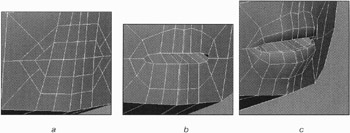
Figure 16.5: Creating the mouth and lips -
-
Finally, make the chin and the cheeks (Fig. 16.6,a and b). The face is ready!
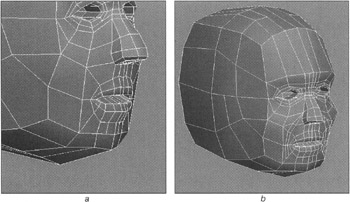
Figure 16.6: Creating the chin and cheeks
As you can see, there was nothing difficult. We think that you will manage to finish the model by yourself. By the way, the Wiro's website contains a perfect lesson on ear modeling.
By creating our model in this way, it does not require further complication of the mesh — if the smoothing groups are set up correctly. But applying the MeshSmooth modifier once may help smooth the sharp angles where necessary.
And the final tip: Look in the mirror often when you model a human head. You may discover interesting features there!
|
| < Day Day Up > |
|
EAN: N/A
Pages: 136
- Enterprise Application Integration: New Solutions for a Solved Problem or a Challenging Research Field?
- Distributed Data Warehouse for Geo-spatial Services
- A Hybrid Clustering Technique to Improve Patient Data Quality
- Relevance and Micro-Relevance for the Professional as Determinants of IT-Diffusion and IT-Use in Healthcare
- Development of Interactive Web Sites to Enhance Police/Community Relations