Editing the Texture Mapping Coordinates
|
| < Day Day Up > |
|
Assign the Lancia material to the car body by dragging it from the sample slot of the material editor to the object. Make one of the textures of any material visible in the viewport (for example, ![]() bump_map.tga) and switch to the Smooth+Highlight mode in the viewport window by pressing the <F3> and <F4> keys.
bump_map.tga) and switch to the Smooth+Highlight mode in the viewport window by pressing the <F3> and <F4> keys.

You also need to adjust the texture coordinates. This can be done using the Unwrap UVW modifier.
Compared to the previous versions, this modifier in 3ds max 5 has become a powerful and excellent tool. There is no need to describe all of its novelties in this lesson because our model is very simple, but we suggest that you master these tools on your own. The options for texture application should be the first to receive your attention.
-
Apply the Unwrap UVW modifier.
-
Expand the branch of sub-objects and choose the Select Face option.
-
Select the patches for the hood, windscreen, top, and rear glass. Notice how the coordinate plane of the modifier changes (Fig. 15.7, a).
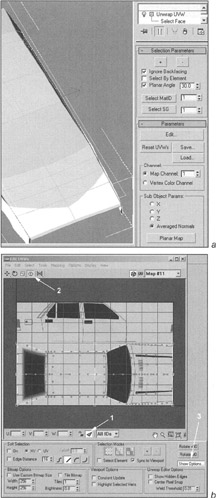
Figure 15.7: Editing the texture mapping coordinatesTip During the selection, it is convenient to use the angle specification option in which polygons are considered co-planed (Planar Angle).
-
Align the plane on the Y-axis, click the Planar Map button, and switch to coordinate editing by clicking the Edit button (Fig. 15.7, b).
-
In the coordinate-editing window, select the appropriate texture (pointed to by arrow 1 in Fig. 15.7, b).
-
Adjust the texture's appearance as desired by rotating, moving, and re-scaling. For this purpose, use the Freeform Mode tool (arrow 2). When you use this tool, a container (gizmo) appears around the selected elements. To move it, press the left mouse button and grab at any place within the container. To rotate it, grab at the centers of the sides; to scale it, grab at the corners. The usage of the <Alt>, <Ctrl>, and <Shift> keys provides you with additional options during the editing process.
-
When you open the option window (arrow 3), you can edit the texture appearance in the editing window. The texture may not be shown at all if a zero value is set for brightness (Brightness).
Note When you are editing texture mapping coordinates for patches, handles appear near the texture control vertices that are similar to the patch vertex handles. This enables you to edit the coordinate curvature in accordance with the curvature of the patches themselves.
-
Select the lateral patches and correct their coordinates.
Now, everything is ready!
Still, we would like to give you some tips and advice.
-
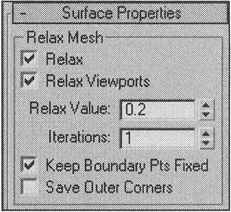
After the texture coordinates are edited, you can apply the Edit Patch modifier and smooth the result slightly by using the Relax Mesh option. Be careful with this option: It may distort the textures.
-
If you have the f-Edge plug-in extension module at your disposal, try to apply this instrument. The demo version of this module can be found on the companion CD-ROM in the Plugins folder.
As you can see, this task didn't prove to be too complicated. Therefore, the question arises: "Is it possible to create more complex shapes using this method?" Fig. 15.8 shows the set of models that we produced for one of the projects developed by Doka Media. When creating these models, we simply copied the materials from one scene to another and replaced the appropriate textures.
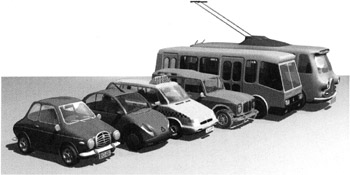
Figure 15.8: Example car models (published with the permission of Doka Media)
|
| < Day Day Up > |
|
EAN: N/A
Pages: 136
- ERP Systems Impact on Organizations
- Challenging the Unpredictable: Changeable Order Management Systems
- Context Management of ERP Processes in Virtual Communities
- Healthcare Information: From Administrative to Practice Databases
- Relevance and Micro-Relevance for the Professional as Determinants of IT-Diffusion and IT-Use in Healthcare