Creating Materials
|
| < Day Day Up > |
|
To be precise, we are going to create only one material. In 3ds max, there is a general rule: One object - one material. This material can be composite and contain many sub-materials. These, in turn, can be composites, and so on.
Let us begin with sub-materials. First, we'll need the base material for the car body with the bump and color textures imitating door handles, openings, etc.; material for chromium-plated shaping strips and door handles; and material for glasses. We also will need material for the inner surface of the car body.
Thus, the list of textures and masks is as follows: the mask for mixing the main material and chromium, and the mask for mixing chromium and glasses.
-
It is possible to create several sets of files for each projection. However, we recommend that you try to join every texture of each type within a single file. This will simplify the structure of the materials. (This is rather complex by itself.)
-
The \Lessons\Lesson15\Scenes\ folder on the companion CD-ROM contains the textures required for the project. As you can see, nearly all of them are black-and-white images.
| Note | We have "merged" the models and textures. On one hand, this is awkward and inconvenient. On the other hand, when projects are moved from one computer to another, unpleasant situations will occur if 3ds max cannot find the necessary textures. In the material editor, generally the absolute path to the files is used, and 3ds max will constantly demand the paths to the texture files. You can correct this problem by adding the folders with the textures into the path settings (Main menu à Customize à Configure Paths), but note that this database is limited. Therefore, we recommend using a property of 3ds max: If a file is not found, 3ds max searches for it in the folder with the source file of the scene. By the way, the 3ds max package has the useful Resource Collector utility (Control panel à Utilities à More à Resource Collector) enabling the collection all the project files into one folder. |
We would like to draw your attention to the texture in the ![]() diffuse_map.tga file. At first glance, it looks strange. This is because the main element of this texture is not the image itself, but rather the alpha channel that will be used to apply all required elements to the surface of the car body. It is possible to change the color of the body immediately by choosing the diffuse color of the material directly in 3ds max. Initially, the drawing was done on a white background; however, this background will probably produce an undesirable light contour when applying the texture. Therefore, we advise you either to fill in all unused space in the texture with the drawing color or to blur the image by increasing the width of the lines.
diffuse_map.tga file. At first glance, it looks strange. This is because the main element of this texture is not the image itself, but rather the alpha channel that will be used to apply all required elements to the surface of the car body. It is possible to change the color of the body immediately by choosing the diffuse color of the material directly in 3ds max. Initially, the drawing was done on a white background; however, this background will probably produce an undesirable light contour when applying the texture. Therefore, we advise you either to fill in all unused space in the texture with the drawing color or to blur the image by increasing the width of the lines.
Fig. 15.6 shows the structure of the Lancia material. Let us consider it in more detail.
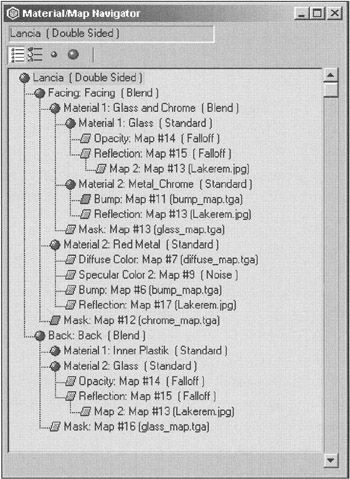
Figure 15.6: Structure of the material for the car body
The material that will be assigned to the model is composite, double-sided material. It comprises two other composite materials (Facing and Back) of the Blend type. These materials are applied to the outer and inner sides, respectively. Outer sub-material consists of the standard Red Metal sub-material and a composite Glass and Chrome sub-material. These materials are mixed using the mask texture ![]() chrome_map.tga. The Glass and Chrome sub-material comprises two appropriate sub-materials mixed using the glass-map.tga texture. The nesting order is vitally important; the mask of the material at the deeper nesting level must be "inside" the mask of the material at the higher level.
chrome_map.tga. The Glass and Chrome sub-material comprises two appropriate sub-materials mixed using the glass-map.tga texture. The nesting order is vitally important; the mask of the material at the deeper nesting level must be "inside" the mask of the material at the higher level.
Inner material is much simpler. It consists of the Glass and Inner Plastik sub-materials, also mixed using the ![]() glass_map.tga mask.
glass_map.tga mask.
Now, try to study the material parameters yourself by going over the ![]() lesson15(final).max file. We hope that you're able to understand everything without additional comments. We will only emphasize some important aspects.
lesson15(final).max file. We hope that you're able to understand everything without additional comments. We will only emphasize some important aspects.
-
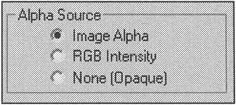
The diffuse-map.tga texture in the Red Metal material is applied using the alpha channel. This enables you to alter the body color by changing the Diffuse color of the material. Notice that the Premultiplied Alpha checkbox is cleared. As for other textures, we recommended that you select the None option (non-transparent material).
-
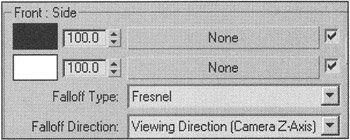
Transparency and reflection in the Glass material are produced using the Falloff map of the Fresnel type.
-
The Chrome material is taken from the standard 3ds max library. The same bump textures from the
 bump_map.tga file are applied to Red Metal and Chrome materials.
 -
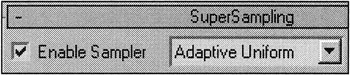
We advise you to enable SuperSampling when specifying parameters of all materials. In the parameters of all materials, we recommend setting the Summed Area option for texture filtering to allow better smoothing of the contours.
|
| < Day Day Up > |
|
EAN: N/A
Pages: 136