Lesson 10: Daylight Adjustment
|
| < Day Day Up > |
|
Adjusting Daylight without Using the Global Illumination System
Although 3ds max 5 provides two methods of global illumination rendering - Radiosity and Light Tracer - their use is hampered by a considerable drawback: The rendering time is greatly increased. Therefore, it often makes sense to simulate global illumination using additional sources of light. Fig. 10.1, a, shows the placement scheme for the sources of light in our room, and Figs. 10.1, b - d illustrate their approximate parameters. The scene file is included in \Lessons\Lessonl0\Scenes\Lesson10(GI-Imitation).max on the accompanying CD-ROM.
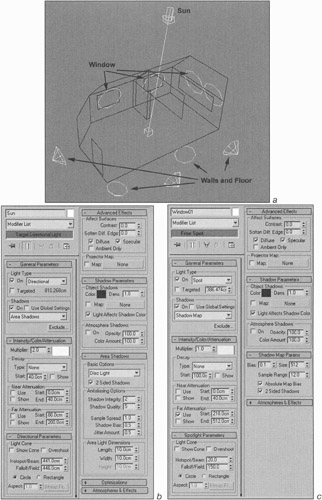
Figure 10.1, a-c: Daylight simulation in the room
| Note | This section is cognitive and may be skipped. If you are a beginner, however, don't be lazy - spend some time looking through it. We do not give a detailed description of the light sources. If you performed the first project, you should understand this process. |
There is a good rule to be followed when you create a scene: First set the light, and then start practicing with the materials. By default, 3ds max paints objects in various colors to help you orient yourself when you model, but they are unfit for setting the illumination. The easiest way to get rid of them is to assign one material to all objects.
-
Select all objects.
-
If there are hidden objects in the scene, make them visible first:
-
Context menu à Unhide All
-
-
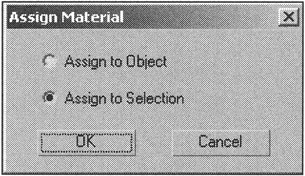
Open the material editor by pressing the <M> key. Assign the first material named 1-Default by dragging it from the material preview window (Sample Slot) on the objects and selecting the Assign to Selection item.
However strange it may seem, the brightest (but the least useful) source of light is the Sun. Its task is to make a bright spot on the floor and on objects within the range of its illumination. To simulate the Sun, a light source of Direct type is the most suitable. The color of this light source is yellowish, and it is supposed to cast shadows. However, we recommend setting the Area Shadows to a small size to simulate the "spotlessness" of the source (see Fig. 10.1, b).
In reality, the main room light goes through the windows, is scattered from the sky, and is reflected from objects (the Earth, houses, etc.). In our book "3ds max 4: From Objects to Animation," we discussed in detail how to create the so-called coelosphere. In this case, however, it does not work. Therefore, we need to create several Spot sources (by setting the number of windows) with the greatest attenuation angle. These sources should have a bluish color. They should produce very blurred shadows; the usual shadows of the Shadow Map type are good for this purpose, with a higher Sample Range value. In addition, it is necessary to adjust the intensiveness attenuation farther from the source. To do so, adjust the Far Attenuation parameter (see Fig. 10.1, c).
| Note | The Decay parameter in the light source settings physically employs the most correct approach for attenuating the light. You are free to experiment with it. You can use Decay and Far Attenuation parameters together, but remember that Decay has priority over Far Attenuation. |
To take into account the light from the floor, the walls, and the ceiling, set a few low-powered sources along the perimeter of your room. These sources should neither cast shadows nor affect the flash channel (Specular) of the material. These sources may be placed outside the room, and they may have either Spot or Omni type. It is important to accurately adjust the intensity of the attenuation (see Fig. 10.1, d).
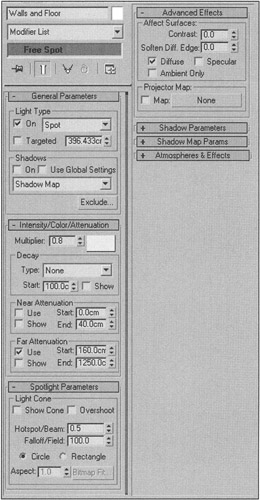
Figure 10.1, d: Daylight simulation in the room
Finally, you can add some ambient light, but be careful. You could lose the 3D-effect.
-
Main menu à Rendering à Environment à Global Lighting à Ambient
At first glance, this scheme is rather good and suitable for showing to an undemanding customer. However, as a rule, such placement of the light sources is insufficient. If there are objects in the room made of highly reflective or shiny materials (e.g., mirrors or polished wardrobes), you will need additional sources of light.
| Tip | The Light Lister tool (Main menu à Tools à Light Lister) is useful for setting a large number of light sources. It helps to quickly change the main parameters of light sources. |
| Do it yourself | Sometimes it is useful to employ not only the source of light, but also the "source of shadow" - the one with the negative value of the Multiplier parameter. Try to use such sources to create shadows under the furniture (e.g., under the armchairs). |
|
| < Day Day Up > |
|
EAN: N/A
Pages: 136
- Linking the IT Balanced Scorecard to the Business Objectives at a Major Canadian Financial Group
- Measuring and Managing E-Business Initiatives Through the Balanced Scorecard
- Measuring ROI in E-Commerce Applications: Analysis to Action
- Technical Issues Related to IT Governance Tactics: Product Metrics, Measurements and Process Control
- Governing Information Technology Through COBIT