Clustering SQL Server 2000
|
|
Now that the cluster is completely configured, you're ready to begin installing any applications. Before you begin the installation, ensure that you have no errors in the Windows System and Application Event logs. If you don't have any critical errors, you can move forward with the installation.
The first step in the SQL Server installation is to install MS DTC as a cluster resource. To do this, go to a command prompt on your first node and type COMCLUST as shown in Figure 11-20. This will install the MS DTC resource into the cluster in the main Cluster Group. It will also set up the necessary folder on the quorum drive. After you run this on the first node, repeat the same step for each of the other nodes.
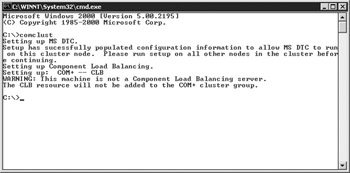
Figure 11-20: Installing MS DTC in a cluster using comclust.exe
Most of the SQL Server installation is similar to what you've seen before with SQL Server installations. You will notice a few different screens. For example, once you enter the installation wizard, the first screen you'll see after the welcome screen is the Computer Name screen. This looks much like it did before, but this time you have a Virtual Server option (shown in Figure 11-21). If you do not see this option, you're probably not using Enterprise Edition of SQL Server.
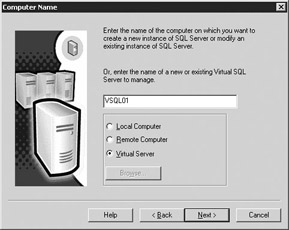
Figure 11-21: Naming the SQL Server virtual server
Type in the virtual name of the SQL Server you want to install and click Next. This name will be used by the applications when connecting to SQL Server instead of the physical server name. It must be a unique name on your network, much like a computer name. Whatever you select, stick with a standard naming convention so you can easily find it later.
The next unusual screen is the Failover Clustering screen. This screen is where you assign a VIPA to the name you just chose. You must also specify a network that this VIPA will use for public communication (shown in Figure 11-22). After you type in the information, click Add and then Next. There will be a few seconds pause while the system obtains the IP address.
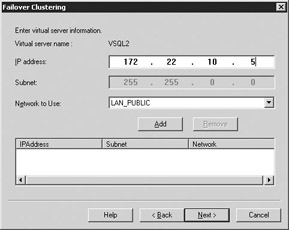
Figure 11-22: Assigning a VIPA to the SQL Server name
The Cluster Disk Selection screen (Figure 11-23) is where you select what cluster disks will hold the data files for this instance of SQL Server. Select a drive that matches your standards, but make sure you do not choose the quorum drive or a drive used by another instance of SQL Server. Make sure that the drive you select has been failed over to the node you're installing SQL Server from.
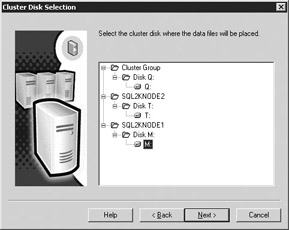
Figure 11-23: Choosing a data drive for SQL Server
Next, choose what nodes can potentially host your SQL Server (see Figure 11-24). The wizard will actually copy the binaries and install SQL Server on both nodes during the installation. Unless you're running Windows Data Center, you should only see two possible nodes. Select both nodes if they're not already on the Configured Nodes column and click Next.

Figure 11-24: Defining who are possible owners of the SQL Server instance
Another new screen is the Remote Information screen (shown in Figure 11-25). In this screen, you specify what account you want to use to copy the files between the two nodes. Make sure this account is a valid administrator on both machines. I generally use the same account that starts my MSCS cluster.
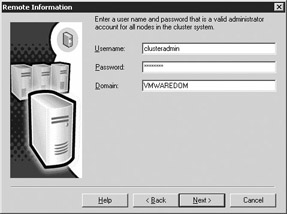
Figure 11-25: Setting up the account to copy the files
After that screen, you'll go through the same standard screens you've seen before in SQL Server. If this is an additional instance of SQL Server, you will have to name the instance on the Instance Name screen. Otherwise, select the Default option. A bug that I encounter regularly is on the Setup Type screen, where you specify what drive you want the program files and data files to reside on. Often the installation will ignore the drive selection you made earlier and will choose another drive to place the data files on. Watch this carefully and if you need to change it, click Browse in the Data Files selection. Your program files must reside on the local drive of each node.
The rest of the screens will be the standard installation wizard screens. Once you have completed all the screens necessary for SQL Server to install, you will see this message:
![]()
This means that SQL Server is in the process of installing SQL Server on both nodes. You can actually open Explorer on the second node and see the files being copied to the specified directories on that server as well. This may take a while, but will provide an interesting troubleshooting tip later. For example, if the installation fails and you don't see any files on the remote server, you can conclude that it may be a network communication problem or a file sharing problem. I'll cover this momentarily.
As a final step, SQL Server will create the cluster resources on the node's cluster group. This may take an additional minute or so while it creates the resources and then tries to start them. You can actually open the Cluster Administrator on the second node to watch this entire process occur. After the installation is complete, you may be prompted to reboot both nodes if the connectivity components (MDAC) had to be upgraded.
Failed Installations
If this installation fails, you may be in for a long process of debugging. The SQL Server installation wizard typically displays this message when a failure occurs:
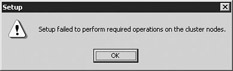
The installation wizard will then roll back. All cluster resources that were created will be removed from the system and files deleted. One of the problems I've seen is that if SQL Server was installed on this system before, you may need to remove any of the directories and registry keys that the installation has left behind. You will also want to go to each node and delete the files in the temporary folder. This is generally located in \Documents and Settings\AccountTypedInFigure25\Local Settings\Temp.
File and Printer Sharing must be enabled on the nodes before a SQL Server installation occurs. If it is not enabled, you'll receive the error message shown in the previous illustration. The way to debug this is to sign in to both nodes with the account name and password you typed in the screen shown in Figure 11-25. Try to access the other node's local drives by selecting Start | Run and typing \\NODENAME\C$, where C$ is the drive you wanted to install SQL Server on. Other items that may cause problems are
-
Firewalls may be preventing files from copying from one node to another.
-
There may be services running on either node that are preventing files from copying. To prevent this, stop all unnecessary services. Services I've had problems with are any firewall services, SNMP, Tivoli or monitoring services, and vendor-specific services like Compaq Insight Manager.
-
You've performed security hardening on one or both nodes. If this is the case, log onto each node with the account you typed in Figure 11-25 and watch for popup messages such as certificates that have not been signed. If you see this message on the primary node, it will also appear on the secondary node. If no one is logged on interactively to acknowledge the messages, the installation will time out.
-
The account you typed in Figure 11-25 may not have enough permissions to copy the files or access the registry.
Post-Installation Configuration
Now that the installation is complete, you're ready to do the post-installation configuration. Most of this is done in Cluster Administrator. After you install SQL Server, Cluster Administrator will look like Figure 11-26. You'll see a cluster resource for the SQL Server VIPA, SQL Server network name, and the various SQL Server services.
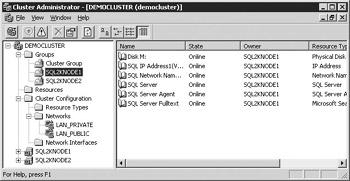
Figure 11-26: Cluster Administrator after the complete installation
By default, SQL Server can only create backups and databases on the drive you selecting during the installation to hold the data files. If you'd like to use additional drives, you will need to first ensure that they're in the cluster group with the SQL Server service. Then you'll need to make the SQL Server resource dependent on the new drives. The reason you must follow those steps is that SQL Server can only write to drives that it knows are available. If the drive fails, then SQL Server too must fail.
To make the SQL Server resource dependent on the new drive or any other resource, right-click on the SQL Server service and select Take Offline. This will stop the SQL Server service, causing an outage for your application. Next, right-click on the SQL Server resource and select Properties. This will take you to the SQL Server Properties screen where you will want to select dependencies (shown in Figure 11-27).
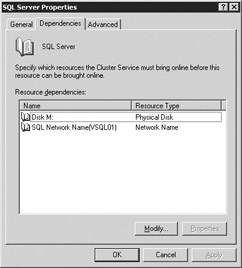
Figure 11-27: Setting up the disk dependencies
Select Modify to add additional dependencies. This will pull up a screen where you'll see any available resources on the left (see Figure 11-28). To make SQL Server dependent on these resources, click the left arrow button, then click OK.
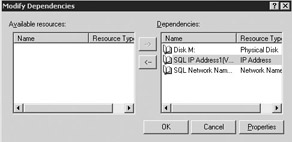
Figure 11-28: Adding additional resources drives as dependencies
Finally, select OK to get out to the Properties screen. Then right-click on the SQL Server resource and select Bring Online. You will also need to bring online any additional SQL Server service such as SQL Server Agent and SQL Server Fulltext. If the SQL Server resource is online whenever you try to modify its dependencies, you will receive this error:
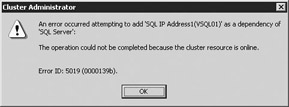
In the same Properties screen where you set the dependencies, you can also adjust some important settings in the Advanced tab (shown in Figure 11-29). If a resource fails, you can specify here if you want it to attempt to restart itself or if you want it to stay failed. If you want it to attempt to restart itself, select the Restart option. This option is the default option for cluster resources.

Figure 11-29: Advanced resource options
By default, if a cluster resource fails, it will affect the entire group. If, for example, your SQL Server Fulltext resource fails, it could cause the entire group to fail over as well, causing an outage. The way to avoid that for resources you don't mind failing is to go to the Advanced tab and deselect Affect the Group.
The rest of the settings in this tab should be left alone unless you experience problems where you feel you should adjust them. The Threshold and Period options specify the amount of times (3 by default) in a given period (900 seconds by default) that the resource will attempt to start on the existing node before failing over if the Affect the Group option is selected. For example, if the Threshold option is set to 3, the Period option is set to 900, the Affect the Group option is selected, and the resource fails, the resource will attempt to start on the current system three times. If it fails three times within 900 seconds, the entire group will fail over to the other node and the process repeats itself.
The Looks Alive and Is Alive settings specify how often the resource will see that it is still online on its current node. Never adjust these settings. The Pending Timeout setting should also not be adjusted unless there is a problem with the default settings. The Pending Timeout setting represents in seconds the amount of time the resource is allowed to be in either a state of Offline Pending or Online Pending before MSCS moves it to Failed.
Configuring the Resource Group
The cluster group also has some properties that are useful to note. To access these options, right-click on the cluster group you want to modify and select Properties. The General tab allows you to adjust what nodes are possible owners of the cluster group. The Failover tab (shown in Figure 11-30) has two options that should by default be left alone. The Threshold and Period options specify the number of times within a period of hours the group is allowed to fail before taking it offline. By default the Threshold is set to 10 and the Period is set to 6. This means if the resource group fails ten times in six hours, the entire group or individual resource is set to a failed status.
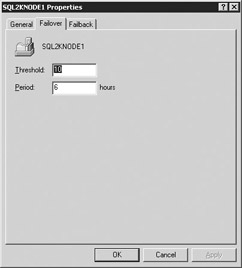
Figure 11-30: The resource group's Failover tab
| Note | Generally speaking, don't tweak many of these settings unless you have a problem. These settings have been optimized for 99 percent of systems and don't need adjustments. Altering them could make your system unstable in some cases. |
The Failback tab (Figure 11-31) is where you specify the failback policy. Failing back essentially means that the cluster group will fail back to the preferred node when it becomes available. This is set by default to Prevent Failback. In most cases this is fine because you want to manually troubleshoot what caused the primary node to fail before bringing the resources back online on that node. If the machines were sized properly, you should have no problems running both nodes' resources on the machine until it can be failed over manually. If you select the Allow Failback option, you can specify if you want the failback to occur immediately or between certain given hours (0 to 23).
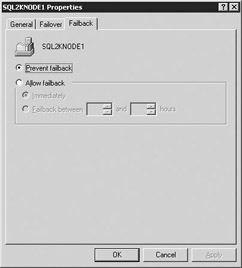
Figure 11-31: The resource group's Failback tab
|
|