Clustering Windows 2000 Advanced Server
|
|
You may be wondering why I'm covering clustering Windows in a SQL Server book. Clustering SQL Server cannot be properly covered until we cluster Windows. The two are intertwined tightly so that if you don't properly cluster Windows, your SQL Server environment will be unstable. Seeing my servers lock up unpredictably on a periodic basis made me come up with a very strict step-by-step guide to clustering Windows and SQL Server once I found the right formula.
Preinstallation Checklist
Before you even begin to cluster Windows, you will need to have some information ready and some pre-installation steps complete. Make sure you can answer yes to the following questions:
-
Do you have a copy of the I386 directory in an easy to access place? This can be found on the original Windows 2000 Advanced Server CD.
-
Do you have your IP address information? I would recommend that you have at least six IP addresses in a single-node cluster environment. Two of those IP addresses are for the private heartbeat and don't necessarily need to be public.
-
Have both servers joined the same domain?
-
Can all the servers in the cluster communicate with each other?
-
Are both servers hooked up to the shared disk or SAN?
-
Have you grabbed a good book or magazine to read? The cluster installation has long lulls where you're sitting waiting for the server to reboot.
I would also recommend that you create a Domain Admin account for the cluster service to start with. Remember the password for this account because you'll use it many times before the installation is complete.
Installation
Now that you've gotten past all the pre-installation steps, you'll be amazed how easy the rest of the installation is. In Windows 2000 and in SQL Server 2000, everything is wizard-based (the Microsoft way). To begin clustering Windows on the first node, first power off the second node. Again, this is very rarely a needed step, but I do it because of the few times I tried to figure out a strange problem, only to find I just had to power down the second node before beginning the wizard.
Now that you have the second node powered off, you can go to the Control Panel and select Add/Remove Programs. Once the applet comes up, select Add/Remove Windows Components, which may open minimized just to keep you on your toes. To install clustering for Windows select Cluster Service (as shown in Figure 11-3). You'll notice that when you select it, a piece of Internet Information Services (IIS) also gets installed. The piece includes the common files of IIS but not the web server.
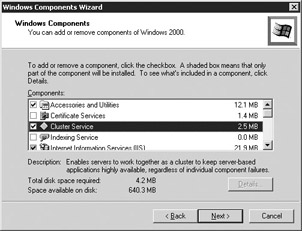
Figure 11-3: Starting the Cluster Service Configuration Wizard
Windows will then copy the necessary files over from the I386 directory for IIS and MSCS. It's important to note here that Windows is copying older files that do not have any service pack applied, so if you have a service pack installed this installation will overwrite those files with older files. The service pack will have to be reinstalled after this installation. I'll talk much more about service packs in 'Service Pack Installations,' later in the chapter.
You will then be taken to the Cluster Service Configuration Wizard and the standard Microsoft welcome screen. When you click Next, you'll be taken to the important Hardware Configuration screen, where you must confirm that the hardware you have installed on your system matches the Hardware Compatibility List (HCL). To see the full list of hardware that is supported in a Microsoft cluster go to http://www.microsoft.com/hwdq/hcl/scnet.asp. The web address shown in the wizard is invalid and there's no pointer to redirect you to the proper address. If your hardware is compatible with an MSCS cluster, click the I Understand button (see Figure 11-4) and then click Next.
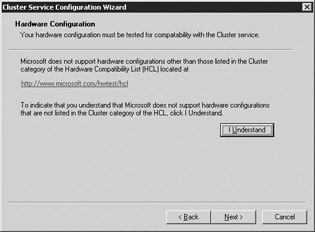
Figure 11-4: Hardware Configuration screen
| Caution | If you can't find your hardware on the list, do not proceed! If your vendor says that their hardware supports an MSCS cluster, then receive a written assurance from the vendor that states that fact. |
On the Create or Join a Cluster screen (Figure 11-5), specify that you want to create a new cluster by selecting 'The first node in the cluster'.
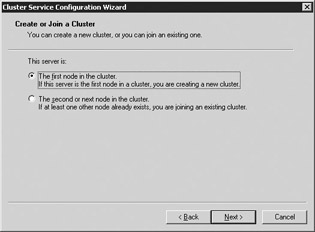
Figure 11-5: Create of Join a Cluster screen
On the Cluster Name screen (Figure 11-6) you specify a name for the cluster. This name will be used in Windows to identify the cluster when a client wants to connect to Windows itself. This name transfers between the two nodes based on who currently owns the network name. This name should also be registered in WINS. I named my cluster DEMOCLUSTER, but chances are you're going to want to come up with some sort of standard that lets you increment a suffix number. For example, CLUS01 would be a suitable name if you plan on creating more than one cluster.
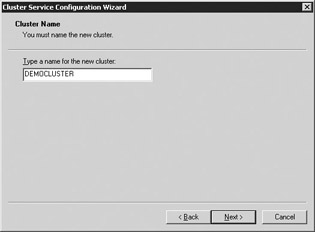
Figure 11-6: Assigning the cluster name
The Select an Account screen (Figure 11-7) is where you specify what account you would like MSCS to use to start the Cluster service. This account must be a domain account with local administrator rights on each node.
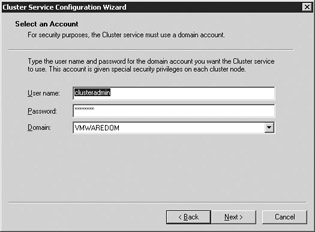
Figure 11-7: Selecting the account to start MSCS
In the Add or Remove Managed Drives screen (Figure 11-8), you specify what drives you'd like to participate in the cluster. If you don't specify a drive here, you can add it later. The drives you specify here will be available to both nodes in the cluster.
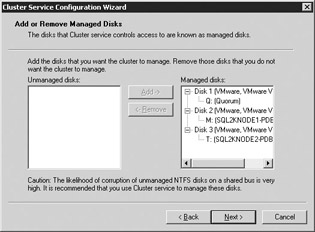
Figure 11-8: Selecting the drives that will be clustered
Next, in the Cluster File Storage screen (Figure 11-9), select which drive will be your quorum drive. As I discussed earlier, this drive should have at least 500MB available and should only be used by the cluster for internal usage. You should also never store data here since you can't guarantee which node will own the quorum drive. I always make my quorum drive the Q drive and label it appropriately.
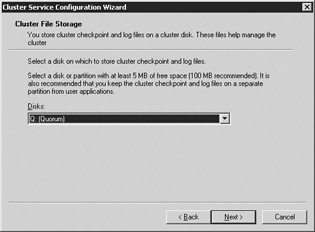
Figure 11-9: Selecting the cluster disk
In the Network Connections screen, you will need to specify what networks you want to use for your private and public network communication. See Chapter 10 for what the recommended configuration is for this so you don't create a single point of failure. I have two network cards in this example and do have a single point of failure for my public communication. My private communication, shown in Figure 11-10, uses a cross-connect cable instead of a public network. I send only private heartbeat communication out of it by selecting the Internal Cluster Communications Only option and checking Enable This Network for Cluster Use. I named it LAN_PRIVATE so I can recognize it easily.
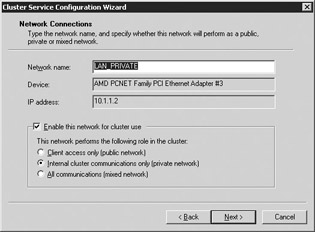
Figure 11-10: Selecting the heartbeat connection
The public network is configured to send all traffic out of it. This way, if my private cross-connect cards fail, internal communication can still proceed. I've enabled this by selecting the All Communications option shown in Figure 11-11. I named this network LAN_PUBLIC.
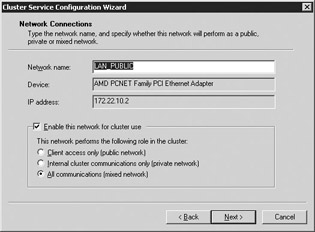
Figure 11-11: Selecting the public connection
The last step in the network configuration is to specify which network will be prioritized first for private communication. Since the cluster communication is chatty, I recommend that you use the cross-connect for your private communication as shown in Figure 11-12. You can adjust what network is given priority for private communication by selecting the network name and clicking the Up and Down buttons.
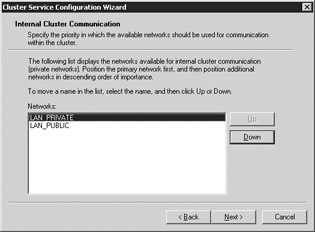
Figure 11-12: Selecting the private connection for the cluster
The final step is to specify the VIPA for the cluster network name (shown in Figure 11-13). After you type the cluster IP address, the subnet should be filled in automatically for you. You must also select what public network you want clients and applications to use when connecting to the cluster. Even though the cross-connect network does show up in the drop-down box, make sure you select the public one.
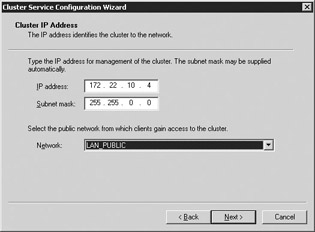
Figure 11-13: Setting the cluster's IP address and network
The wizard will then spend a few minutes registering files, copying files, and attempting to start services. If the services do start, you will see this message:
If any errors occur (such as network errors), the setup will abort and you will have to go back through the process after correcting the problem.
The first node is now installed. You can now power on the second node and begin the installation on it. To install the second node, access the Cluster Service Configuration Wizard through the same method you did on the first node (Add/Remove Programs in the Control Panel). This time when you access the Create or Join a Cluster screen, select 'The second or next node in the cluster'.
On the next screen (shown in Figure 11-14), type in the cluster name you created earlier (back in Figure 11-6). Also, type the name of the account and password that starts Cluster Services. This is the same account that you used earlier in Figure 11-7.
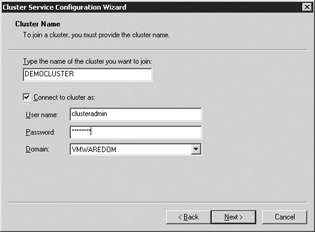
Figure 11-14: Joining an existing Cluster Name screen
Again, you may have to specify any additional networks and confirm the priority of the networks for private communication. This step may not be required for your system. Also, you may be prompted for the password one more time for the account that starts the MSCS service (shown in Figure 11-15).
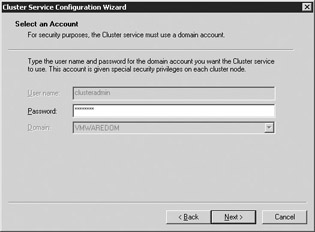
Figure 11-15: Security confirmation in the Select an Account screen
The wizard will then copy and register the files and start the services on the second node. Once this is complete (generally it takes about a minute), your Windows cluster installation is complete.
Cluster Administrator
The tool you will find yourself using the most for cluster administration is Cluster Administrator. You'll use it so much even as a DBA that I recommend that you place it on your desktop. You can find the tool under the Administrative Tools group in Control Panel. Once you open it, you may be prompted to connect to the cluster (generally, by default, it will automatically do this for you). If you are prompted (as shown next), you can type the Windows cluster name or just type a period (.) to connect to the local cluster. As you can imagine, you can connect to remote clusters by typing their cluster name as well.

Cluster Administrator (shown in Figure 11-16) has several main sections you'll find yourself using frequently. The main area you'll use is the Groups section, which will show you all the cluster groups that are configured in the cluster. After installation, you are left with a group for each drive and one called Cluster Group, which includes all the shared resources such as the network name. You can also see all the resources under the Resources group of Cluster Administrator. Under the Cluster Configuration group, you can see all the network interfaces that are enabled for cluster use. You can also see what resource types have been added in this group.

Figure 11-16: Cluster Administration before you configure the resource groups
To perform server-wide configuration, you can right-click on the cluster's name and select Properties. Inside these tabs, you'll find the same options that you saw earlier in the configuration wizard. The main new screen you did not see is where you can change the size of the quorum drive. If you've added a lot of shares to your cluster, you may exceed your 64K quorum log limit and you can increase it under the Quorum tab.
You can also see in Cluster Administrator the servers that are participating in the cluster. By drilling into the server name, you can see what resources are currently active on that server. Additionally, you can right-click on a server to start the MSCS service on that remote machine or pause the node.
As I mentioned earlier, 90 percent of your time will be spent in the Groups section of Cluster Administrator. If you click on a given group (as shown in Figure 11-16), you can see the name of the resources that are in that group. You can also see if they're online, pending a status, or offline. The Owner column is an all-important column that shows you who currently owns the resources. You cannot fail over a single resource; resources are failed over as a whole group. This is why you don't want a configuration where each drive has its own group (such as Disk Group 1). The next section will show you how to change that.
If you want to test a failover of the resource group, right-click on a given group and select Move Group. This will change the state of the resource to the following sequence:
-
Offline Pending: The stopping of the resource is pending.
-
Offline: No one on either node can access the resource.
-
Online Pending: The resource is coming online, but no one can access it yet.
-
Online: The resource can now be accessed and is online.
There's also a Failed state if a problem or timeout occurs. I'll cover how to troubleshoot this status in 'Troubleshooting Clusters,' later in this chapter. You will often have the need to stop a service or group. If you want to stop an entire group, you can right-click on the group and select Take Offline. You can also take any resource offline by right-clicking on the individual resource and selecting Take Offline. By taking a resource offline, you're essentially stopping the service to where neither node can access the service.
| Note | The entire failover process should take no longer than two minutes. Generally, it takes about 45 seconds. |
Post-Installation Configuration
Now that you know your way around Cluster Administrator, let's go ahead and properly configure the cluster. I mentioned earlier that I do not like to see a cluster group for each drive. In my example, it may be feasible since I only have two drives. However, typically in my environments people have about five drives total for each SQL Server, making a total of ten for our two-instance cluster. In that case, you must create a group for each instance of SQL Server and place the drives that will be used by that instance in each group. If you don't, SQL Server will not be able to see those other drives.
| Note | A cluster resource can only interact with resources in its own group. SQL Server can also only write to drives that it's set to depend on (I'll cover this in a moment after we install SQL Server). |
With that said, let's create a group for each instance of SQL Server. In a two-instance cluster, you can name each cluster group the name of the node. To create the new group, right-click on Groups and select New | Group. This will take you to the New Group Wizard (shown in Figure 11-17). Name your group and type a description that will help you later.
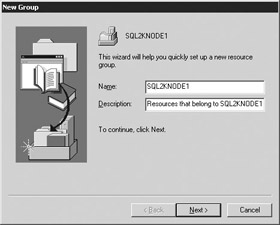
Figure 11-17: Creating a new cluster group
Next, in the Preferred Owners screen (Figure 11-18), select the preferred owners of the group. Sequence is important in this screen. Make sure the preferred owner you want for this group is at the top of the list. If you need to adjust this, select the node and press Move Up.
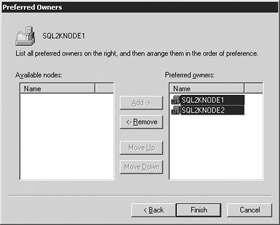
Figure 11-18: Specify the preferred owners of the group and their priority
The new group will then be added to the cluster with no resources tied to it. Because no resources are tied to it, it will appear as offline. To add a resource, drill into the group that has the resource you want to move, right-click on the resource and select Change Group | Group Name. If the source group is not owned by the same node that you're transferring to, you will receive the error shown here:
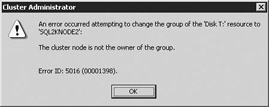
If you receive this error, you must right-click on the source cluster group and select Move Group to fail over the cluster group. Next, retry the process to change the group again.
Finally, delete all the empty cluster groups by right-clicking on the group and selecting Delete. You will only be able to delete the cluster group if it is empty. When you're all complete, Cluster Administrator should look like Figure 11-19. Unlike my example, you will probably have many drives to set up and the final result of your configuration will appear much cleaner.
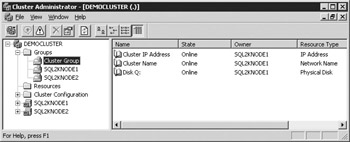
Figure 11-19: Cluster Administrator after resource group configuration
As drives fail back and forth, you will notice changes in the way your Explorer or My Computer screen looks, based on who owns the given drives at any given time. For example, if you're on Node1 and Node1 owns all the drives, you will be able to see the drive labels and information in Explorer. When you fail over the drives, you will only be able to see this information from Node2's Explorer. In Node1's Explorer, you will see Local Drive (T) for the T drive, but you will not see a drive label telling you what's on the drive. Also, when you try to access the drive from the node that does not own the drive, you will receive this access error:

This is normal since that server doesn't own the drives and MSCS only lets one server write to the drive at a given time for data protection.
|
|