Chapter 11: Clustering Windows and SQL Server
|
|
The toughest high availability topic to discuss is SQL Server clustering. Unfortunately, it's nearly impossible to cover this topic adequately without also discussing Windows 2000 clustering. In this chapter, I'll walk you through creating a cluster from the ground up and then discuss how to troubleshoot when problems arise. If you skipped the clustering sections of the last chapter, I recommend that you read them, as we'll be using terminology discussed in that chapter. Because you may not have the hardware available to participate in the example cluster installation, I've provided a good number of screen shots so you can see each step in case you're ever thrown into the situation of having to install a cluster.
Preparing Your Drives
Even though clustering is a tough topic to discuss, it's actually quite easy to do once you made it through the steps the first time. The most difficult part of clustering is the disk confirmation. This is where you'll first see if you have an old driver on your fiber connect cards or if your shared SCSI is misconfigured. There is little you can do as a DBA to remedy any problem in this step. Sometimes that will fall under a different group, such as Storage Management. In smaller to midsized companies, you'd have a single network administrator who would manage the storage as well.
With that said, I generally request a very specific drive setup for optimization of SQL Server. I like to separate out the data, log, and backup drives. The more drives you can make, the better. For example, two smaller backup drives would be better than one large one, so you can spread the devices over the two drives. I generally set up my cluster with the following drive configuration:
| Q drive | Quorum drive |
| M drive | First instance's data drive |
| N drive | First instance's log drive |
| O drive | First instance's backup drive |
| T drive | Second instance's data drive |
| U drive | Second instance's log drive |
| V drive | Second instance's backup drive |
For simplicity in our example, though, I'm going to keep to one drive for each instance. We will use a M drive for our first instance and a T drive for our second instance. Before beginning, make sure you know what drives will be used for what nodes and how those drives will show up in each node's Disk Management utility (it may be in a different order on each node in the utility). Whoever created the drives can tell you by looking in the utility they used to create the drives.
If you have any type of fiber card that connects to a SAN, make sure that you configure the proper drivers before continuing with the rest of this section. Check with your hardware vendor to ensure that the drives and the fiber cards are supported for MSCS. If they are not or if you're using outdated drivers, it will almost always lead to problems. Also, before you configure the drives on your first node, make sure your second node is powered off. In most cases, this is not mandatory, but I've found in rare cases this was required. Just to be safe, I always stick to the rule of lowest common denominator and power off the second node.
To configure the drives, right-click on My Computer and select Manage. This will take you to the Computer Management console, which can also be accessed through Administrative Tools. Once the console is open, select Disk Management under the Storage group. There will be a pause while Windows searches for configured and unconfigured drives. This pause may take up to a few minutes.
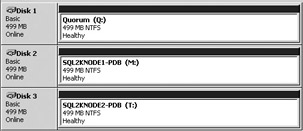
You may be prompted to write drive signatures on the drives. If so, this is fine, but do not upgrade the drives to a dynamic disk configuration. Dynamic disks provide a handy way in Windows to dynamically add space to the drive without having to rebuild the drives. This is not supported in MSCS and will not work, so always keep your disks set to the basic configuration setting. Your partitions should look like what you see here:
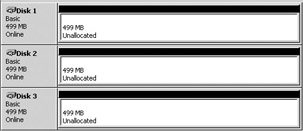
If a drive you want to use is set to dynamic (where Basic is shown here), right-click on that box and select Revert To Basic. If there is a volume configured for that dynamic drive already, you'll have to drop the volume.
| Note | Do not use dynamic drives on drives you plan to cluster. |
If your drives are already configured, go ahead and skip these steps. Now that you have the drives ready to configure, identify what drives in Disk Management should belong to that node. Right-click on the disk that you want to partition and select Create Partition. This will take you to the Create Partition Wizard where you can create a disk partition. Move past the first welcome screen and select the Primary Partition option on the Select Partition Type screen (see Figure 11-1).
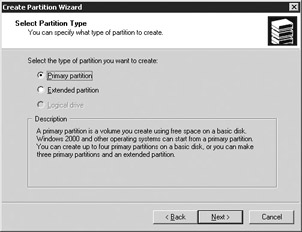
Figure 11-1: The Select Partition Type screen
The next screen is the Specify Partition Size screen. Choose a size that's adequate for your drive. If you're configuring the quorum drive, you will need to size the drive to be at least 500MB. The quorum drive is used to hold shared files that usually don't amount to more than a few hundred MB, but just in case I make mine about 1GB. Make sure you never store anything on the quorum drive. The next section, 'Best Practices for Drive Configuration,' covers a few more ideas you may also want to read before finalizing your configuration.
On the Assign Drive Letter or Path screen, select the appropriate letter for this drive from the drop-down box. For our example, I'm giving the drive the letter P, as it will be the primary drive for data on node 1. The next screen is the Format Partition screen, shown in Figure 11-2, which is where you name your drive. Select Format This Partition with the Following Settings, then give your drive a name. Whatever you select as your name, make sure you keep to a standard. My standard is to base the drive name on the server name. If my server name is SQL2KNODE1, then my drive name would be SQL2KNODE-PDB (PDB for primary database). Other drive suffixes I use are
-
PDB Primary database drive
-
SDB Any secondary database files go on this drive
-
LDF Log files go on this drive
-
DMP Backup drive
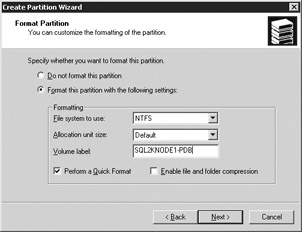
Figure 11-2: Formatting and naming the drive
Since no one owns the quorum drive, I simply call it Quorum without a server name prefix. I also check the Perform A Quick Format option to quickly format the drive.
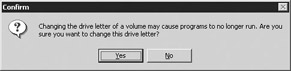
Confirm your settings and you're done. Repeat the same settings until you've created and formatted each of the drives that the first node is supposed to own. When the first node is complete, power it off and power on the second node. If you go to My Computer or Windows Explorer in the second computer, you'll notice that the drive letters may be incorrect although the volume names are correct. To fix this, reopen the Computer Manager and right-click on each of the wrongly labeled drives in the Disk Management section, selecting Change Drive Letter And Path. Click the Edit button to change the drive letter and select the same drive letter that you specified on the first server for that volume name. After that, you will receive the following error message. This can be ignored as long as there are no programs on that drive.
Once you rename the drive letters on the second node to the correct letters, create and format the partitions for that node just as you did on the first node. This step may not be necessary if you're running a single-node cluster and don't plan on installing anything on the second node. When your drive configuration is complete, your Disk Management screen should look like the following. You can then power on node 1 again and rename node 2's drives on node 1.
Best Practices for Drive Configuration
When configuring your drives, you can gain performance and reliability by following a few basic steps:
-
Use controller-based partitioning for slicing the drives.
-
If you're operating in a SAN environment, you'll gain added performance by separating drives by physical LUNS if you can afford it.
-
Make the quorum drive a highly available drive by using RAID 1 or RAID 1 + 0.
|
|