70. Pan and Zoom Still Images a la Ken Burns  BEFORE YOU BEGIN BEFORE YOU BEGIN
22 Prepare a Still for Video 67 About Keyframing 68 About the Properties Panel 69 Add Motion to a Still
 SEE ALSO SEE ALSO
65 Create and Save a Preset 71 Make a Variable-Speed Pan and Zoom 73 Control Volume at Specific Points
Although filmmaker Ken Burns (notable for such epic PBS documentaries as Jazz, Baseball, and The Civil War) didn't invent the technique of slowly moving in and around a photo to make it seem to come to life, he has used it so extensively and so effectively that it has become forever linked to his namethe Ken Burns Effect. By carefully and creatively isolating areas of photos and then revealing a wider context by moving across them, Burns has managed to bring action, suspense, and drama to stills and paintings, giving them a dynamic, intriguing, almost movie-like quality. By controlling the Scale and Position settings for your stills over time, Premiere Elements's keyframing tool gives you the ability to produce the very same effects. But, even greater, the nature of the keyframing tool is that it also allows for easy revision and customization, making it simple for you to match the motions you create to music, sound effects, and narration. By controlling motion, you decide how your audience experiences a photo. You show them what to focus on. You decide how the photo is revealed to them; you control their eye movement through the scene. In doing so, you give your audience not merely a picture to look at but a story to experience. Before you begin, remember that whenever you change the scale of a still or any raster image, there are resolution issues to consider. 22 Prepare a Still for Video discusses how best to ensure that your image quality is maintained throughout this effect. 1. | Drag to Set the Photo's Duration
Stretch the photo or clip you want to pan and zoom down the main Timeline until it's your desired duration.
You can extend or trim the clip later, and it won't affect the positions of the keyframes.
70. Pan and Zoom Still Images a la Ken Burns  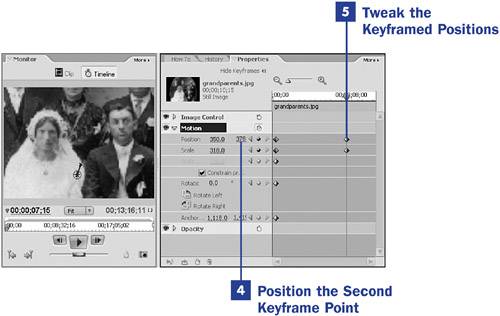
 TIP TIP
When you start changing the positions and scale of your clips and adding effects, you'll find that the playback becomes irregular or that the video image seems degraded. This is because you're actually looking at a preview of the affected clip, which the program is creating on-the-fly. (You'll also notice that a red line has appeared on the Timeline above the clip.) To see a more true representation of what your final clip will look like, render the clip by pressing the Enter key. (When your clip is rendered, the red line above it becomes a green line.) | 2. | Create the Opening Keyframes
Make sure that the photo to which you want to apply the Ken Burns effect is selected on the Timeline. If the Properties panel timeline is not already visible, click the Show Keyframes button at the top of the panel. Also click the triangle to the left of the Motion property to reveal the motion details control panel. Move the current time indicator (CTI) on the Properties timeline to approximately the point you want your motion path to begin.
Click the stopwatch icon to the right of the Motion property title. A column of small diamonds appears on the timeline to the right of the Motion details. These are the opening keyframes for your motion path.
| 3. | Adjust the Keyframe's Settings
As long as the CTI remains at the position of the newly created keyframe points, you can continue to tweak their settings.
You can change the Position and Scale settings several ways:
Type new coordinates or percentages Drag across the numerical settings so they increase or decrease; watch the effect in the Monitor panel Click the image in the Monitor panel and drag it to a new position or resize it by pulling the corner handles
In this example, I began with a wider shot of the wedding photo, using Position settings of 367x330 and a Scale of 177%. (Naturally, I made sure that my photo had enough resolution to allow for this much scaling.)
| 4. | Position the Second Keyframe Points
Move the CTI to the approximate position where you'd like your motion path to change directions.
Change the Position and/or Scale settings. As you do, new keyframe points are automatically created for those settings at the CTI's current position.
In this example, I set the second set of keyframes to a Position of 350x378 and a Scale of 318%a close-up of the bride and groom's faces.
Premiere Elements will create a smooth path between these two keyframe points. In this example, the clip begins with a wide shot of the entire wedding party and then slowly zooms into a tight shot of just the bride and groom.
NOTE As long as the current time indicator (CTI) remains in position, you can tweak your newly created keyframe point's settings. It's only after the CTI is repositioned that the settings become permanently locked to that keyframe point. To change the settings for the keyframe point after moving the CTI, click the left or right arrows to the right of the property in the Properties panel. The CTI jumps to the next or previous keyframe point, at which point you can tweak the point's settings. Just as you can set Position values either by changing the property's numerical settings or manipulating the image in the Monitor panel, you can set Scale and Rotation numerically or by clicking the image in the Monitor panel and resize or rotate it by dragging the corner handles.
TIP Keyframe points are added only as settings for each individual property changes. It's quite possible for a motion to be created in which one property has several keyframe points while another has one or no keyframe points at all. | 5. | Tweak the Keyframed Positions
There's no need to create your keyframes in the exact timeline positions you ultimately want them. Positioning them farther apart slows the transition between them. Positioning them closer together speeds the transition. (Also see 71 Make a Variable-Speed Pan and Zoom.)
Using the same process you used to create the second keyframe, continue to add a virtually unlimited number of keyframes to a clip, creating custom motion paths or controlling effects as precisely as you desire.
Remember, nothing is permanent in keyframing. And changing a transition or motion path's speed, keyframe points, or even eliminating the keyframe points completely is as simple as moving, revising, or deleting a keyframe point.
|
|