71. Make a Variable-Speed Pan and Zoom  BEFORE YOU BEGIN BEFORE YOU BEGIN
22 Prepare a Still for Video 67 About Keyframing 68 About the Properties Panel
 SEE ALSO SEE ALSO
69 Add Motion to a Still 70 Pan and Zoom Still Images a la Ken Burns 73 Control Volume at Specific Points
71. Make a Variable-Speed Pan and Zoom 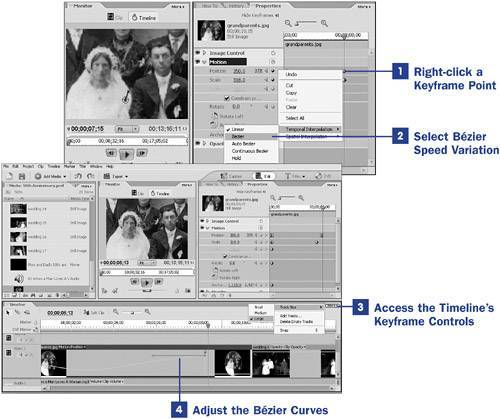
The basic tools of keyframing allow you to create a simple path of motion around your still photos and graphics. However, there are times when you also want to vary the speed of that motion. Premiere Elements provides several options for varying speed of motion along a path. You'll find instructions for creating a simple motion using presets in 69 Add Motion to a Still or a more complicated motion path using your own keyframe points in 70 Pan and Zoom Still Images a la Ken Burns. After you've clicked to select the clip in the main Timeline, open the Properties panel and, if the Properties timeline is hidden, click the Show Keyframes button at the top of the panel. Now you're ready to create a panning or zooming motion that varies its speed across the duration of the clip. 1. | Right-click a Keyframe Point
Right-click a keyframe point to open the keyframe general context menu.
By default, the speed of motion from one keyframe point to the next is Linear, or constant. In other words, if you were move the CTI to a point halfway between two Linear keyframes, you would find that the effect at this point is 50% completed.
| 2. | Select B Bézier Speed Variation
The Spatial Interpolation options affect the motion of the effect on your image through space. The Temporal Interpolation options affect the motion of the effect on your image through time. To change the pan or zoom effect so it varies over time, select the Temporal Interpolation option from the context menu you opened in step 1. A submenu of time-based options appears.
The Linear option makes the speed of the motion constant; Ease In is a Bézier preset in which the motion begins slowly and speeds up as it approaches the next keyframe; Ease Out is a Bézier preset that begins quickly but slows as it approaches the next keyframe; the Hold option holds the keyframe's position until the next keyframe; the Auto Bézier, Bézier, and Continuous Bézier options allow you to manipulate curves to control speed throughout the path or transition.
Choose the Bézier motion option and notice that the shape of the keyframe in the main Timeline changes from a straight line into a curved figure.
 KEY TERM KEY TERM
Bézier A system for controlling a curve's shape by manipulating handles at the end points of the curve.
| 3. | Access the Timeline's Keyframe Controls
Click the More button in the Timeline panel and select Track Size/Large to give yourself better access to the keyframe controls.
Right-click the clip on the Timeline and, from the context menu that appears, choose Show Clip Keyframes and then choose the effect whose keyframes you want to control (in this case, Motion: Position).
| 4. | Adjust the Bézier Curves
By manipulating the control handles on the Bézier curve in the Timeline, adjust the curve of motion or transition to your preference. The shape of the curve represents the variations of the speed of the motion between the keyframes, with the lowest portions of the curve representing slowest motion and the highest portions of the curve representing the fastest motion.
The Bézier curve in this example produces a movement between my Position settings that is slow in movement to about the three-second point, then increases in speed as it approached the second keyframe. (Bézier settings are a rather high-level concept, so you might want to experiment to develop a feel for how the various settings affect the results.)
|
|