72. Control a Video Track's Opacity over Time  BEFORE YOU BEGIN BEFORE YOU BEGIN
67 About Keyframing 68 About the Properties Panel
 SEE ALSO SEE ALSO
69 Add Motion to a Still 70 Pan and Zoom Still Images a la Ken Burns 73 Control Volume at Specific Points
Just as you can map motion to specific points in a clip using keyframing, you can map other effects and properties (such as Image Control and Opacity) to specific points in a clip. In 67 About Keyframing, we demonstrate that the automatic video Fade In and Fade Out effects are actually keyframed effects. Creating such an effect from scratch is also easy, the result being the video equivalent of the audio fade effect created in 73 Control Volume at Specific Points. 1. | Select a Clip on the Timeline
Click to select a video clip on the main Timeline. If you have clips on more than one track and you want to adjust the opacity for one clip so another clip shows through the first clip, arrange the clips in the tracks so the clip to adjust is on an upper track and the clip you want to show through is on a lower track.
The Properties panel shows the standard properties of Image Control, Motion, and Opacity (see 68 About the Properties Panel). If the Properties panel timeline isn't visible, click the Show Keyframes button at the top of the panel to reveal the timeline. Also click the triangle to the left of the Opacity property to reveal its detail settings.
72. Control a Video Track's Opacity over Time 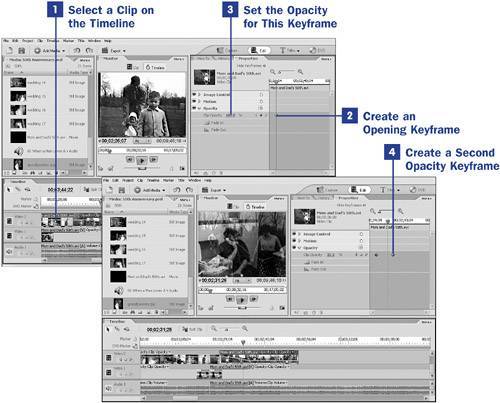
 NOTE NOTE
The Opacity settings affect the transparency of a clip in your Timeline. If nothing is on the video track below the affected clip, making your clip transparent reveals the black background. If a clip does exist on the video track below the clip you're affecting, reducing the clip's Opacity reveals the clip on the track below. | 2. | Create an Opening Keyframe
Move the current time indicator (CTI) on the Properties timeline to the beginning of the timeline and click the stopwatch icon to the right of the Opacity label. A second hand appears on the stopwatch icon, indicating that the property is keyframed, and a keyframe point for the Opacity setting appears at the CTI on the timeline.
| 3. | Set the Opacity for This Keyframe
As long as the CTI remains in position, you can adjust the settings for the current keyframe points. (Move the CTI to apply the current settings and create another set of keyframe points.) Set the Opacity value for the first keyframe point to 100%. The selected clip (for example, the clip on the Video 2 track), is displayed in the Monitor panel and the clip on the Video 1 track (the lower track) is not visible.
| 4. | Create a Second Opacity Keyframe
Move the CTI to the right some distance and set the Opacity value for this point to 0%. A keyframe point is automatically added at the CTI as you change the Opacity settings for this clip. (You can reposition the keyframe point on the Properties panel timeline if you later decide to do so.)
In the Monitor panel, you'll see that the clip has become transparent, revealing the clip on the Video 1 track. (If there is no clip on a lower track, the black background shows through the selected clip.) As you scrub between the two points or play the clip, notice that Premiere Elements has filled in the transitional frames, creating essentially a dissolve from the clip on Video 2 to the clip on Video 1.
Creating additional keyframe points, you can continue to control the opacity of the clip at various points.
Any audio or video property can be keyframed to transition in this way. And, just as you can add motion to a still image by setting keyframe points (see 70 Pan and Zoom Still Images a la Ken Burns), you can morph nearly all the effects and image adjustments by modifying the effect's keyframe settings.
|
|