73. Control Volume at Specific Points  BEFORE YOU BEGIN BEFORE YOU BEGIN
47 Add an Audio Transition 67 About Keyframing 68 About the Properties Panel
 SEE ALSO SEE ALSO
70 Pan and Zoom Still Images a la Ken Burns
73. Control Volume at Specific Points 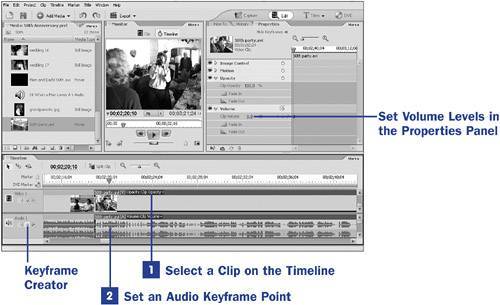 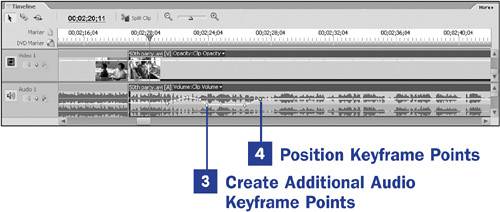
Unfortunately, some people speak too quietly on camera, and you need to bring up the audio on your video so you can hear them. Others speak louder than anyone else in the scene, and you need to bring down their audio to make the sound levels more even. And sometimes you just want to lower or completely mute the volume on a clip so an alternate track of music or narration can dominate. Fortunately, Premiere Elements's keyframing tool allows you to easily set the audio levels at specific points on your Timelinepoints you can also easily revise, move, or remove. (Note that the effect described in 47 Add an Audio Transition is essentially a keyframed preset that fades the audio in or out.) 1. | Select a Clip on the Timeline
Click an audio or a video clip on the main Timeline. In the Properties panel, you'll see the standard properties of Image Control, Motion, Opacity, and Volume if you selected a video clip; if you selected an audio clip, the only property in the Properties panel is Volume. For this task, we will be concerned with only the Volume property of the clip you've selected.
When using keyframing in audio, it's worth noting that the same principles apply to audio keyframing as apply to video keyframingnamely that you set specific points on the timeline at which you want certain effects to occur. (See 67 About Keyframing.) With audio levels, however, your main concern is not so much setting up keyframes for effects (although that is also possible) but with setting your audio volume to raise or lower at specific points.
| 2. | Set an Audio Keyframe Point
Although you can set your keyframe points in the Properties panel, as you would with a video effect or movement, it is usually easier, and more intuitive, to set audio keyframe points right in the audio track on the main Timeline.
After you've selected a video clip with an audio track, the keyframe creator (the little diamond next to the audio track's name on the left end of the Timeline) becomes activated. Click the little diamond in this control panel and a keyframe point appears on the yellow line that runs horizontally through the audio track of your clip at the position of the current time indicator (CTI).
This yellow line represents the clip's audio level. By raising and lowering it, you can raise or lower the audio level of the clip. By placing keyframe points on this line, you can raise or lower the levels of specific points on the clip.
For this example, I wanted the audio for the clip to start at its default level (the level I recorded when I shot the video with my camcorder) and then increase slightly for about three seconds to compensate for some dialog recorded at a low volume before tapering off again for another four seconds when the sound level on my audio track gets louder than I'd prefer. About 9 seconds into the video clip, I want the volume level to again return to the default level. I'll set keyframe points at roughly the 3-second, 7-second, and 9-second positions on the Timeline.
 NOTE NOTE
The yellow, horizontal line that runs through every audio clip is, by default, a volume level control. Without a keyframe point, you can raise or lower the volume of an entire clip by raising or lowering this line in the track. | 3. | Create Additional Audio Keyframe Points
To create another audio keyframe point, move the CTI on the main Timeline to the right and click the audio keyframe creator (the little diamond on the left end of the audio track) again.
You need not create your keyframe points at the exact positions you want them. You can move them around and adjust their levels later as needed.
NOTE Although most people find it easier to set audio keyframe points right in the Timeline panel, you can also do so on the Properties panel timeline, where volume levels for each keyframe point can be set numerically or by using the slider control. | 4. | Position Keyframe Points
Drag the CTI back to the beginning of your clip and click the Play button on the Monitor panel. Listen to your clip or, better yet, open the Audio Meters panel (choose Window, Audio Meters to display it) and watch the audio levels. Pause your playback when you reach a spot where you want to raise or lower the audio level for the clip.
The higher you drag the keyframe point, the louder the track plays. The lower you drag the keyframe point, the lower the track plays. To sustain an increased or decreased level, position a keyframe at the beginning and end of the section you want to affect and make sure that the keyframe points are exactly opposite each other on the yellow volume control line (at the level you want to sustain).
Continue to add and position keyframes as necessary to vary the clip's volume as desired.
|
NOTES You might find it easier to position the keyframed audio levels if you expand the height of the audio track. To do this, mouse over the seam between two audio tracks on the left side of the Timeline panel until the mouse pointer becomes a double-horizontal line. Click and drag the audio track to whatever height with which you find it easiest to work. You can also set the height of the tracks on the Timeline by clicking the Timeline panel's More button and choosing the track size from the menu.
|