69. Add Motion to a Still  BEFORE YOU BEGIN BEFORE YOU BEGIN
22 Prepare a Still for Video 67 About Keyframing 68 About the Properties Panel
 SEE ALSO SEE ALSO
28 Use and Customize Preset Camera Moves 65 Create and Save a Preset 70 Pan and Zoom Still Images a la Ken Burns 71 Make a Variable-Speed Pan and Zoom
69. Add Motion to a Still 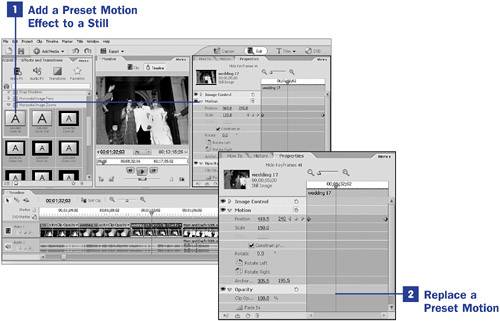 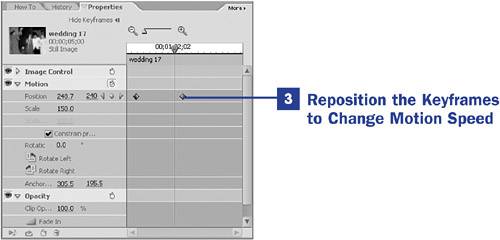
It's the first principle of great movie making: Movies move. Adding motion to a still photo or graphic in your video gives the still image life. It's the difference between merely running a slideshow and telling a story with pictures. Motion directs your audience's attention to certain elements of your image. It isolates an area and then reveals its context. Motion makes the static dynamic. Premiere Elements offers a variety of presets that allow you to simply drag and drop horizontal and vertical pans and in and out zooms onto your clips. These presets add the motion you want, and offer you some control over the way the motion works. As you know, creating and customizing such motion is easy using the keyframing tool in Premiere Elements. After you establish the points at which you want your scale and position to change, Premiere Elements fills in the movement between those points, creating a smooth motion from one keyframe point to the next.  NOTE NOTE
After you've created or customized your keyframed movement or effect, you can save it as a permanent preset, and it will be automatically added to your preset collection. Just select Save Preset from the Properties panel's More menu.
1. | Add a Preset Motion Effect to a Still
The preset motions you can add to a still image are limited to panning over the still or zooming in or away from the image. Open the Effects and Transitions panel and click the Video FX button at the top of the panel. Scroll through the list of preset effects and look for the Horizontal or Vertical Image Pans or the Horizontal or Vertical Image Zooms.
Drag a preset pan or zoom onto a still on the Timeline. The motion of the selected pan or zoom is automatically timed to the duration of the still. Play the clip and watch how the preset affects the clip.
Unless the size of your image has the same dimensions as those listed in the name of the preset (for example, 640480 pixels), it's possible that the preset you selected will either show too little of your image or the motion will extend beyond the edges of the clip. If so, you can customize the motion as described in 28 Use and Customize Preset Camera Moves.
| 2. | Replace a Preset Motion
Because all preset motions are based on the Motion property, dragging another motion or zoom preset onto your clip will overwrite the previous effect.
| 3. | Reposition the Keyframes to Change Motion Speed
The motion path is set to the keyframe points on the Properties timeline. By moving these points, you can control the speed of the transition or motion path between the points.
If you lengthen the duration of the clip, the keyframes remain in their original places, ending the motion path at the final keyframe point and holding that position until the end of the clip. Repositioning the keyframe point to the end of the clip results in a steady motion from beginning to end.
Finally, you can save the new positions you've created as a custom preset as explained in 65 Create and Save a Preset.
|
|