87. Create a Brady Bunch Effect  BEFORE YOU BEGIN BEFORE YOU BEGIN
20 About the Monitor Panel 29 About the Timeline and Video Tracks 30 Add, Delete, and Size Tracks 33 Add or Move a Clip on the Timeline 84 Create a Split-Screen Effect
 SEE ALSO SEE ALSO
22 Prepare a Still for Video 64 Copy Effect Attributes from One Clip to Another 70 Pan and Zoom Still Images a la Ken Burns 71 Make a Variable-Speed Pan and Zoom 104 Output to an AVI Movie
Why is it impossible to see a tic-tac-toe pattern of headshots without thinking of the opening to the 1970s television show The Brady Bunch? No matter. This same effect can be used to have several clips running at once in the same video frame, no matter what arrangement you place them in.  TIP TIP
When arranging my clips in a video frame, I've often found it helpful to create a templatein this case, a tic-tac-toe-style gridin Photoshop Elements as a guide for positioning my clips. I place this template on the Video 1 track and use it as a guide until my clips have all been arranged; then I delete the grid graphic from the Timeline.
87. Create a Brady Bunch Effect 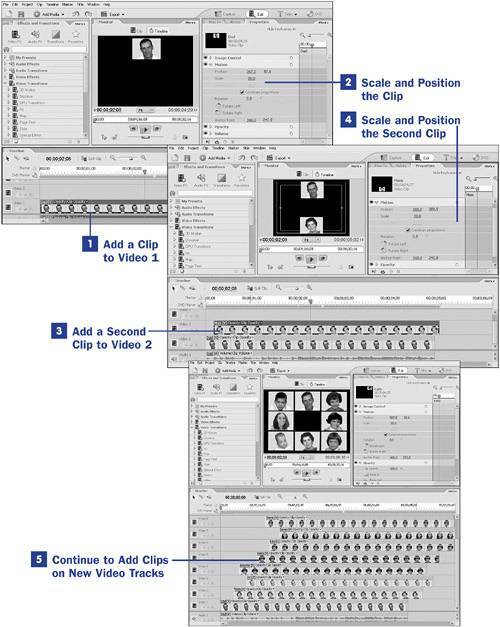
1. | Add a Clip to Video 1
Drag your first clip from the Media panel to the Video 1 track. For a true Brady Bunch effect, the clips you'll be using will be headshots, although other limited-motion clips can also be used to great effect.
You can create in advance as many video tracks as you'll ultimately need. Click the More button in the Timeline panel and select Add Tracks to create more video tracks.
Because you are ultimately going to be using eight or nine video tracks, you might want to reposition the panels in your workspace to allow plenty of room for the Timeline panel.
| 2. | Scale and Position the Clip
With the clip selected in the Timeline, click the triangle to the left of the Motion listing in the Properties panel to open the control panel.
Adjust the values for the Scale and Position settings for the clip to position the clip in its opening location on the screen. You can change these settings in a number of ways: You can type new coordinates or percentages for each setting; you can drag across the numerical settings so they increase or decrease, watching the changes to the effect in the Monitor panel; or you can click the image in the Monitor panel and scale it by dragging the corner handles or position the image by dragging it. Use the method that makes the most sense for you to place a scaled-down image in position on the screen.
If necessary, you can apply a Crop effect to shape the clip, as explained in 84 Create a Split-Screen Effect.)
NOTE Remember, nothing has to stay in one place or at one setting. With keyframing, your clips can be moving around and changing shape throughout the video sequence (see 67 About Keyframing). | 3. | Add a Second Clip to Video 2
Drag a second clip from the Media panel to the Video 2 track, partially overlapping the first clip on the Timeline.
Positioning the second and subsequent clips at staggered positions on the Timeline will have the clips popping in pseudo-randomly when you play the sequence rather than the entire set coming in at once. (See 29 About the Timeline and Video Tracks.)
| 4. | Scale and Position the Second Clip
Repeat step 2 to adjust the Scale and Position settings for the second clip, moving it into position in the Monitor.
When positioning clips in the Monitor panel, make sure you have the safe margins turned on (click the More button in the Monitor panel to access the margin guides) to ensure that you don't position your clips off the edges of a typical TV screen. (See 20 About the Monitor Panel.)
| 5. | Continue to Add Clips on New Video Tracks
Continue to position new clips on new video tracks until you've assembled your pattern of clips in the video frame.
|
TIP Although Premiere Elements allows you to add a virtually unlimited number of video and audio tracks, you might find that running 8 or 10 tracks of video at once is a bit taxing on your system. If so, after you've built your multi-track, multi-clip segment, you might want to export it as an AVI, which is automatically added to your Media panel. You can then use this AVI clip to replace the multi-track segment of video in your final movie project. See 104 Output to an AVI Movie.
|