Section 80. Add a Lightning Bolt Effect
80. Add a Lightning Bolt Effect
33 Add or Move a Clip on the Timeline 61 Add and Customize an Effect 68 About the Properties Panel 74 About Advanced Effects
63 Reset or Remove an Effect 65 Create and Save a Preset 67 About Keyframing 71 Make a Variable-Speed Pan and Zoom 75 Control a Video Effect with Keyframes The infinitely customizable Lightning effect is one of the coolest in the Premiere Elements Video FX collection. By adjusting its settings, you can make the effect appear as anything from a single bolt to an elaborate plasma array of Tesla lightning. You can also use the effect with keyframing to track the endpoints of the lightning with a moving object on screen. For example, you can follow an object as the camera angle changes, show one end of a lightning bolt following a path (as if it were "writing" text in wood, for instance), or even creating the illusion that a person or object is actually carrying the lightning bolts. The only downside is that it's definitely a resource-intensive effect, and even state-of-the-art computers might have trouble rendering previews on-the-fly. But be patient. The results are well worth it. In fact, it's worth your time to render the clip as you experiment with its settings (press Enter to render) so you can see this effect in all its glory as you work.
To make a lightning bolt appear briefly, as if it were a lightning strike, zoom into the Timeline (press the + key) and use the Split Clip tool as described in 36 Split a Clip to slice your clip at the point at which you want the lightning bolt to begin. Nudge the CTI about half a second to the right and slice the clip again, creating a tiny, isolated segment of the original clip. Apply the Lightning effect to this short segment. The clips will still play seamlessly over the slices, but the dancing bolt of lightning will appear for only those few, isolated frames. Add a sound from your own collection to complete the effect! 80. Add a Lightning Bolt Effect 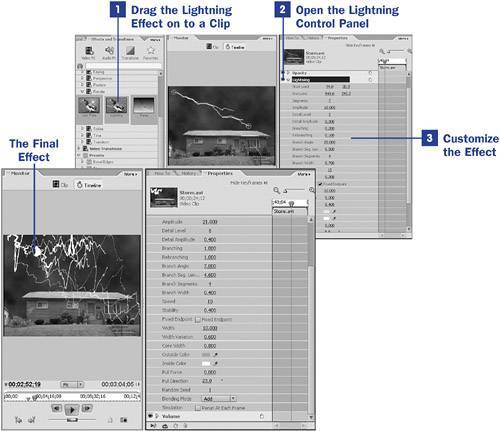
After you begin applying effects to your clip, you'll find that the quality of the image in your playback has apparently deteriorated. On slower computers, playback might even seem jumpy or irregular. This is because your computer is creating a soft render of the clip on-the-fly. Also notice that the affected clip is marked by a red line above the clip on the Timeline. To see a better example of what your clip will look like on final output, press Enter to render the Timeline. The red line above the clip turns green when rendering is complete, and the quality of your playback will be an accurate representation of what your final output will look like. |
 BEFORE YOU BEGIN
 SEE ALSO
 TIP
TIPEAN: 2147483647
Pages: 199