79. Add a Strobe Effect  BEFORE YOU BEGIN BEFORE YOU BEGIN
33 Add or Move a Clip on the Timeline 61 Add and Customize an Effect 68 About the Properties Panel 74 About Advanced Effects
 SEE ALSO SEE ALSO
63 Reset or Remove an Effect 65 Create and Save a Preset 67 About Keyframing 71 Make a Variable-Speed Pan and Zoom 75 Control a Video Effect with Keyframes
Premiere Elements makes it easy to add and customize a strobe effect to your video clip. The Strobe Light effect adds a flash of white (or whatever color you designate) at regular intervals to your clip. 1. | Drag the Strobe Light Effect on to a Clip
The Strobe Light effect is found on-the-Effects and Transitions panel, in the Stylize category of the Video FX collection. Drag this effect from the Effects and Transitions panel and drop it on a clip in the Timeline.
Applying this effect to a clip gives you a flashing strobe effect at the default settings.
| 2. | Open the Strobe Light Control Panel
With the clip selected, click the triangle to the left of the Strobe Light listing in the Properties panel to reveal the effect's control panel.
79. Add a Strobe Effect 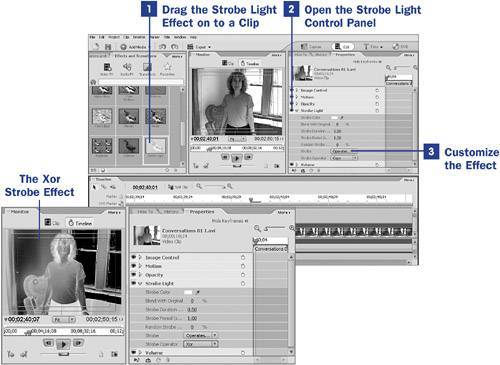
| 3. | Customize the Effect
The control panel enables you to set the color of the flash, its duration, its period (rate), an option for blending it with the original image, and an option to randomize the timing of the flashes.
You will also find an additional Strobe option for making the clip transparent rather than introducing a flash of color at regular intervals (a particu-larly interesting effect if you have another clip on the video track below the strobe-affected clip). You set this effect by choosing Strobe Makes Layer Transparent from the Strobe drop-down list.
You might also want to experiment with the Strobe Operator settings, which perform calculations on the colors in the clip to create different effects. The Xor option pops in a negative of the screen image rather than a white or colored flash at regular intervals.
|
 TIP TIP
After you begin applying effects to your clip, you'll find that the quality of the image in your playback has apparently deteriorated. On slower computers, playback might even seem jumpy or irregular. This is because your computer is creating a soft render of the clip on-the-fly. Also notice that the affected clip is marked by a red line above the clip on the Timeline. To see a better example of what your clip will look like on final output, press Enter to render the Timeline. The red line above the clip turns green when rendering is complete, and the quality of your playback will be an accurate representation of what your final output will look like.
|