Configuring the Project's Classpath Like most project settings, the classpath used to compile Mobility projects is managed in the Project Properties dialog box. Two panels in particular control the classpath: the Libraries & Resources panel and the Platform panel. In addition to compilation, code completion is controlled by these settings. Changing the Project's Emulator Platform The selected emulator platform is used to determine which vendor-supplied libraries are to be used for project compilation. By default, your project is configured to use the latest version of the J2ME Wireless Toolkit. You can modify this using the Platform panel of the Project Properties dialog box: Right-click your project in the Projects window and choose Properties. Select the Platform node in the Project Properties dialog box (as shown in Figure 14-3). Figure 14-3. Mobile Application Project Properties dialog box, Platform panel 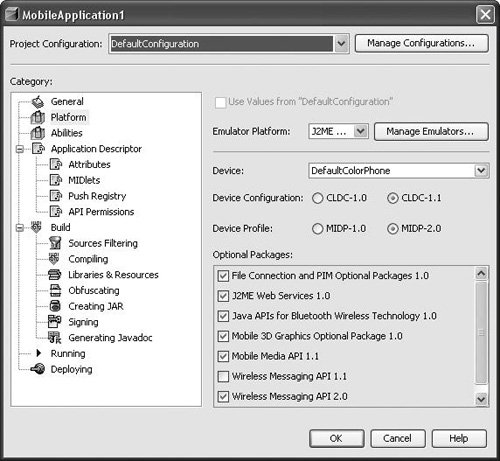 Optionally, modify any of the following fields to change which emulator libraries are used to build and run the project:
Emulator Platform. The installed emulator platform you would like to use. This controls which values are available for all following fields. Device. Selects which device skin to use when launching the application. Device Configuration. Determines the device configuration. This setting affects your classpath. Device Profile. Determines the device profile. This setting affects your classpath. Optional Packages. Select or deselect any number of the optional packages. Again, this setting affects your project's classpath.  | Sometimes, one device profile or device configuration is disabled when a given emulator platform is selected. This is a result of that emulator platform's response to a Unified Emulator Interface (UEI) query regarding its profile and configuration abilities. You can still develop an application for the disabled configuration or profile using the selected platform (for example, developing a MIDP-1.0 profile with the WTK2.0 emulator platform). First, ensure that you do not use any invalid code for the desired profile or configuration; then add a MicroEdition-Configuration or MicroEdition-Profile attribute to the project's Application Descriptor. These attributes are managed in the Project Properties dialog box's Attributes panel. |
Although NetBeans Mobility Pack ships only with the J2ME Wireless Toolkit, it is also possible to install additional third-party-vendor emulators into the IDE. This is done using the standard Platform Manager, which can be accessed in the standard way from the Tools | Java Platform Manager main menu option or from within the Project Properties dialog box. Right-click your project in the Projects window and choose Properties. In the Project Properties dialog box, select the Platform node. Click Manage Emulators. This opens the Java Platform Manager. Click Add Platform. Select the Java Micro Edition Platform Emulator radio button and click Next. After the IDE finishes its scan for installed emulators, select those emulators that you would like to add. If the IDE has not detected an emulator you are looking for, click Find More Java ME Platform Folders and navigate to the location of the emulator you would like to install. Note that automatic detection is available only on Windows systems (through the Windows registry). On UNIX-based systems, you must always specify the path to search. Click Next and wait for the IDE to retrieve detailed information about the SDKs. If there is at least one valid emulator platform, the Finish button is enabled. Note that only UEI-compliant emulators are detected. See Installing Nonstandard Emulator Platforms later in this chapter to learn how you can install non-UEI-compliant emulators into the IDE. It is possible to add the same emulator twice; however, a different name has to be specified. Optionally, click the Javadocs tab or Sources tab to specify the locations of emulator sources and documentation. Click Finish.
Installing Nonstandard Emulator Platforms This section describes the process by which you can use an emulator platform installed on your system that is not automatically recognized by the Java Platform Manager. Platforms are not automatically detected if they do not comply with the Unified Emulator Interface (UEI) specification. This specification defines queries that allow external tools to determine the capabilities of the emulator (for example, supported MIDP and CLDC versions). Although most modern emulators are written in accordance with this standard, it can still be useful to use the older, non-UEI-compliant emulators. | Emulators that are not UEI-compliant can sometimes be installed in the J2ME Wireless Toolkit as a device. Once installed in the J2ME Wireless Toolkit, the device appears in the Devices combo box of the Platforms panel when that platform is selected. Although the Nokia 7210 can be installed in this manner, it is still used here as an example illustrating how platform descriptor files can be manually created or edited. |
An emulator platform that is not UEI compliant can be added using Tools | Java Platform Manager: Click Add Platform. Choose Custom Java Micro Edition Platform Emulator. Click Next. The information you must enter is: Platform Home. The path to the directory where the emulator platform is installed. You can enter a path, or use the Browse button to navigate to the directory. Platform Name. A name for the emulator platform. Device Name. A name for the specific device the platform emulates. Preverify Command. The command-line syntax that invokes the emulator to preverify a MIDlet. Execution Command. The command-line syntax that invokes the emulator to execute a MIDlet. Debugger Command. The command-line syntax that invokes the emulator to debug a MIDlet.
To see descriptions of the command-line syntax parameters, click in the appropriate field. Click Finish.
Adding JAR Files and Folders to the Classpath If your project depends on additional APIs or classes that aren't part of the selected emulator platform, you can add them to your project's source path manually. Unlike classpath items for general Java projects, all classes added by this panel are packaged in the project's distribution JAR file. Care must be taken to ensure that all included classes pass preverification. Right-click your project in the Projects window and choose Properties. Select the Libraries & Resources node in the Project Properties dialog box. Click Add Jar/Zip or Add Folder. In the file browser, choose the file or folder containing the classes you would like to include. Click OK to close the Project Properties dialog box.
| If you want to use a library solely for compilation without packaging it with your application, you should make that library an optional API of one of your emulator platforms. See Changing the Project's Emulator Platform earlier in this chapter. Also, it is important to remember that the preverification process can cause the build process to fail even for projects that compile without any problems. All classes in the Libraries & Resources panel must preverify correctly using the selected emulator platform's preverify command for the build process to succeed. |
|