Using Conditionals Recorded macros are, to put it bluntly, stupid. They can repeat what you did when you recorded the macro, but they can't behave differently in different circumstances. They can't make decisions. The only way that you can make your macros 'smart' is to add the decision-making ability yourself. Make a Decision The Chapter07 workbook contains a macro named MoveRight. The MoveRight macro looks like this: Sub MoveRight() ActiveCell.Offset(0, 1).Select End Sub This macro selects the cell to the right of the active cell. It has the keyboard shortcut Ctrl+Shift+R assigned to it. This macro works fine-most of the time. -
With cell A1 selected, press Ctrl+Shift+R. The macro selects cell B1. -
Press Ctrl+Right Arrow to select cell IV1, the rightmost cell on the first row, and press Ctrl+Shift+R. Microsoft Visual Basic displays an error. 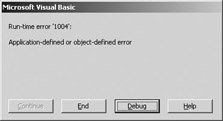 You can't select the cell to the right of the rightmost cell. An ugly error message appears. You'd rather have your macro simply do nothing if it can't move to the right. Reset  -
Click the Debug button to jump to the code, and then click the Reset button to stop the macro. -
Insert the statement If ActiveCell.Column < 256 Then after the Sub statement. Indent the main statement, and insert the statement End If before the End Sub statement. The revised macro should look like this: Sub MoveRight() If ActiveCell.Column < 256 Then ActiveCell.Offset(0, 1).Select End If End Sub An If statement (a statement that begins with the word If) pairs with an End If statement. The group of statements from the If to the End If are called, collectively, an If structure. Visual Basic looks at the expression immediately after the word If and determines whether it's True or False. This true-or-false expression is called a conditional expression. If the expression is True, then in a simple If structure such as this example, Visual Basic executes all the statements between the If statement and the End If statement. If the expression is False, Visual Basic jumps directly to the End If statement. You must always put the word Then at the end of the If statement. -
Switch back to Excel, select cell IS1, and then press Ctrl+Shift+R four or five times. The macro moves the active cell to the right until it gets to the last cell. After that it does nothing, precisely according to your instructions.  The macro recorder will never create an If structure. This kind of decision is pure Visual Basic, and you must add it yourself. Fortunately, adding an If structure is easy. -
Figure out a question with a 'yes or no' answer. In this example, the question is, 'Is the column number of the active cell less than 256?' You can then turn this question into the true-or-false conditional expression in an If statement. -
Put the word If in front of the conditional expression, and put the word Then after it. -
Figure out how many statements you want to execute if the conditional expression returns a True value. -
Put an End If statement after the last statement that you want controlled by the If structure. Using If structures makes your macro smart. Make a Double Decision Sometimes-such as when you're preventing an error-you want your macro to execute only if the conditional expression is True. Other times, you want the macro simply to behave differently depending on the answer to the question. For example, suppose that you want a macro that moves the active cell to the right, but only within the first five columns of the worksheet. When the active cell gets to the fifth column, you want it to move back to the first cell of the next line, like a typewriter. In this case, you want the macro to carry out one action if the cell column is less than five (move to the right) and a different action if it isn't (move down and back). You can make the macro choose between two options by adding a second part to the If structure. -
Switch to the Visual Basic Editor, and change the number 256 to 5 in the If statement. -
Add the statement Else before the End If statement, and press the Enter key. Then press the Tab key and add the statement Cells(ActiveCell.Row + 1, 1).Select after the Else statement. The revised macro should look like this: Sub MoveRight() If ActiveCell.Column < 5 Then ActiveCell.Offset(0, 1).Select Else Cells(ActiveCell.Row + 1, 1).Select End If End Sub The Else statement simply tells Visual Basic which statement or statements to execute if the conditional expression is False. -
Press F5 repeatedly to execute the macro. You see the selection move to the right and then scroll back to column A, much as a typewriter does. 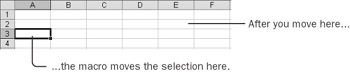 An If structure can contain a single part, executing statements only when the conditional expression is True, or it can have two or more parts, executing one set of statements when the conditional expression is True and a different set when it's False. | Tip | An If structure can also become much more complex than either of these two alternatives. To find out more about If structures, enter the words if then in the Ask A Question box of the Visual Basic Editor. | Ask Yourself a Question In Chapter 2, you created a macro that asked you to enter a date. You used the Visual Basic InputBox function to do that. The InputBox function is excellent for asking a question, but you must be careful about what happens when you click the Cancel button. The Chapter07 workbook contains a macro named TestInput that prompts for the date. The code in this macro should look familiar. Sub TestInput() Dim myDate As String myDate = InputBox("Enter Month in MMM-YYYY format") MsgBox "Continue the macro" End Sub The macro prompts for a date. It then displays a simple message box indicating that it's running the rest of the macro. -
Click in the TestInput macro. Press F5 to run the macro, type Nov-2002 for the date, and then click OK. The message box appears, simulating the rest of the macro. 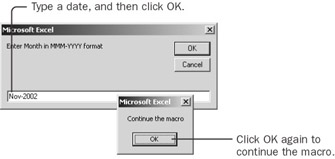 -
Click OK to close the message box. -
Press F5 to run the macro again, but this time click Cancel when prompted to enter the date. The message box still appears, even though your normal expectation when you click Cancel is that you'll cancel what you started. -
Click OK to close the message box. You need a question to which the answer is 'yes' if you want the macro to continue. An appropriate question is, 'Did you enter anything in the box?' Clicking Cancel is the same as leaving the box empty. Whether you click Cancel or leave the box empty, the InputBox function returns an empty string (equivalent to two quotation marks with nothing between them). The operator <> (a less-than sign followed by a greater-than sign) means 'not equal'; it's the opposite of an equal sign. -
Before the MsgBox statement, enter the statement If myDate <> "" Then. Before the End Sub statement, enter End If. Indent the statement inside the If structure. The revised macro should look like this: Sub TestInput() Dim myDate As String myDate = InputBox("Enter Month in MMM-YYYY format") If myDate <> "" Then MsgBox "Continue the macro" End If End Sub -
Press F5 to run the macro. Type a date, and click OK. The macro 'continues.' -
Click OK to close the message box. -
Now run the macro again, but this time click Cancel when prompted for a date. The macro stops quietly. Whenever you allow user input in a macro, you must be sure to check whether the user took the opportunity to cancel the macro entirely. Test for a Valid Entry Testing for an empty string checks to see whether the user clicked the Cancel button, but it does not help you determine whether the value entered into the box is valid. You can add a second test to check the input value. -
Run the TestInput macro again, but this time type hippopotamus in the input box and click OK. The macro continues-the same as it would have if you had entered a date. 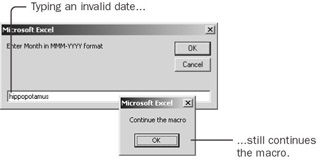 -
Click OK to close the message box. This behavior could be a problem. You need to check whether the box is empty, but you also need to check for a valid date. Visual Basic has an IsDate function that will tell you whether Visual Basic can interpret a value as a date. However, you want to check for a date only if the user didn't click Cancel. This calls for nested If structures. -
Change the macro to look like this: Sub TestInput() Dim myDate As String myDate = InputBox("Enter Month in MMM-YYYY format") If myDate <> "" Then If IsDate(myDate) Then MsgBox "Continue the macro" Else MsgBox "You didn't enter a date" End If End If End Sub Be sure to indent each statement in such a way as to make it clear which statement is governed by which If or Else statement. Visual Basic doesn't require proper indentation, but indentation is critical to help you (or someone following after you) interpret the macro the same way that Visual Basic does. -
Run the macro at least three times. Test it with a valid date, with an invalid entry, and by clicking Cancel. The valid and invalid entries should display the appropriate messages. Clicking Cancel or leaving the box empty should display no message. | Tip | Visual Basic can interpret several different formats as dates. Try different date formats, such as 11/02, to see which ones Visual Basic interprets as dates. | Using the InputBox function can be a valuable way of making a macro useful across a wide range of circumstances. You must be careful, however, to check the result of the InputBox before you continue the macro. Typically, you need to check for three possibilities: valid input, invalid input, and Cancel. An If structure-and sometimes a nested If structure-can make your macro smart enough to respond to all the possible options. Ask with a Message The Visual Basic MsgBox function is handy for displaying simple messages. As its name implies, this function displays a message box. The MsgBox function can do much more than that, however. It can ask questions, too. Many times, when a macro asks a question, all it needs is a simple yes-or-no answer. The MsgBox function is perfect for yes-or-no questions. Suppose that you have two macros. One is a long, slow macro named PrintMonth, and the other is a short, quick macro named ProcessMonth. You find that you often accidentally run the slow one when you mean to run the quick one. One solution might be to add a message box to the beginning of the slow macro that asks you to confirm that you intended to run the slow one. The Chapter07 workbook includes a macro named CheckRun. You'll enhance this macro to see how to use a MsgBox function to ask a question. The macro looks like this before you start: Sub CheckRun() MsgBox "This takes a long time. Continue?" MsgBox "Continue with slow macro…" End Sub -
Click in the CheckRun macro, and press F5 to run it. Click OK twice to close each message box. The first message box appears to ask a question, but it has only a single button. To ask a question, you must add more buttons.  -
Move the cursor to the end of the first MsgBox statement. Immediately after the closing quotation mark, type a comma. As soon as you type the comma, Visual Basic displays the Quick Info for the MsgBox function. The first argument is named Prompt. That's the one in which you enter the message you want to display. The second argument is named Buttons. This is an enumerated list of values. The default value for Buttons is vbOKOnly, which is why you saw only a single OK button when you ran the macro before.  Along with the Quick Info box, Visual Basic also displays the Auto List of possible values for the Buttons argument. You want the buttons to ask the question in terms of yes or no. -
Scroll nearly to the bottom of the list, select vbYesNo, and then press the Tab key. -
Press F5 to run the macro. The first message box now has two buttons.  The message box asks a question, but it totally ignores your answer. You need to get the answer from the MsgBox function and then use that answer to control the way the macro runs. -
Click Yes to close the first message box, and then click OK to close the second one. Then type the statement Dim myCheck As VbMsgBoxResult at the beginning of the macro. When you know a variable will contain only the value from an enumerated list, you can use the name of the list when you declare the variable. When you later write a statement to test the value of the variable, Visual Basic will display the list of possible values for you. -
At the beginning of the first MsgBox statement, type myCheck = , and then put parentheses around the argument list of the MsgBox function. The revised statement should look like this: myCheck = MsgBox("This takes a long time. Continue?", vbYesNo) | Important | When you use the return value of a function such as MsgBox, you must put parentheses around the argument list. When you don't use the return value, you must not use parentheses. | -
Insert these three statements before the second MsgBox statement: If myCheck = vbNo Then Exit Sub End If When you create a conditional expression using the result of the MsgBox function, you must not check for True or False. MsgBox has many types of buttons it can display, so it has many types of answers. If you use vbYesNo as the Buttons argument, MsgBox will always return either vbYes or vbNo. The Exit Sub statement causes Visual Basic to stop the current macro immediately. To avoid making your macros hard to understand, you should use Exit Sub sparingly. One good use for Exit Sub is when you cancel the macro at the beginning, as in this case. -
Test the macro. Run it and click Yes, and then run it and click No. Make sure the rest of the macro runs only when you click Yes. A message box is a powerful tool for asking simple questions. Be very careful to compare the answer to the correct constant rather than to True or False. Declaring a variable with the name of the enumerated list makes it easy to choose the correct constant. The MsgBox function is also a good example of when and when not to use parentheses around argument lists: use the parentheses if you use the return value of the function; otherwise, don't use them. |