| When you place a Captivate into Flash MX 2004, everything in the movie is converted to bitmaps. This includes background images, mouse pointers, captions, and so on. These bitmaps are then converted to Flash Graphic symbols and imported into folders in the Captivate Objects folder, which is created in the Flash Library. The original bitmaps will sit loose in the Flash Library along with any sounds used in the Captivate movie (Figure 10.6). Figure 10.6. All objects in the Captivate movie are converted to bitmaps and placed in the Flash Library. 
 Tip Tip
To avoid a cluttered Flash Library, create a folder in the Library named Bitmaps and another named Sounds. Drag the bitmaps and sounds into their respective Library folders. Do not delete any of the bitmapsthey have tree iconsbecause they are referenced by the symbols in the Captivate Objects folder.
Inside the Captivate Objects folder are a number of subfolders (Figure 10.7) containing the Graphic symbols used in the Flash movie created from your Captivate movie: Backgrounds (Captivate) Any backgrounds, including the slide background color, are converted to bitmaps, broken apart in Flash, grouped, and then saved as a Graphic symbol. This is a rather clunky approach; if you are familiar with Flash, feel free to replace the object in the symbol with a vector object drawn with the Rectangle tool in the Flash toolbar. Captions (Captivate) All of the captions used in the movie, including the balloons, are placed in this folder. If you double-click a caption in this folder, the symbol opens, and you can change the text (Figure 10.8). Figure 10.8. You can change, reformat, or edit caption text in Flash. 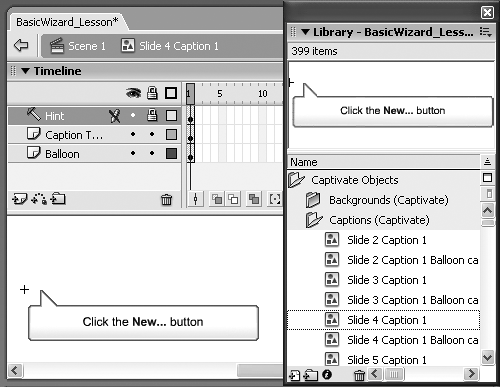
Elements (Captivate) The contents of this folder comprise all of the bits and pieces used to construct the interface elements, such as the balloons used in captions. Don't change a thing in this folder. Images (Captivate) All of the inter-faces and other images used in the Captivate movie are moved to this folder (Figure 10.9). Figure 10.9. The Images (Captivate) folder will contain the screen shots of the interfaces captured along with any images used in the Captivate movie. 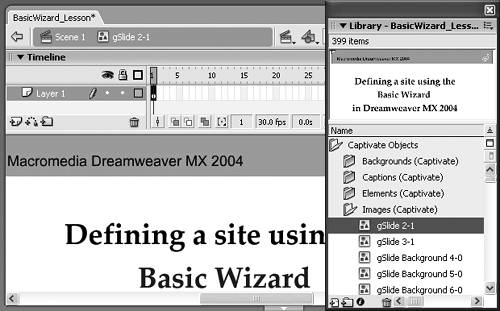
Mouse Pointers (Captivate) Any mouse pointers captured during the recording are converted to bitmaps and placed in this folder. Playback Controller (Captivate) If you chose to import the controller, the controller movie clip, buttons, and sliders that are in the controller, and the Captivate Info box, are placed in this folder (Figure 10.10). Figure 10.10. The playback controller will be converted to a series or Flash buttons and movie clips if it is imported into your Flash movie. 
Figure 10.7. The subfolders found in the Flash Library's Captivate Objects folder. 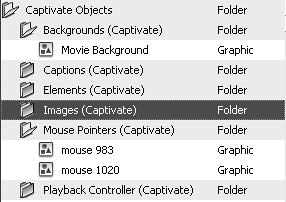
Navigating through the Flash timeline When you create your Captivate movie, it is designed to playback through the Flash Player 6 at 30 frames per second (fps). Assuming you have a Captivate movie that is 30 slides long and each slide takes up 15 seconds on the Captivate timeline, you can reasonably assume you are going to need well over 13,000 frames in a Flash movie. This explains why the timeline in a Flash movie is so long. In the case of the movie shown in Figure 10.11, 1,149 frames are used. Figure 10.11. Each Captivate slide is reconstructed in Flash. Captions and highlight boxes are placed on separate layers in the Flash timeline, and any actions or labels are added also. 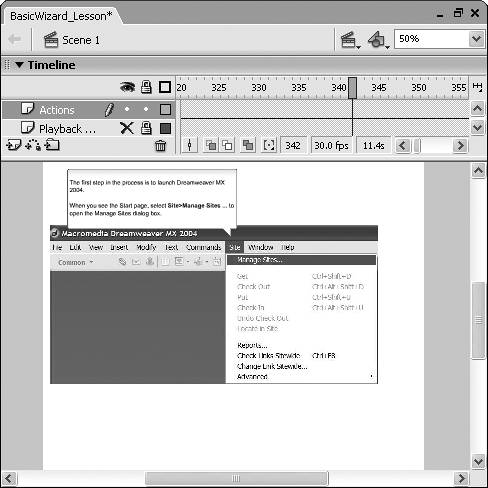
How this occurs is a result of how the Captivate movie is reconstructed in Flash. Each slide of the Captivate movie is brought onto the timeline. The duration of the slide is calculated, and the appropriate number of Flash frames is added. Any transitions, such as fade in and fade out, are created using a Flash Tween and, if there are any full motion SWF files attached to the slide, Flash writes the appropriate ActionScript to load the SWF into the movie when it is needed. Layers are created for objects such as captions, highlight boxes, sounds, mouse movement, and the playback controller. The start point of each slide is indicated by the use of a label (a little flag). As well, any actions that control the playback head are added. If you find the label names or layer names to be confusing, you can change them. To change a label name 1. | Click the frame containing the frame label.
| 2. | In the Property Inspector, select the name in the Frame area and enter the new name.
|
Tip Be careful with this step. If there are any buttons in the movie that navigate to different areas of the Flash timeline, they will be included in a folder named Interactive (Captivate). It isn't the button that will cause a problemit is the movie clip that will be the issue. When the Captivate movie is imported into Flash, navigation will use the frame labels. If you change the label, be sure to locate the script containing the navigation and change the name of the label in that script (Figure 10.12). Figure 10.12. If you change a frame label, be sure to change the name in the ActionScript attached to any navigation elements in the slide. 
To change a layer name 1. | Double-click the layer name on the Flash timeline to select it.
| 2. | Enter the new name.
| 3. | Press the Enter key.
|
It is standard Flash practice to have frame labels appear on a separate Flash layer named Labels. As you can see, Captivate doesn't exactly mirror this "best practice." To create a separate Labels layer 1. | Click the "New layer" button.
The new layer appears in the timeline.
| 2. | Drag the new layer to the top of the timeline and name it Labels.
| 3. | Click the hollow dot in Frame 1 of the new layer, and in the Frame area of the Property Inspector, select <Frame Label> and enter the name of the current frame label.
A red flag with the name entered appears in the layer.
| 4. | Single-click on the frame containing the "old" label name.
| 5. | Select the name in the Property Inspector, press the Delete key, and press the Enter key.
The flag and frame name disappear.
| 6. | Right-click (PC) or Control-click (Mac) on the frame in the Labels layer that is directly above the next frame label.
The context menu opens.
| 7. | Select Insert Keyframe.
A hollow dot appears in the frame.
| 8. | Create the new frame label and delete the old one (Figure 10.13).
Figure 10.13. It is common practice to have a separate Labels layer in Flash. The Slide_2 label created during the import of the Captivate movie into Flash is about to be deleted. 
| 9. | Repeat steps 6 and 7 for the rest of the frames that require labels.
|
Changing the frame rate To the average Flash developer, 30 fps (Captivate's default rate) is quite fast. Again, it is best practice among Flash developers to produce Flash movies with frame rates between 12 and 15 fps. You can change the frame rate of the Flash movie from 30 fps to 12 or 15 fps by double-clicking the frame rate on the timeline to open the Document Properties dialog box (Figure 10.14) and changing the frame rate. Figure 10.14. You can change the frame rate of the Flash movie by double-clicking the Frame Rate area of the timeline and changing the rate in the Document Properties dialog box. 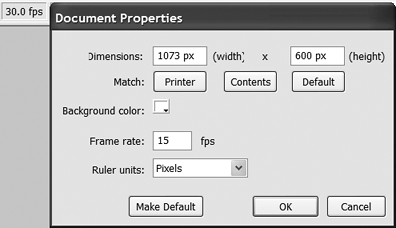
You should approach changing the frame rate with a high degree of caution. Keep in mind that full motion video being "called" into the Flash movie will be affected because these SWF files will adopt the frame rate of the Flash SWF calling them. If a movie is destined for Flash, it might be a better idea to change the frame rate in Captivate. There could be a lot of extra work that could be done more easily in Captivate. To change the frame rate 1. | Open a Captivate movie in Captivate and select Movie > Preferences.
The Movie Preferences dialog box opens.
| 2. | Select the Preferences tab and change the "Frames per second" from the default value of 30 to the new rate (Figure 10.15).
Figure 10.15. If the playback rate needs to be changed, make the change in Captivate. 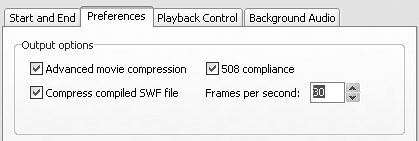
| 3. | Click OK.
Most likely, you will see an alert box notifying you that changing the frame rate may affect the playback of any animation objects in the movie.
| 4. | Click Yes to accept the change.
| 5. | Locate the frames containing animation objects, if any, and adjust their timing on the timeline.
| 6. | Save the movie and export the movie to Flash.
|
|