Simple Customization
|
| < Day Day Up > |
|
A simple customization may involve adding a meaningful description next to the code or adding a prompt to shorten a long list. Each customization has three main steps:
-
Associate a list of values with an object.
-
Add additional information or conditions.
-
Export the customization with the universe.
Adding a Description Object to a Code Object
Some codes may have a logical meaning with which users are familiar. For example, many accountants know certain account ranges by sight. Power users also may know a number of account, product, and customer codes. However, in many cases, the codes are meaningless and users will only ever want to use names or descriptions as conditions.
| Note | Keys are different from codes; they are generated during data warehouse or mart loads. They are often sequential by row and lack any business meaning. Unless there are response time problems, users should never see or use data warehouse-generated keys. |
In large data warehouse environments or in OLTP systems, you want to encourage users to use indexed fields as condition objects whenever possible. This will speed their queries and improve overall response time. In many cases, the code or ID field is indexed but the description field may not be. Displaying a description next to the field in the list of values balances response time needs (searching on index field) while also making the universe more user friendly (letting users search on familiar names and descriptions). You also may want to add additional dimension objects in your list of values to facilitate sorting. Figure 9-2 shows that it may be meaningful to add Country, Region, and City to the Customer Id list of values.
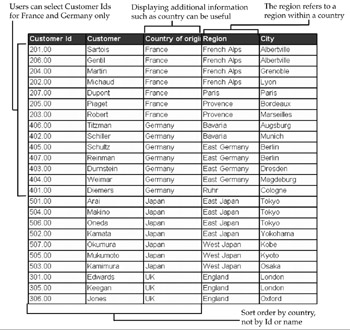
Figure 9-2: Customers reside in cities that are part of countries. Marketing and sales personnel may manage more than one country.
In the following example, you will use the Island Resorts Marketing or BEACH universe. To ensure you do not affect the original universe, import the universe from the repository (choose File | Import and select Island Resorts Marketing). Then select File | Save As and enter the new name: T_BEACH, for Test Beach.
Associating a List of Values
-
Select the Customer class.
-
Select Insert | Object or click Insert Object.
-
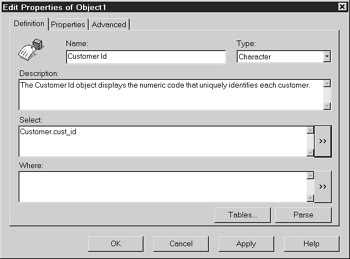
Replace the default object name OBJECT1 with Customer Id. Complete the Description and SQL Select fields shown next:
-
Select the Properties tab.
-
Change the list name to CUSTID.
-
Click Display. If the list is blank, click Refresh. Note that you are presented with a fairly meaningless list of codes to which you want to add the customer name.

-
Click OK to return to the Object Properties tab.
Adding Additional Information
Now that the object has an associated list of values, you can modify the .lov query file to include an additional column of information.
-
From the Object Properties, select Edit. Designer presents you with a standard Query Panel. For more information on using the Query Panel, refer to Chapter 21.
-
Click the Customer class to expand the list of objects.
-
Drag the Customer (CUSTOMER.NAME) object to the right of the new Customer Id object.
-
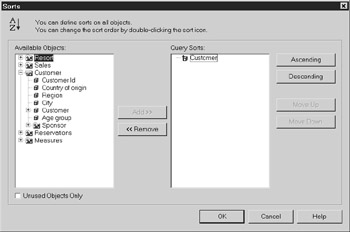
The Customer Id has no sequence that is meaningful to users, so add a sort on Customer so that the names are sorted in alphabetical order. Click the Manage Sorts icon.
-
Expand the Customer class.
-
Double-click Customer to add it to the Query Sorts column. Leave the sort order at the default of Ascending.
-
Click OK to return to the list of values Query Panel. The final query definitions should appear as follows:
-
Click OK to return to the Edit Properties of Customer Id panel.
-
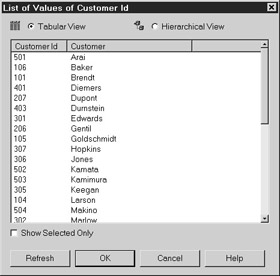
Click Display and then Refresh to see the results of your customized list of values. Set the view to Tabular View (these views are explained later in 'Tabular vs. Hierarchical Views'). This is what users will see when they access the list of values:
Exporting Customization with the Universe
Now that you are satisfied with the customization, you are ready to export the list of values with the universe. You do not want the data exported with the query definition (as explained in Table 9-1), so the following steps will purge the data and ensure only the query file gets exported:
| Note | If you test your list of values (step 9 in the previous section), you must first purge the results or the data will be exported with the query customization. Exporting list of values data to the repository can slow universe imports unnecessarily. |
-
From Object Properties, select Edit to return to the Query Panel.
-
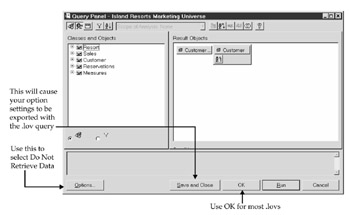
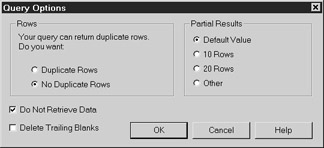
From the Query Panel, select Options.
-
Check the box Do Not Retrieve Data.
-
Click OK to return to the Query Panel.
-
From the Query Panel, select OK to return to the Edit Properties of CustomerId screen.
Caution If you select Save and Close rather than OK, the query option 'Do Not Retrieve Data' is saved with the object.lov definition. You do not want this, as users also will not be able to retrieve data when using the list of values.
-
Check the box Export with universe.
-
Select OK to save the changes and exit the Edit Properties screen.
-
Select File | Save and then File | Export to save your universe changes and export them to the repository.
As an extra check, you may also want to view the size of the .lov file via Windows Explorer. The exact size of the .lov file will vary depending on how many columns of data, sorts, and conditions are in the list of values. The main point here is to make sure that no list of values files unintentionally have data with the query definitions.
Adding a Prompt to Filter a Long List of Values
The code table in the T_BEACH universe is quite small (35 rows); however, for many real-world data warehouses and OLTP systems, the customer tables and product tables are fairly large. For this reason, universe designers should customize the list of values to shorten the number of rows presented to the user. There is no fixed number as to how many rows are reasonable; it's more a question of reasonable response time. For lists of values, aim for seconds, not minutes, or users may incorrectly assume the system is down.
When adding prompts as part of your customized list of values, you must first be familiar with the dimension tables, how they relate, and which prompts will give a good response time without annoying the users. If a user is simply trying to find a customer code, the user does not want to be asked five questions in advance to arrive at the customer code; one or two levels of prompting should be the most you do. Whenever possible, strive to display more columns of information in the original list of values rather than adding a prompt as your first choice. The goal of the prompt is to shorten your list to guarantee a reasonable response time and navigatable size; the goal is not to generate the smallest list possible.
For customers, you may shorten the list by adding a prompt for customers beginning with a certain letter or a prompt for customers residing in a certain city or region. For products or SKUs, objects such as product category or line of business bring the list of values to a more manageable size.
In the following example, you will continue to work with the Customer Id object. First, study the dimension data. In looking at earlier Figure 9-2, notice which city and country each customer resides in. Additionally, each country is divided into multiple regions within the country; if your business users had not specifically told you this or if you had not studied the dimensional data, you may have incorrectly assumed that Region referred to World Region (such as North America, Europe, and so on). Ideally, users will tell you which customizations they want, but for them, the choices may not be clear, and the business definitions may not be obvious; it's up to you as the universe designer to give them your best guess for the friendliest, fastest customization.
Next, look at the tables involved, as shown in Figure 9-3. If you decide to prompt the users on Country of Origin, then four tables will be joined together to present the shortened list of Customer Ids. In this demo example, the tables are small, so the joins are not a problem. In a production implementation, carefully evaluate the impact on response time when your list of values customization involves more than one table. At this point, also see if a shortcut join is available, for example, to shorten the list of product IDs according to which plants make the products (see Chapter 7, 'Shortcut Joins'). Prompting on City may result in a faster query, but it doesn't make sense from a business viewpoint; managers are organized by country.

Figure 9-3: Adding Country as a prompt in the Customer Id list of values involves four tables.
-
Select the object Customer Id and double-click to bring up the Edit Properties box.
-
Select the Properties tab.
-
Select Edit to modify the CUSTID.LOV query and display the Query Panel.
-
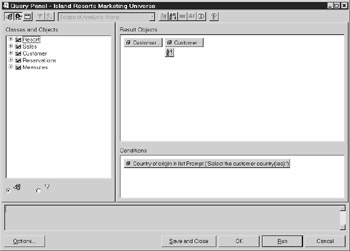
Expand the Customer class and drag the object Country of Origin to the Conditions box.
-
When prompted, select the operator In List and the operand Type a New Prompt. In List allows users to select multiple countries. Operators and operands are explained more fully in Chapter 21. The customized list of values should appear as follows:
-
Follow the steps from the preceding section ('Export Customization with the Universe') to save the prompt into the list of values customization.
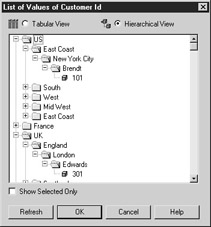
Tabular vs. Hierarchical Views
As you add more result columns in the customized list of values queries, users may wish to view customizations by hierarchy rather than in tabular form. As seen in most of the illustrations in this chapter, Tabular View presents the list of values information in a tabular or spreadsheet format. Hierarchical View provides drill-down functionality within the list of values.
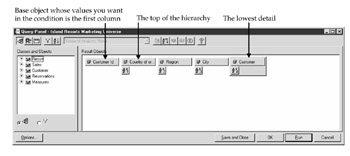
In order for the hierarchical view to work correctly, BusinessObjects requires the columns be in a particular order. The list of values object must always be the first column. If the object is an ID or Code object, it would be intuitive if the description were the second column; but it's not! After the base object, the result objects run from left to right with the left-most object being the top of the hierarchy and the description or most detailed object being on the right side of the query. Each of the objects should have a corresponding sort order.
To continue with the customer example, Customer Id is the object whose list of values you are customizing. In the following screen, this is the left-most object. Country of origin is the top of the hierarchy and appears second. Country of origin is the primary sort order.
| Note | It is important to sort the objects according to the hierarchy levels, or the drill-down may appear nonsensical. |
Now when users request to select a list of values, they can scroll through the possible values by drilling down through a hierarchy. My only complaint with the hierarchy view is that it does not work particularly well with code/description customizations. I would like it if the final drill-down displayed both the code and the description. Otherwise, this is a useful feature for helping users navigate long lists.
| Caution | As with prompts, be careful that the Hierarchical View does not require too many extra clicks. In the preceding example, the country hierarchy alone would have been sufficient, and I recommend leaving out the region and city columns. |
|
| < Day Day Up > |
|
EAN: 2147483647
Pages: 206