| You can have up to 99 tracks of audio at one time within one sequence, but your computer's processor speed determines just how many of them you can play back in real time at the same time. This real-time audio mixing is set from the General tab of the User Preferences window, as shown in Figure 6.1. Figure 6.1. The Real-time Audio Mixing setting. 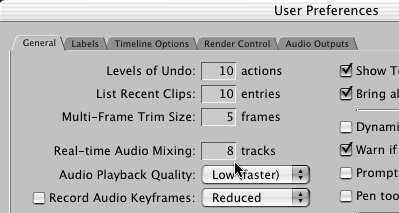 Experimentation is the way to find out how many tracks your computer will play back at the same time. Final Cut Pro has a default setting of eight tracks for real-time mixing. Faster machines, such as G4 duals, play back upwards of 20 or more. Most audio filters play back in real time, but "track costs" are involved with their use. Each machine is different, but it makes sense that if you ask your processor to process more data per track, fewer tracks will be available for monitoring at one time. You can use a couple methods to increase the number of tracks you can play in real time: -
You can render audio filters on a clip-by-clip basis. This lets you monitor more tracks, because you aren't asking your computer to apply the effect in real time. -
If you render video effects that currently play in real time, you again relieve your computer from using computing power to show you these effects at the same time. To render an individual audio item in your sequence, highlight the clips in your sequence that have filters or transition effects added to them and select Sequence, Render Selection, Audio. You can select Sequence, Render All, Audio to render all audio effects. If you render all the audio effects, you can still mix the pan and level settings in real time with the Audio Mixer (see "Understanding the Audio Mixer and Real-Time Mixing" later in this chapter). Furthermore, if you trim, move, or copy and paste a rendered audio clip, the audio-rendered file is preserved. If you are experiencing poor performance, temporarily turn off tracks you don't need to monitor by clicking the green track-monitoring indicators. (Be aware that you might lose rendered files if you do this.) You also can set the number of tracks monitored at one time to a lower number in the General tab of the User Preferences. Or solo the track you want to hear against locked tracks. Monitoring too many tracks at the same time can cause dropped frames during playback. When you are done mixing levels or adding audio effects, you can mix down your audio by selecting Sequence, Render Only, Mixdown or by pressing Opt+Cmd+R. This creates an invisible render file and allows you to hear all the files you've edited into your sequence and improve playback reliability. Because audio files are comparatively small, this process is relatively quick. |