Commands
Commands
chgrp
[OPTION] GROUP FILE
Change the group membership of the file(s) to GROUP. Group must be a valid option as defined in /etc/groups. Depending on your current access permissions for the target file, this command may or may not work for you. In general, if you already have access to FILE, you can grant access permission to someone else. If you do not currently have permission to access the file, you cannot grant access to yourself.
Example: To change the group ownership of the file testfile to group2, use
chgrp group2 testfile
Example: To recursively change the group ownership of all the files in the directory dir1 to group2, use
chgrp -R group2 dir1
| -c, --changes | Print out a confirmation for each file whose permission is successfully changed. |
| -f, --silent, --quiet | Suppress any error messages generated by the chgrp command. |
| -h, --nodereference | In the case where the target file is a symbolic link, make any changes to the link itself rather than the file to which it points. |
| -v, --verbose | Verbose output. |
| -R, --recursive | In the case where the file is a directory, also change the contents of the directory (including any subdirectories). |
chmod
[OPTION] NEW_PERMISSIONS FILE
Change the permissions (mode) of the target FILE(s) to NEW_PERMISSIONS. NEW_PERMISSIONS may be one of two forms, one of which is
[ + | - ] [ r | w | x ]
for [adding | subtracting] one of the three permission types [ read | write | execute].
Unless otherwise specified, using the +|- syntax in chmod will cause changes to apply to everyone. If you want to be more specific, you can specify whether to apply to the user (u), the group, (g), everyone (e), or all of these (a).
This generates commands like the following:
Example: To grant read access to the file to user, group, and everyone, use
chmod a+r file1
Example: To revoke execute access on the file from the group, use
chmod g-x file2
Alternatively, you may specify the new permissions in octal notation. Each file has three sets of permissions associated with it: those for the file's owner , those for the owner's group , and those for the rest of the world . Within each set there are three possible permissions: read , write , and execute (see Figure 2-1).
Figure 2-1. Permissions
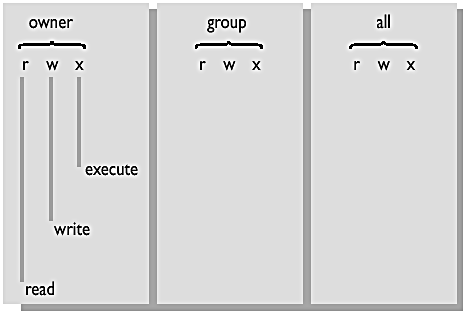
To understand the use of octal notation, think of each of the three sets as being a separate number between 0 and 7. Notice how a 1 in the binary column means that there will be a corresponding permission in the permissions column.
| Octal | Binary | Permission | English Translation |
| 0 | 000 | --- | No permissions. |
| 1 | 001 | --x | Execute only. |
| 2 | 010 | -w- | Write only. |
| 3 | 011 | -wx | Write and execute. |
| 4 | 100 | r-- | Read only. |
| 5 | 101 | r-x | Read and execute. |
| 6 | 110 | rw- | Read and write. |
| 7 | 111 | rwx | Read, write, and execute. |
Use of the octal permission set generates commands such as those presented in the following three examples:
Example: To grant the file's owner read, write, and execute permission (octal = 7); grant the owner's group read permission (octal = 4); and deny any access to the rest of the world (octal = 0), use
chmod 740 file
Example: To grant read and execute access to the user (octal = 5); grant execute access to the owner's group (octal = 1); grant no access to the outside world (octal = 0), use
chmod 510 file
Example: To recursively change the permissions of all the files in the directory dir1 to 700 (read, write, and execute for the owner and no permissions for anyone else), use the following command:
chmod -R 700 dir1
| -c, --changes | Print out a confirmation for each file whose permission is successfully changed. |
| -f, --silent, --quiet | Suppress any error messages generated by the chgrp command. |
| -h, --no-dereference | In the case where the target file is a symbolic link, make any changes to the link itself rather than the file to which it points. |
| -v, --verbose | Verbose output. |
| -R, --recursive | In the case where the file is a directory, also change the contents of the directory (including any subdirectories). |
chown
[OPTION] NEW-OWNER[[:|.]GROUP] FILE
Change the owner of FILE to be NEW-OWNER. Optionally, also change the group associated with the file. NEW-OWNER is either a user-id number or a user name as found in the /etc/passwd file.
|
| For nontrivial use of this command (i.e., changing ownership to anyone other than yourself) you need superuser privileges. |
The OWNER value may be either the login name of a valid user or the numeric value associated with that user. (See the /etc/passwd file for user ids.) The GROUP may be either a group (from the /etc/group file) or a numeric group id.
If you omit the NEW-OWNER argument, but do supply an argument for NEW_GROUP, this command will behave like the chgrp command.
Example: To change the owner of the file bigfile to be "rcowan" and the group of the file to be "compsci," use
chown rcowan:compsci bigfile
Example: The object here is to change the owner of the file otherfile to be "bob," but because there is a colon after bob's user name and no group id is provided, the group id will be changed to bob's login group. The following command is used:
chown bob: otherfile
Example: To recursively change the owner and group of all files in dir1 to "newowner" and "newgroup" respectively, use the following command:
chown -R newowner:newgroup dir1
| -c, --changes | Print out a confirmation for each file whose permission is successfully changed. |
| -f, --silent, --quiet | Suppress any error messages generated by the chgrp command. |
| -h, --no-dereference | In the case where the target file is a symbolic link, make any changes to the link itself, rather than the file to which it points.<Anchor1> |
| -v, --verbose | Verbose output. |
| -R, --recursive | In the case where the file is a directory, also change the contents of the directory (including any subdirectories). |
cksum
[OPTION] [FILE]
Compute and print the Cyclic Redundancy Check for each file specified. The primary use for this command is to verify that a file you have just transferred via some potentially unreliable means has arrived in one piece. That is, if you calculate the checksum from the original file and compare it to the transferred copy, the sums will be identical if and only if it was transferred correctly.
Example: To verify that rcp copied testfile from host1 to host2 correctly, use
host1> cksum testfile
4294967295 329 testfile
host1> rlogin host2
host2> rcp hostfile:/tmp/testfile
host2> cksum testfile
4294967295 329 testfile
cp [OPTION] SOURCE TARGET
Create a copy of the file SOURCE at TARGET. TARGET may be a file or a directory. If TARGET is a directory, cp will create a copy of SOURCE in that directory with the same name as the source file. Note that this command is distinct from mv in that an entirely new file is created with a different inode number and a different location in the filesystem.
By default, cp doesn't copy directories. However, you can force it to do so by specifying the -r option.
Example: To copy the file ch08.txt to ch09.txt without prompting before overwriting (-f option) the existing copy of ch09.txt, use
cp -f ch08.txt ch09.txt
Example: To recursively copy all files in the subdirectory Linux.book to the subdirectory Reference, use
cp -r Linux.book Reference
Example: To copy file1 to the location dir2 while retaining the file's original permissions, use
cp -p file1 dir2
| -a, --archive | Preserve as many of the attributes of the original as possible. |
| -b, --backup | Make backups of the files that are about to be overwritten. |
| -d, --nodereference | In the case where the file is a symbolic link, copy the link itself rather than the file to which it points. |
| -f, --force | Force the removal of target files. |
| -i, --interactive | In the case where TARGET is an existing file, prompt the user before removing it. |
| -l, --link | Rather than copying a file, create a hard link instead. |
| -p, --preserve | Preserve the owner, group, permissions, and timestamp of the original file. |
| -P, --parents | When copying a SOURCE that is specified by a directory path as well as a file name, retain the directory path (by creating subdirectories, if necessary) at the TARGET. |
Example: To create a subdirectory "etc" under myhomedir and place the file "passwd" within it, use
cp /etc/passwd myhomedir
| -r, -R, --recursive | In the case where SOURCE is a directory, recursively copy any subdirectories under it. |
| --sparse=[auto | always | never] | In the case where a file is sparse (that is, contains a sequence of zero bytes that occupy no disk blocks, which is a common space-saving technique in modern filesystems) treat the sparse sequence as specified. |
| auto | If the SOURCE is sparse, the TARGET is sparse. This option is the default. |
| always | The TARGET is always sparse. |
| never | The TARGET is never sparse. |
| -s, --symbolic-link | Create symbolic links instead of actual copies. |
| -S SUFFIX, --suffix=SUFFIX | In the case where use of the -b option is about to generate backup files, append the specified SUFFIX to the backup. |
| -u, --update | In the case where the target file already exists and has a more recent update time than the source, do not make the copy. |
| -v, --verbose | Verbose output. (Print the file name before copying.) |
| -V METHOD, --version-control=METHOD | Used in conjunction with the "-b" option. The METHOD argument is one of the following: [ numbered | t ] [ existing | nil ] [ never | simple ] |
| -x, --one-file-system | In the case where copying recursively, skip any subdirectories not on the current file system. |
dd
[OPTION]
Copy a file with a changeable I/O blocksize. By default, copying is done from standard input to standard output. dd is usually used to perform conversions from one file format to another.
Example: To copy and convert an EBCDIC-formatted source file (file.mainframe) into ASCII format (file.linux), use
dd if=file.mainframe of=file.linux conv=ascii
Example: To test that the disk /dev/hda6 is still in working order by copying data from it to /dev/null in units of 1 kilobyte, use
dd if=/dev/hda6 of=/dev/null bs=1024
| if=FILE | Read from FILE, instead of standard input. |
| of=FILE | Write to FILE, instead of standard output. |
| ibs=BYTES | Input the specified number of bytes at a time. |
| obs=BYTES | Output the specified number of bytes at a time. |
| bs=BYTES | Input and output the specified number of bytes at a time. |
| cbs=BYTES | Convert the specified number of bytes at a time. |
| skip=BLOCKS | Skip the specified number of blocks in the input file before beginning to copy. |
| seek=BLOCKS | Skip the specified number of blocks in the output file before beginning to copy. |
| count=BLOCKS | Copy only the specified number of bytes from the input file and then stop. |
| conv=CONVERSION[,CONVERSION]... | Convert the file from one format to another. CONVERSION is one of the following: |
| ascii | EBCDIC to ASCII. |
| ebcdic | ASCII to EBCDIC. |
| ibm | ASCII to alternate EBCDIC. |
| block | For each line in the input, output exactly the number of bytes specified by the "cbs" argument, padding with spaces as necessary. |
| unblock | Replace the trailing spaces in each "cbs"-sized input block with newline. |
| lcase | Change uppercase letters to lowercase. |
| ucase | Change lowercase letters to uppercase. |
| swap | Swap every pair of input bytes. |
| noerror | Continue after read errors. |
| notrunc | Do not truncate the output file. |
| sync | Pad every input block to size of "ibs" with trailing zero bytes. |
file [-vbczl] [-f namefile] [-m magicfiles] file
The file program tests all the files listed on the command line in an attempt to determine their type.
Example: To determine the types of the files named in the file filelist, use
file -f filelist
| -v | Display version information and exit. |
| -m | Specify a different source for the "magic numbers" used to determine file type. |
| -z | Attempt to look at the contents of compressed files. |
| -b | Brief mode. |
| -c | Print out the parsed magic file. |
| -f namefile | Read the list of file names to be tested from namefile. |
| -L | Follow symbolic links. |
install
[OPTION] SOURCE DEST
install works much like the cp command. It copies files, but also attempts to set their permissions, owner, and group. DEST may be either a file or a directory. It is most commonly used in makefiles to copy compiled programs into their destination directories.
Example: To copy the executable interest into the directory /usr/bin with read and execute permissions while at the same time backing up any existing copy of interest, use
install -b -m 555 interest /usr/bin
| -b, --backup | Create backups of files about to be overwritten. |
| -c | No action. The command is included for backward compatibility. |
| -d, --directory | Create the directory specified by DEST. |
| -gGROUP, --group=GROUP | Set the group attribute of installed files as specified by GROUP. |
| -mMODE, --mode=MODE | Set the permissions attribute of installed files as specified by MODE. |
| -oOWNER, --owner=OWNER | Set the ownership attribute of installed files to a value of OWNER. |
| -s, --strip | Strip the symbol tables from installed binary executables. |
| -SSUFFIX, --suffix=SUFFIX | In the case where a backup file is being generated as a result of the use of the -b option, append SUFFIX to the backup file. |
| -VMETHOD, --version-control=METHOD | Used in conjunction with the "-b" option. The METHOD argument is one of the following: [ numbered | t ] [ existing | nil ] [ never | simple ] |
ln
[OPTION] SOURCE [DEST]
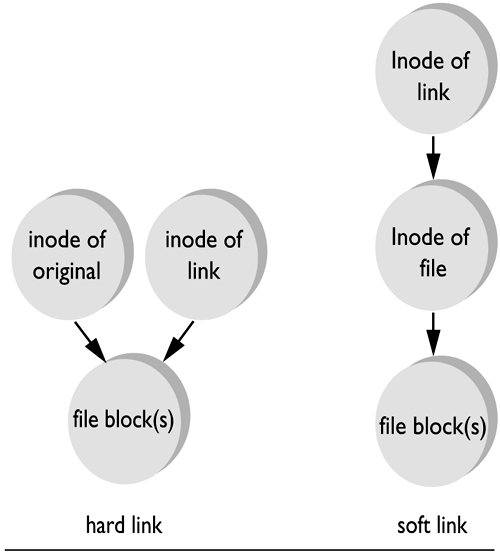
Create a link between files or directories. This link may be either "hard" or "soft" (see Figure 2-2). A hard link is effectively a new file name for the existing file. A soft link is a special type of file that is a pointer to the original file. For most purposes, the links behave as if they were the file itself.
Figure 2-2. Hard versus soft links
Example: To create a symbolic link called junk to the /tmp directory, use
ln -s -d /tmp junk
Example: To create a hard link in your home directory named debug to the executable /bin/dbx (note that the hard link must be created in the same filesystem that /oracle exists in), use
ln /bin/dbx ~/debug
| -b, --backup | Create backups of files about to be overwritten. |
| -d, -F, --directory | Allow hard links to directories (superuser only). |
| -f, --force | Force the removal of previously existing destination files. |
| -i, --interactive | Prompt the user before removing existing destination files. |
| -n, --no-dereference | In the case where the DEST value is itself a symbolic link, treat the DEST as if it were an actual file. That is, create a link to DEST, rather than a direct link to the (third) file, which DEST is already a link to. |
| -s, --symbolic | Create symbolic, rather than hard links. |
| -v, --verbose | Print the name of each file before linking. |
| -SSUFFIX, --suffix=SUFFIX | In the case where use of the -b option generates a backup file, append SUFFIX to each backup file created. |
| -VMETHOD, --version-control=METHOD | Used in conjunction with the " -b " option. The METHOD argument is one of the following: [ numbered | t ] [ existing | nil ] [ never | simple ] |
lockfile
-sleeptime | -r retries | -l locktimeout | -suspend | -! | -ml | -mu | filename
lockfile is used to create a semaphore file. A semaphore file is used to determine whether another file (e.g., a system mailbox) is currently in use. If it is unable to create the specified lockfile, it will wait (by default) 8 seconds to try again. By default, this retrying will go on indefinitely. Arguments can be specified anywhere on the command line and apply only to files listed after the argument.
Example: To unlock your system mailbox, use
lockfile -mu
| -! | Invert return value of lockfile. |
| -h, -? | Help. |
| -SLEEPTIME | Sleeptime specifies the number of seconds to wait between retries. |
| -s | Sleep n seconds after the forced removal occurs. |
| -r retries | Stop after specified number of retries. |
| -ml | Lock your system mailbox. |
| -mu | Unlock your system mailbox. |
ls
whole_lot_of_options
The ls program displays information about files or directories. The output is presented in alphabetical order by default.
ls is inarguably the single most used command in the UNIX world. I have taken my cue from the man page authors and organized the options by functional area.
Example: Frequently, the files output by the ls command will occupy much more than a single screen. If so, pipe the output of the ls command to the less paginator for easy viewing:
ls | less
Example: To suppress listing of subdirectory contents (that is, list the directory name only), use
ls -d
Example: To list the contents of the /etc directory in reverse alphabetical order, use
ls -r /etc
Example: To list the contents of the current directory, including files beginning with a period (".") and including access times and inode information, use
ls -ali
|
| Take the time to familiarize yourself with the options to ls. Once you've got them in your mental toolchest, you'll be amazed at how often they come in handy. |
|
| Create a couple of entries in the .alias file in your home directory for your favorite options to ls, by using the following command: alias ll='ls -al' |
|
| If you're running Linux on a color terminal, include the --color option in your alias. Hence, you can distinguish file types at a glance. |
Options that specify which files to list:
| -a, --all | List all files in directories, including files that start with a period ("."). |
| -A, --almost-all | List all files in directories, including files that start with ".", but do not list "." and "..". |
| -B, --ignore-backups | Do not list files ending in "~". |
| -d, --directory | List the names of directories, rather than their contents. |
| -I, --ignore PATTERN | Ignore files whose names match the shell pattern PATTERN. |
| -L, --dereference | Show file information for the reference of symbolic links rather than the links themselves. |
| -R, --recursive | Recursively list contents of directories. |
Options that specify the information to be listed:
| -D, --dired | Print an additional line specifying the unsigned integers that record the byte position of the beginning and end of each file name in the output. |
| -G, --no-group | Do not display group information. |
| -i,--inode | Include the inode number in the listing. |
| -l, --format=long, --format=verbose | Include file type, permissions, hard link count, owner name, group name, size, and modification time. The third character of each set (owner, group, and all) of permissions may be one of the following codes: |
| s | Indicates that the setuid or setgid bit and the corresponding executable bit are both set. |
| S | Indicates that the setuid or setgid bit is set, but the corresponding executable bit is not set. |
| t | Indicates that the sticky bit and the other-executable bit are both set. |
| T | Indicates that the sticky bit is set, but the other-executable bit is not set. |
| x | Indicates that the executable bit is set and none of the aforementioned applies. |
| - | Otherwise. |
| -o | Long listing without group information |
| -s, --size | Include the size (in 1024-byte) blocks in the listing. |
Ordering the output:
| -c, --time=ctime, --time=status | Sort output by status chante time ("ctime" of the inode). |
| -f | List files in the order they are stored within the directory. |
| -r, --reverse | Reverse whatever ordering might otherwise apply. |
| -S, --sort=size | Order files by size from largest to smallest. |
| -t, --sort=time | Order files by modification time, most recent first. |
| -u, --time=atime, --time=access,--time=use | Order files by access time. |
| -U, --sort=none | Do not sort. |
| -X, --sort=extension | Order by file extension. |
Output appearance
| -1, --format=single-column | List one file per line. |
| -C, --format=vertical | List in columns. |
| --color[=WHEN] | Specify whether to use color for distinguishing between file types. |
| -F, --classify | Append a character to each file name, indicating the file type. |
| --full-time | Print out any time values in full, rather than abbreviating. |
| -k, --kilobytes | Display any sizes in kilobytes. |
| -m, --format=commas | List files horizontally, separated by commas. |
| -n, --numeric-uid-gid | List the numeric user id and group id as opposed to the actual names. |
| -p | Append a character to each file name indicating the file type. |
| -x FORMAT, --format=across, --format=horizontal | List the files in columns, ordered horizontally. |
| -T COLS, --tabsize=COLS | Set tabstop to be COLS columns wide. |
| -w, --width=COLS | Set screen width to be COLS columns wide. |
Specify filename printing style:
| -b, --escape | Display nongraphic characters in file names by using alphabetic and octal backslash sequences like those in C. |
| -N, --literal | Do not quote file names. |
| -q, --hide-control-chars | Do not attempt to print nongraphic control characters. (Use "?" instead.) |
| -Q, --quote-name | Enclose file names in double quotes, also quote nongraphic characters. |
mv
[options] source target
mv moves (effectively renames) a file. If the target argument is a directory, mv moves the source files into that directory without changing the file name. Only regular files can be moved across filesystems.
Example: To rename the file program.c to be program.old, regardless of whether or not there is already a file called program.old (-f), use
mv -f program.c program.old
|
| The main difference between mv and cp is in what happens with (update time, inode number, etc.). mv retains the inode number and the inode. cp creates an entirely new file with new inode information, changing only the filename and access time. |
| -b, --backup | Create backups of files that are about to be overwritten. |
| -f, --force | Overwrite existing target files without prompting the user. |
| -i, --interactive | Prompt the user before overwriting a target file. |
| -u, --update | In the case where a target file has the same name as the source and the target file's most recent modification time is more recent than that of the source, do not move. |
| -v, --verbose | Display the name of each file before moving. |
| -SSUFFIX, --suffix=SUFFIX | In the case where use of the -b option generates a backup file, append SUFFIX to the filename of each backup file created. |
| -V METHOD, --versioncontrol=METHOD | Used in conjunction with the "-b" option. The METHOD argument is one of the following: [ numbered | t ] [ existing | nil ] [ never | simple ] |
pathchk
[OPTION] NAME
Determine whether NAME is a valid and portable UNIX filename. Returns a message if
1. a directory in NAME does not have execute permission.
2. the length of NAME is outside the filesystem's limits.
3. the length of any component of NAME is outside the filesystem's limits.
Example: If you've got a program directory that you're planning to send out into the world, you ought to check it as follows:
pathchk my_baby
| -p, --portability | Perform tests by using the POSIX minimum limits for portability. |
rm
[OPTION] [FILE]
Remove (delete) a file. By default, rm does not remove directories and will prompt you before getting rid of anything.
Example: To recursively remove all the files in the directory tree useless_crap without prompting the user at each file, use
rm -rf useless_crap
The -rf options are handy, but before you hit <Enter>, take a second and think about what you're doing, especially if it's after midnight.
| -d, --directory | Remove directories via "unlink" (as opposed to rmdir). Does not require that a directory be empty before removal. Use with caution. |
| -f, --force | Force removal without prompting the user. |
| -i, --interactive | Prompt the user before removing a file. |
| -r, -R, --recursive | Recursively remove the contents of any subdirectories. |
| -v, --verbose | Print the name of any file before removal. |
stat
filename
Print the contents of the inode associated with filename. This includes
| File | Filename |
| Size | Size in bytes |
| Filetype | Regular, block device, link |
| Mode | Access permissions |
| Uid | User id of file owner |
| Gid | Group id of file owner |
| Device | Device number of device containing file |
| Inode | Inode number of file |
| Links | Number of links to file |
| Access | Time file last accessed (e.g., catted out) |
| Modify | Time file last modified (e.g., edited) |
| Change | Time file last changed (e.g., touched, copied) |
Example: To print out the inode information on the file /etc/passwd, use
stat /etc/passwd
sum
[OPTION] [FILE]
Print the checksum for each FILE, followed by the number of blocks in the file. Generally used before and after transmission of a file to verify that everything arrived OK.
Example: To print the BSD checksum for the file traveller , use
sum -r traveller
| -r | Compute checksums via BSD algorithms. |
| -s, --sysv | Compute checksums via System V algorithms. |
symlinks
[ -cdrv ] dirlist
This command scans directories for symbolic links, listing them to standard output. Each link is classified as one of the following:
| relative | A link expressed as a path relative to the directory in which the link resides. |
| absolute | A link given as an absolute path from the root directory. |
| dangling | A link whose target does not currently exist. |
| messy | A link containing unnecessary slashes or dots in the path. |
| lengthy | A length using "../" more than necessary in the path. |
| other_fs | A link whose target resides on a different filesystem. |
Example: To search all the subdirectories under your home directory (-r option) for symbolic links, removing any dangling links found (-d option), use
symlinks -r -d ~
| -c | Convert absolute links to relative links. |
| -d | Remove dangling links. |
| -r | Recursive operation (within a single filesystem). |
| -s | Detach lengthy links. |
| -t | Test what would happen if -c was specified, but don't change anything. |
| -v | Include relative links in the output (by default, they are excluded). |
touch
[OPTION] FILE
Change the access and modification times of FILE to the current time. If FILE does not exist, it is created as an empty file.
Example: To create an empty file named blah, use
touch blah
|
| Use the touch command in shell scripts. If you're writing a script that removes or moves a file and the file isn't there, the script will bomb. If you touch the file first, it is guaranteed to be there. touch won't alter the contents of the file or the access and modification times. |
Example: To set the last access time of file1 to 2 a.m. on Christmas morning, 1999, use the following command:
touch -a 1225020099 file1
| -a, --time=atime, --time=access, --time=use, | Change the access time only. |
| -c, --no-create | Do not create any files that do not exist. |
| -d --date=time | Use the specified time instead of the current time. |
| -f | No effect. Included for backward compatibility. |
| -m, --time=mtime, --time=modify | Change the modification time only. |
| -r FILE, --reference=FILE | Use the times of the reference file, rather than the current time. |
| -t MMDDhhmm[[CC]YY][.ss]' | Use the time as specified, rather than the current time. |
EAN: 2147483647
Pages: 174