Section 9.2. Code View
Dreamweaver provides several different ways to view a page's HTML code:
-
Code view . In Code view, Dreamweaver displays your page's raw code.
-
Split view . This shows the HTML code and the "regular" Design view simultaneously (Figure 9-2).
-
Code inspector . The Code inspector is a floating code window that lets you use Design view in its full glory (not cut in half as in Split view), while still providing access to the code. (To open the Code inspector, choose Window
 Code Inspector, or press F10.) Code warriors who are into serious multitasking can also use the Code inspector to look at one area of code, while using the main document window to work on another area of code.
The rest of this chapter assumes that you're using Code view for HTML editing.
To move between Dreamweaver's different views, use the buttons in the Document toolbar (Figure 9-2) or choose a name from the View menu: Code, Design (the "regular" visual mode), or Code and Design (Split view).
Figure 9-2. In Split view (also called Code and Design view), the top half shows your page's HTML; the bottom half shows the WYSIWYG Design view. Selecting an object in the visual half (circled) also selects the corresponding HTML in the code half (the highlighted paragraph tag)a great way to identify an object in your HTML. As you work in one half of the Split view, Dreamweaver updates the other half. Use the buttons (labeled) in the Document toolbar to jump between the different views. (Notice that the tag selector at the bottom of the document window [circled] also identifies the selected tag.)

Tip: You can quickly jump between Code and Design view by pressing Control+` (on both Windows and the Mac). In Split view, this shortcut jumps between the two views, so you could insert an image in the design half of Split view and then press Control+` to jump right into the HTML for that image in the Code half of the window.
Code view functions just like a text editor. You can click anywhere inside the window and start typing HTML, JavaScript, Cascading Style Sheet, or other programming code (such as ASP, ColdFusion, or PHP).
That doesn't mean you have to type out everything by hand; the Insert bar, Insert menu, and Property inspector also function in Code view. Using these sources of canned HTML blobs, you can combine hands-on HTML work with the easy-to-use, rapid action of Dreamweaver's objects. This trick can be a real time-saver when you need to add a table, which would otherwise be a multiline exercise in typing accuracy. You can also select a tag (an image's <img> tag, for example) in Code view and use the Property inspector to modify it.
Tip: When you add HTML to Code view, Dreamweaver doesn't automatically update Design view, which can be disconcerting when you're working in Split view. (After all, how would Dreamweaver display a halffinished tag like this: < table border="? ) Click the Refresh button in the Property inspector (see Figure 9-3), or press F5, to update the visual display.
Figure 9-3. After changing code in Split view, click Refresh on the Property inspector to update Dreamweaver's visual display.

To help you navigate your code, Code view provides several visual cues. They include:
-
Syntax coloring . Dreamweaver displays different elements in different colors. Comments, for example, are gray. Text is black, HTML tags appear in dark blue, and HTML properties show up in bright blue. You can change any of these colors, and even specify unique colors for different types of tags, using the Preferences window (see Figure 9-4).
Figure 9-4. From the Preferences window, you can control the color Dreamweaver uses to display HTML and script code while in Code view. To do so, select the Code Coloring Category. Then select the type of documentHTML, ASP, CSS, or whateverand click Edit Coloring Scheme. In the Edit Coloring Scheme window (shown here), select an item whose color you wish to changeLibrary Item or HTML Form Tags, for exampleand set a text and/or background color using the color boxes. You can also make the code bold, italic, or underlined using the appropriate formatting buttons.
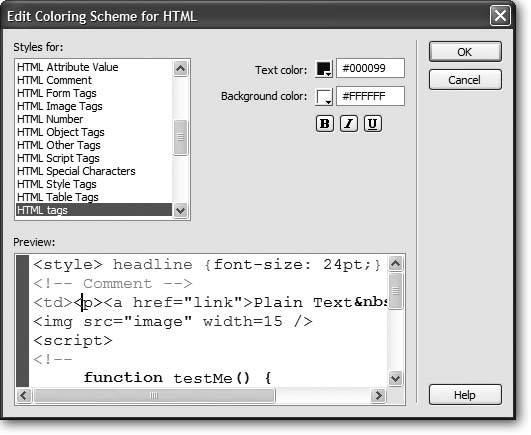
To really make a tag stand out, you can underline it, make it bold, italicize it, and even give it a background color. Dreamweaver has separate color schemes for 24 different types of documents, such as ASP, CSS, and XML files. (But do you really need different colors for HTML forms in ASP pages, HTML pages, and PHP pages? You be the judge.)
-
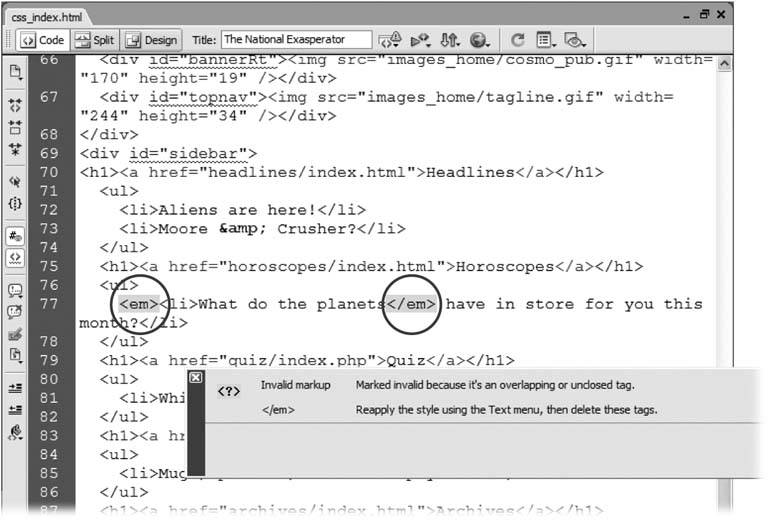
Bad code highlighting . When you type incorrect code (an opening tag without a closing tag, say), it's highlighted in yellow (see Figure 9-5).
Figure 9-5. Dreamweaver highlights incorrect HTML code with bright yellow highlighting in Code view (circled). If you click inside the yellow area, the Property inspector reveals the mistake. In this case, a tag is improperly nestedpart of it is outside the <li> tag. (In Design view, on the other hand, Dreamweaver indicates mistakes by showing the HTML tagthe characters <, e, m, and >, for examplein front of a bright yellow background.)
-
Browser error highlighting . Not all browsers understand all the HTML tags and properties available in Dreamweaver, especially since older browsers may not be aware of current standards. This feature, which is part of the Check Browser Support tool described on Section 14.2, lets Dreamweaver identify code that doesn't work with certain browsers.
Here's how you use it: In Code view, a squiggly red underline appears under code that doesn't work with the browsers you've told Dreamweaver to check (see Section 14.2.1). Mousing over the squiggly line produces a pop-up dialog box with a description of the problem.
For example, in Figure 9-5, the code <div id="sidebar"> displays with a squiggly line under id="sidebar" ; mousing over the id attribute generates a message saying that it isn't supported by Navigator 3.0. (In other words, that old Windows 95 machine in the Museum of Ancient Computing might have trouble displaying this page.)
-
Library Items . Library items and uneditable regions in pages built from templates appear in light gray. You can't actually change this code in Code view. This coloring scheme is a little confusing since HTML comments (see Section 9.2.1) are also displayed in gray, and you can edit those. (For more on templates and the Library, see Chapters 16 and 17.)
You can also control Code view display by using the View Options pop-up menu in the toolbar (see Figure 9-6), or by using the View Code Options submenu:
-
Word Wrap . This option makes long lines of code wrap (at the window's edge) to the next line, so you don't have to scroll horizontally to see it all. This option affects only how Dreamweaver displays the line in the document window; it doesn't actually change your code by introducing line breaks.
-
Line Numbers . This automatic line numbering can come in handy when you're using Dreamweaver's Check Target Browser tool (see Section 14.2), or when you encounter an error in a page containing server-side code (such as the code you create in Part Six of this book). You can also click a line number in Code view to select the entire line, which is a great way to delete or cut a line of code.
-
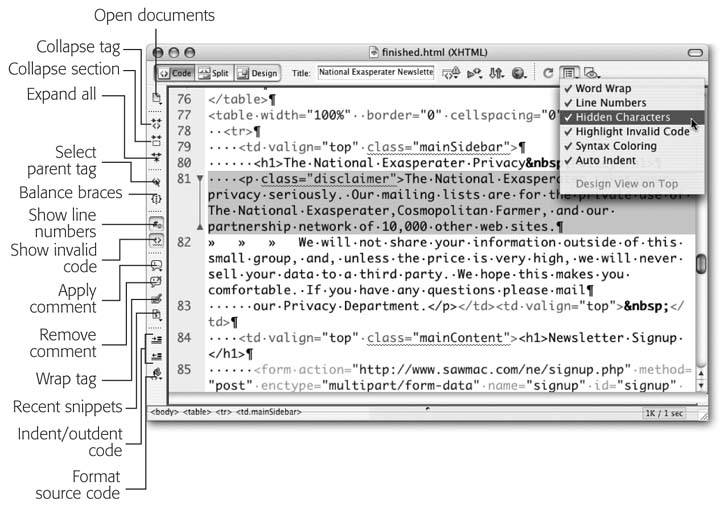
Hidden Characters . Some characters you can type on the keyboard aren't visible on the screen: the end of a line, created by hitting the Enter or Return key, for example. Sometimes, these hidden characters can cause big trouble. For example, when working with dynamic, server-side Web pages (described in Part Six), you might find some cool code on the Web and copy it to your own page. Sometimes copying and pasting code from a Web page introduces hidden characters that prevent the code from working. Turning on the "Hidden Characters" option can help you ferret out these problem characters and eliminate them. Spaces appear as dots, tabs as a set of greater than signs (>>), and paragraphs as a paragraph symbol (
 ) (see Figure 9-6).
 Figure 9-6. Code view provides easy access to common code-writing tasks with the new Coding toolbar (left edge) and the View Options menu (top right), which let you modify how Dreamweaver displays the code. The Word Wrap option, for example, forces all code to fit inside the width of the window. If a line of code extends off the page, Dreamweaver wraps it to the next line (as in the highlighted code in this illustration). Your only clue that you're looking at one long line is that the entire glob of text has only a single line number.
-
Highlight Invalid Code . This is the on/off switch for Dreamweaver's friendly tendency to highlight bad HTML in Code view (see Figure 9-5).
-
Syntax Coloring . This option turns tags, comments, and text into colorful (and informative) text (see Figure 9-4).
-
Auto Indent . When you're working with nested HTML tags, it's often helpful to press the Tab key to indent each level of nested tags, making it easier to identify large blocks of HTML (a table and all its contents, for example). The Auto Indent option carries the same size indent onto the next line when you hit the Return or Enter key. For example, suppose you hit the Tab key twice, type a line of code, and then hit Return. Dreamweaver would place the insertion point on the next line, indented using two tabs. To un-indent, just press the Backspace key.
9.2.1. Coding Toolbar
Dreamweaver 8 introduces a handy toolbar that makes many basic hand-coding tasks go much more quickly. While working in Code view, the Coding toolbar appears on the left edge of the document window (see Figure 9-6). If you don't see it, you can turn it on by choosing View Toolbars Coding, or by right-clicking (Control-clicking) on another toolbar such as the Insert or Document toolbar, and turning on the Coding option in the pop-up menu. Use the same technique to close the toolbar, if you dont use it.
The toolbar contains buttons that duplicate tasks and preference settings that you can control from other parts of Dreamweaver. Here's a quick rundown of the buttons listed in Figure 9-6, with a quick explanation of what they do and, when applicable , a cross-reference to a more detailed description of the tool or action:
-
Open Documents . This is just a pull-down menu, displaying all open documents. It lets you switch among the different documents you're currently working on, but it's actually more work than just clicking a document's tab at the top of the document window (see Section 1.2.1), so you'll probably want to skip it.
-
Collapse Full Tag/Collapse Selection/Expand All . These three buttons work with Dreamweaver 8's Code Collapse feature described on Section 9.2.3. They let you collapse (and expand) multiple lines of code, essentially keeping it out of the way, letting you concentrate on the code you're currently working on.
-
Select Parent Tag . This handy feature lets you quickly select the tag that surrounds your current selection. For example, say you've selected the text inside of a link (<a>) tag, or just clicked inside that tag, and your cursor's blinking happily. Click this button, and the entire <a> tag is selected. Click it again, and that link's parent tag is selected. This button provides a quick way to select the tag you're currently working on. If you really want to be productive, the keyboard shortcut Ctrl-[ (
 -[) is quicker.
 -
Balance Braces . If you do a lot of programming using JavaScript or one of the server languages like PHP, ColdFusion, or ASP, this button can help you find the matching brace ({ or }) character in a chunk of programming code. Just click to the right of an opening brace ({) and then click this button to find the closing brace. To find a closing brace's mate, click to the left of the brace , and then click this button. The button also finds matching parentheses characters. The keyboard shortcutCtrl+' (
-')is even faster. -
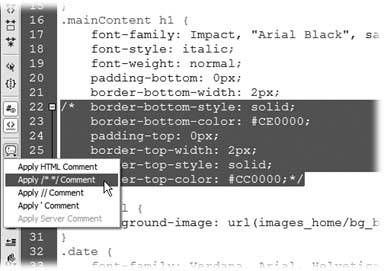
Apply/Remove Comments . Comments are a way of including helpful notes in your code that don't appear on the page when it's displayed in a browser. You may want to leave some explanatory notes in your HTML page to help future generations of Web developers understand what you were doing. For example, you might put a comment before a <div> tag (see Section 8.4) that explains what should go inside it"For corporate logo and navigation bar." Comments are also frequently used to mark the end of a section of the page"End of navigation bar." These buttons let you add or remove comments to HTML, CSS, Java-Script, PHP, and VBScript code, as demonstrated in Figure 9-7.
Tip: Comments are very useful with Cascading Style Sheets (see Chapter 6). You can open a CSS file, select a property inside a style, and stick a pair of comment tags around this property. When you preview a page that uses the style, you'll see the style minus the property you've commented (or commented out, as some programmers say). This maneuver lets you preview a style, temporarily hiding the effect of one or more styling properties without permanently deleting the property. It's a great help in debugging problematic styles.
Figure 9-7. The Coding toolbar lets you wrap HTML, CSS, JavaScript, or other programming code within comment characters. Just select the code you wish to turn into comments, click the Add comment button, and select the type of comment you wish to add. Use the HTML comment option to hide HTML code; the /* */ option to hide multiple lines of CSS, JavaScript, or PHP code; the // option to hide each line of CSS, JavaScript, or PHP code; the ' option to hide VBScript code; and, if you're working on a server-side page as described in Part Six, use the last option to hide code in those pages. To remove a comment, select all of the code (including the comment) and click the Remove comment button (just below the Apply comment button).
-
Wrap tag . Works the same as the Quick Tag editor described on Section 9.2.4.6.
-
Recent Snippets . This pop-up menu lists all the snippets (see Section 16.1) you've recently used. Selecting an item from the menu inserts that snippet's code into your Web page.
-
Indent/Outdent . These buttons will indent or outdent lines of selected code using the settings you've defined in the Code Formatting preferences (see Section 9.2.4.1).
-
Apply Source formatting . This button lets you apply specific formatting to an entire Web page, or just a selection of code, using the code-formatting options you've set up in the Code Formatting preferences window (see Section 9.2.4.1) and the rules defined in the type-A-