Code Templates
|
When Visio generates your code, it goes through classes, interfaces, and associations producing code for you. We remarked earlier that you might be wondering why Visio arranges the fields, methods, and so on as it does. This arrangement is achieved with code templates. Visio checks the templates for every entity to be generated, and substitutes entity parameters into the template, such as class name, method name, and the documentation for that entity. In this way, Visio provides you with more control over the structure of your generated code. We can define particular templates for classes, attributes, operations, and relationships. A default template is used unless we specify otherwise, although we can create our own templates used for the code generation of any particular object based on existing templates.
Using TemplatesVisio uses code generation templates to change the structure of the code generated from UML diagrams. This brings several benefits:
We'll see some examples of these uses as we progress. In Visio, you can use the default templates, create your own, or edit existing ones.
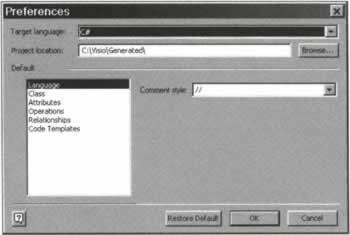
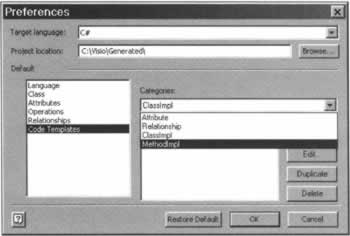
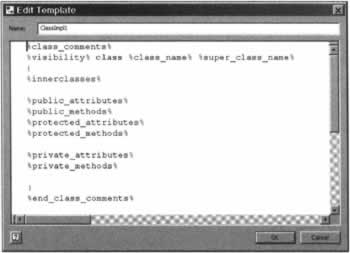
Working with TemplatesTo work with templates, choose the UML | Code | Preferences menu item - this command activates the Preferences dialog window: In C# and Visual Basic .NET, code templates can be applied to four entities: classes, attributes, operations, and relationships. The default template for each of these, and other default settings can be selected by selecting the entity from the Default list. Here's the part of the dialog that is displayed when you choose Operations: The Operation kind dropdown allows you to specify the default method type that an operation will be mapped to in code generation. Be careful with changing this setting - you will find that changing this setting will reset all the operations in your model to the new setting, even if they have previously been defined with a different kind of operation. The Implementation dropdown contains the list of current operation templates - these define the layout of the code generated from a UML operation. The list of operation templates (and the other entity templates) can be found from the Code templates selection: The Categories dropdown lists the categories of templates, and the entity with which they are associated. We'll select ClassImpl - the templates for classes - and the list of all possible templates will be shown in the Templates field. Now you can copy existing templates, delete them, edit, or create a new one. First, select ClassImpl1 and click Edit, to see the structure of the default template for a typical class: The structure of this template is simple; the keywords enclosed by a % symbol are the names of built-in Visio macros. These keywords act as placeholders, into which Visio will put the requested information. The above template determines the structure of the output code as follows: First of all, the %class_comments% parameter indicates that Visio will put comments in the resulting file. The next line specifies the class's visibility, name, and inheritance directives in the class declaration line:
%visibility% class %class_name% %super_class_name% The next set of lines indicate the order in which the various members are put into the class definition:
%innerclasses% %public_attributes% %public_methods% %protected_attributes% %protected_methods% %private_attributes% %private_methods% The order here is that the inner types will go first, then the public fields, public methods, protected fields, and so on, finishing with the private methods. This explains how Visio arranged the code generated for our Employees class earlier. Although we mentioned that these placeholders are actually built-in Visio macros, the Visio documentation states that it is not possible to redefine or extend the existing macros - a limitation as we'll see in a moment. There are other placeholders that can be used in templates:
Notice that some of these placeholders are "scoped" to a particular UML entity - for example, using %attrib_name% on an operation template will simply produce %attrib_name% in the output code. Before we get any deeper into looking at these placeholders, let's see how we can apply specialized templates.
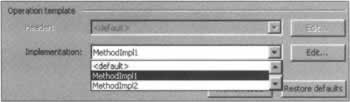
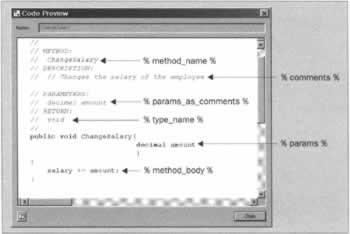
Templates for Specific EntitlesYou can apply a specific template to a particular method. We'll demonstrate this with our ChangeSalary() method. Go to its UML Operation Properties dialog and select the Code Generation Options entry from the Implementation drop-down, and select the existing template MethodImpl1. The MethodImpl1 template looks like the following:
// // METHOD: // %method_name% // DESCRIPTION: // %comments% // PARAMETERS: // %params_as_comments% // RETURN: // %type_name% // %visibility% %type_name% %method_name%(%mark_indent% %indent%%params% %indent%) { %method_body% } When we click Preview code, we can see the effect of this template. The diagram below shows the preview code with the relevant parts of the template marked:
The indenting is controlled by the %mark_indent% and %indent% keywords. %mark_indent% specifies the location in the line to indent to (the position of the first % being the location), and %indent% indents the code to this point in the line. After this, we can generate the code. In the newly-generated code only the ChangeSalary() method has changed since it is the only entity that has a different template specified for it. With this process, you can combine templates for changing the source code format. Visio usually goes from the bottom up applying templates. This means that when it is generating say, a method, it first checks if there is a specific template for that particular method. If there is, Visio will use that bottom-level template; if there isn't, Visio will use the template specified by the code generation properties for the whole project.
Creating New TemplatesAlthough it may not have been clear initially, with code templates in Visio there is the possibility of doing more than simply arranging the class members in a particular order. We are able to enter any characters into a template, in particular - actual code. It is this, combined with the placeholders that provides Visio's code templates with powerful possibilities as we shall see. In Visio, there are two ways to create a new, custom template:
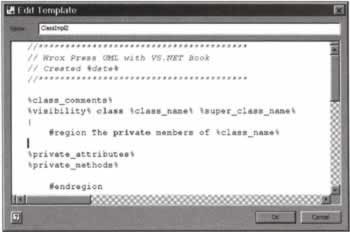
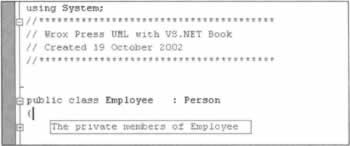
Creating a new template is easy - choose the Code Templates entry in the Preferences dialog window, select the type of template you want to create in the Categories drop-down and press the New button. After this, a new window with an empty text box will be activated for creating a new template, into which you enter your template code. It is probably easier to create a template based on an existing one, rather than starting completely from scratch. This is easy too - go to the Code Templates entry in the Preferences dialog window, select the type of template you want to copy in the Categories drop-down and press the Duplicate button. This will open a new window with a copy of the selected template, and a new name for the template at the top of the window. The screenshot below shows the modifications we'll make to the default template: Note the use of %date% to include the current date, and the #region directive before the private members. This illustrates our observation earlier that we are able to include actual code in our templates, not just the placeholders. Click OK to accept the new template. To edit a particular template, simply select it and click Edit from the Preferences dialog. You can also Delete templates from here - if you delete a template by mistake, click Cancel and then select UML | Code | Preferences to restore your deleted template. To test our new template, double-click the Employees class and from Code Generation Options, select Classlmpl2 from the Implementation drop-down in the Class Template section, and then click OK. When this code is generated, and then opened in Visual Studio .NET, the private members are enclosed in a collapsible block thanks to the #region directive, and collapsing that region produces the following: In this way of adding code to the code templates we are able to add extra features to our classes, fields, and methods that may not form part of the UML model. For example, if we require that the state of the Employee class be transmitted and later recreated, we would want the Employee class to be serializable - this is done by marking the class with the (.NET) attribute [Serializable]. This is easy to add to a class-level template:
%class_comments% [Serializable] %visibility% class %class_name% %super_class_name% { Thus the possibilities offered for fleshing out the skeleton code through code templates become more apparent. However, bear in mind that the code will have to be fleshed out by hand anyway when it is generated, and the more information that you pile into templates the more it ties you to the eventual implementation language, and it is not really contributing to the overall accuracy of your UML model. The placeholders available for use with code templates are somewhat limited - however, if you wanted to generate properties prepopulated, you could use the following shortcut. Suppose you have a private field called number that you wish to expose by a Number property. You could define a new operation called Number, with its Kind set to Procedure from the Code Generation Options menu. For its method body, you would simply enter number. Apply the following template:
%visibility% %type_name% %method_name% { get { return %method_body%; } set { %method_body% = value; } } and you would have a ready-made property, with filled get and set accessors:
public int Number { get { return number; } set { number = value; } } This is a sneaky little example, but if you are determined to leverage as much as possible from code templates then it can pay to experiment with them in such a way. In fact, using templates with properties is somewhat problematic. You'll find that if you want to create a template for properties, you'll have to create one with both get and set accessors, and a separate one if you want only a get accessor, and select the operation kind as procedure and manually choose the required template. If you are a C# user, there is another interesting use for code templates.
XML Comments and Code TemplatesFor C# source files, Visual Studio .NET can automatically generate documentation in XML format, through the presence of XML tags in your source code. Text that is to be processed into XML documentation is provided in special comments with three slashes, rather than the usual two. You can create your own code template with such inserted XML tags. Thus there is a chain:
Before trying to create such templates, let's have a look at some of the XML tags - a complete list is found in the Visual Studio .NET documentation.
Now that we've seen the tags used for creating internal documentation, let's create some templates to include such tags. We'll begin with a class-level template:
%class_comments% /// <summary> /// %comments% /// </summary> %visibility% class %class_name% %super_class_name% { %private_attributes% %private_methods% %public_methods% %public_attributes% %protected_attributes% %protected_methods% %innerclasses% } %end_class_comments% Of course, we also need MethodImpl templates for the methods and properties. The example for the method is listed below.
///<summary> /// %comments% ///</summary> ///<param name=%params%></param> /// <returns>%type_name%</returns> %visibility% %type_name% %method_name%(%mark_indent% %indent%%params% %indent%) { %method_body% } } Finally, we will create new templates for the existing properties - we'll create two, XmlGetSetProperty, with get and set accessors, and XmlGetProperty, with only a get accessor. Here's XmlGetSetProperty:
///<summary> /// %comments% ///</summary> /// <returns>%type_name%</returns> %visibility% %type_name% %method_name% { get { } set { } } If we apply these templates to the various parts of our Employee example (and add some more documentation), then generate code into a new Visual Studio .NET Empty Project, the generated code in Employees.cs will look like the following:
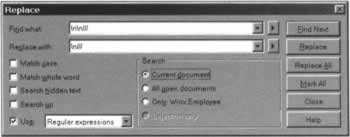
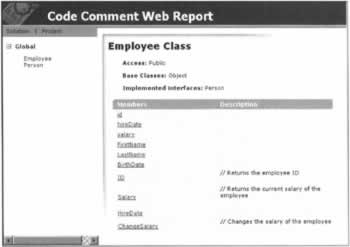
/// <summary> /// // Represents an employee /// </summary> // Represents an employee public class Employee : Person { ... ///<summary> /// // Returns the employee ID ///</summary> /// <returns>int</returns> public int ID { get { } } ///<summary> /// // Returns the current salary of the employee ///</summary> /// <returns>decimal</returns> public decimal Salary { get { } } ///<summary> /// // Returns the current salary of the employee ///</summary> /// <returns>decimal</returns> public DateTime HireDate { get { } set { } } ///<summary> /// // Changes the salary of the employee ///</summary> ///<param name=decimal amount></param> /// <returns>void</returns> public void ChangeSalary( decimal amount ) { salary += amount; } The main thing to note here is how awkward the formatting of the comments is - there's a blank line following each comment. With this blank line, the XML documentation process will not produce the desired output. However, this formatting problem is not insurmountable, a simple find and replace in the Employees.cs file in Visual Studio .NET will remove the problem. The screenshot below shows the Replace dialog from Visual Studio .NET with the settings required to remove our extra-line plague: From Visual Studio .NET we can now generate the XML documentation, by selecting the project in the Solution Explorer and choosing Properties. After that, you need to select Configuration Properties, and enter the name of the file for outputting the XML comments into the XML Documentation file field. When the solution is compiled, the corresponding XML file will be automatically updated. Alternatively, you can generate comment web pages from Tools | Build Comment Web Pages - this option does not require the project to actually compile, and if all you have is skeleton code, then it is likely that your project will not compile as-is anyway. Here's a look at our quick go at producing comment web pages for our Employee class:
| |||||||||||||||||||||||||||||||||||||||||||||||||||||||||||||||||||||||||||||||||||||


EAN: N/A
Pages: 85