| In Chapter 5, "Modeling with Polygons," you created an office lobby with polygon modeling techniques. In this section, you'll begin by adding lights to your scene using Maya's Script Editor. You can use your own final scene file from Chapter 5, or load the file noted next to the DVD icon from this book's DVD-ROM. If you use your own scene file, the results might vary. On the DVD  Chapter_09\ch09tut02begin.mb |
Setting Up Default Lights Before you start adding textures, you need to add some lights to the scene so that your test renderings will give you an accurate view of the fully lit scene. To help you do this, you can load a MELscript from this book's DVD that adds three Point lights to your scene. Start by opening the Script Editor (Window | General Editors | Script Editor). On the DVD  Chapter_09\ch09Lights.mel |
In the Chapter_09 folder on this book's DVD-ROM, you'll find the script file ch09Lights.mel (noted next to the DVD icon). Open this file in the Script Editor (File | Open Script). At the bottom of the Script Editor, you'll see some text, which is the command set you want to run. Click to get a cursor at the bottom of this command set. To run this script, press Ctrl+Enter. Open the Outliner (hotkey: Alt+O). You'll see three Point lights listed.
With some lights in the scene, now you're ready to begin creating and applying materials to the office lobby. Tutorial: Materials for Your Office Lobby In this tutorial, you begin adding more detail to the lobby and its contents by creating materials for the doors, windows, and so forth. On the DVD  Chapter_09\movies\ch09tut02.wmv |
To work more efficiently in this tutorial, switch to the saved layout corresponding to materials and rendering (Window | Panels | Saved Layouts | Hypershade/Render/Persp). The viewports should now be replaced with Hypershade, the Render View window, and the Perspective view. If you had one of the views open as a floating window, the viewport ignores that particular window in the layout and leaves the floating window available. On the DVD  Chapter_09\ch09tut02end.mb |
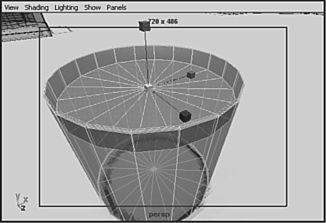
For the door handles texture, you'll create a brushed metal with a worn look. In the Outliner (hotkey: Alt+o), select all the door handles from the groups glassdoors, glassdoors1, and glassdoors2. Group them together (hotkey: Ctrl+g) and name them handles. Orbit and zoom to the glassdoors object in the Perspective view; it's the door handles on the left side of the lobby. When you move your camera, make sure you stay inside the building architecture so that you can see the results in the test renders. The preliminary material for the door handle is identical to the metal you created earlier in this chapter in the "Creating Solid Materials" tutorial, so open Hypershade (hotkey: Alt+h), create a Blinn material, and set the color in the Color Chooser to 240, 0.25, 0.4. Pull the Specular Color slider to the right to create a white specular highlight, and set Reflectivity to 0.85. Name this material doorhandle_chrome. Select the handles group again and assign the doorhandle_chrome material by right-clicking the new material and choosing Assign Material to Selection. IPR render the scene in the Render View window; when it's finished, marquee-select a rectangle that surrounds the door handle. After a few seconds, this area renders again, and IPR is then set to respond instantly to your material edits. note When you use a hyphen (-) between words in filenames, Maya converts it to an underscore (_). The glassdoors need a texture very close to the one you created in the previous tutorial. MMB-drag a new Blinn material from the Create bar, and name it glass. Set the color to Black and the Transparency color to 200, 0, 0.8. Next, use the Color Chooser to change the Specular Color to 200, 0.14, 0.78. Set Reflectivity to 0.25, and in the Raytrace options, set Refraction Index to 1.5. Now, use the Outliner (hotkey: Alt+o) to select all three groups of glassdoors. With the groups selected, right-click over the glass material and choose Assign Material to Selection. Save the scene as ch09OfficeLobby. It's a good idea to frequently save your work. Select all 10 plant stands in the lobby and group them together. Name the group plantstands. Duplicate the doorhandle_chrome material and name it plantstands_chrome. Open the Attribute Editor and change the color to gray (240, 0, .116 in the Color Chooser). Pull the Reflectivity slider up to 1. Then, select the plantstands group again, right-click over the plantstands_chrome material, and choose Assign Material to Selection. The next step is setting up a material to apply to the subobject faces in the top of the planter. This keeps the model intact, allowing you to create more complicated solid models and apply as many textures as necessary. First, create a new Blinn material by MMB-dragging it into the Work Area, and then name it dirt. Using the Outliner (hotkey: Alt+o), open the plantstands group. Select the first plant stand, and use the f hotkey so that it's framed in the window. Right-click on it, and choose Face. Next, Shift-select each face inside the plant stand, being careful to select only the flat faces where dirt will be applied (see Figure 9.11). Figure 9.11. Applying textures to the subobject. 
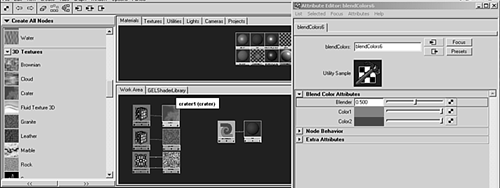
After selecting the faces, right-click on the material swatch dirt, and select Assign Material to Selection. To check that the material is applied to the correct faces, change the color by setting the Color Chooser to 120, 1, 1. This creates a bright green, which should be easily distinguished next to the plant stand's chrome. Now, apply planar mapping coordinates (Edit Polygons | Texture | Planar Mapping | option box). Under Mapping Direction, select Y-Axis and click Apply. Turn off Face subobject mode (hotkey: F8). Repeat this for the remaining plant stands. Then, select the original plant stand and center your Perspective view on it using the hotkey f. Position your view to look inside the top of the plant stand. Then, use the IPR renderer and select the area where the dirt material is applied. Select the dirt material and open the Attribute Editor. Set Eccentricity to 0.4 and Specular Roll Off to 0.1. Change the Specular Color to 29, 0.5, 0.5. Then, set Reflectivity to 0, and click the checkered button beside the color to apply a procedural texture to the color. The Create Render Node dialog box opens. Select the Utilities tab at the top, and then scroll down and select Blend Colors. Now, you're going to quickly create a multinode texture that uses three separate inputs that will add extra surface detail to the material. You'll use two different methods to build a material network quickly. First, scroll down the Create Nodes Bar to the left and click on Fractal, Crater, and Granite. You'll see all three displayed in your Work Area. Begin by zooming out and moving the Crater texture with its placement node to the top left of the Work Area in Hypershade. Next, stack the Granite texture nodes just under the Crater nodes, and then place the Fractal nodes beneath them. To the right, place the main dirt node, and on its left, the Blend Utility. With the Blend Utility still selected, open the Attribute Editor and leave room onscreen to see the Work Area. note You can pan around within the Work Area and zoom into specific areas, just as in viewports. Use this technique to situate texture nodes while networking them. MMB-click on the Crater node and drag it over to the Attribute Editor, releasing the mouse on the Blender node in the Blend Color Attributes section. This creates the connection between the Blender node and the Crater node (see Figure 9.12). Figure 9.12. Creating a complex shader network using the blendColors node. 
Another method of connecting nodes is to stay within Hypershade's Work Area and pull from one node to another. To connect the Granite node, MMB-click over Granite and release the mouse on the Blender node in the Work Area. A drop-down list appears, asking what node you'd like to connect to. Select the color1 option. Repeat this for the Fractal node, MMB-pulling from the Fractal to the Blender node. Connect it to the color2 option. Notice that as these nodes are connected, the IPR renderer should be displaying the changes on the left in real time. Select the Fractal node, and in the Attribute Editor, set Default Color to 30, 0.7, 0.2 and Color Gain to 35, 0.8, 0.25. Now that you've finished the materials for the dirt, save the scene. This scene is used in later chapters, such as a tutorial explaining Paint Effects. There, you'll add plants to the plant stands.
Tutorial: Texturing Furniture In this tutorial, you'll add some materials to the lobby furniture to give it some texture. You can continue from the end of the previous tutorial or, if you decided to skip that tutorial, load the scene file noted next to the DVD icon. On the DVD  Chapter_09\movies\ch09tut03.wmv |
On the DVD  Chapter_09\ch09tut03end.mb |
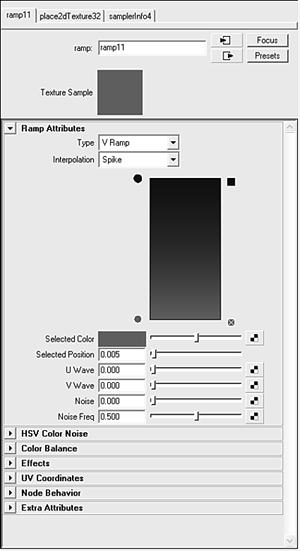
Begin by selecting the long sofa chair at the rear of the lobby and focus the viewport (hotkey: f). MMB-drag the Lambert shader from the Create Nodes bar. Name the new material softFurniture. Set the color to 24, 0.7, 0.5 in the Color Chooser. Next, click the checkered button to the left of the Incandescence option. Select Ramp, and turn off the default middle color green. To do this, click the crossed-out box at the right of the color ramp. Now, select the lower color, red, by clicking on the filled-in circle to the left. Double-click the Selected Color box below to open the Color Chooser. Set the color to 28, 0.65, 0.5. Now, click the blue circle on the ramp and notice that the selected color has changed. Change the blue to 360, 0.65, 0.1. At the top of the Ramp Attributes section, select Spike from the Interpolation drop-down list (see Figure 9.13). Figure 9.13. Editing the color in the Ramp Shader node. 
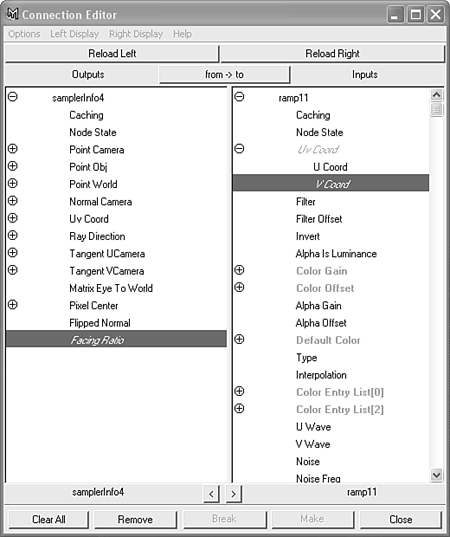
tip If you want to navigate back to a texture node after you've applied it, in the Attribute Editor, next to the variable you want to go back to, click the connection button with the right-arrow icon. If you need to undo a texture's assignment, right-click on the name of the material attribute and choose Break Connection. Close the Attribute Editor. In the Create All Nodes Bar, select Sampler Info under General Utilities. Move the Sampler Info node into position in the Work Area of Hypergraph and MMB-drag over to the Ramp node. When the prompt appears, select Other, which automatically opens the Connection Editor. On the left, you should see Outputs for the Sampler Info node, and on the right are Inputs for the Ramp node. Select Facing Ratio on the Outputs side. On the right side in Inputs, expand the UVCoord item and select VCoord (see Figure 9.14). Close the Connection Editor. Select the couch and chair on the right side of the lobby. Apply this shader to them by right-clicking over the softFurniture material and selecting Assign Material to Selection. Figure 9.14. Creating an advanced furniture shader network that uses a facing ratio utility. 
For the wood table in the middle, create a new Blinn material by MMB-dragging it into the Work Area. Name it wood. Open the Attribute Editor (hotkey: Ctrl+a). Click the checkered button to the right of the color attribute, and in the Create Render Node dialog box, select File for the node type. You should now see the Attribute Editor window with the Image Name attribute ready to receive input. Click the folder icon to the right of the image name bar, and then select the woodtable.jpg file in the folder noted next to the DVD icon. On the DVD  Chapter_09\sourceimages\woodtable.jpg |
At the top of the Attribute Editor, to the right of the texture sample, you'll see a button with an empty box and an arrow pointing to the Presets button. Click the Go to Output Connection button to return to the main attributes of the wood material. Now, set Eccentricity to 0.1 and Specular Roll Off to 0.8. Set Specular Color to 8, 0.6, 0.5 and Reflectivity to 0.1. Select the coffee table in the middle of the sitting area. Apply the wood texture to it by right-clicking over the wood material and selecting Assign Material to Selection. You'll need mapping coordinates to render the wood correctly. Begin by applying a cylindrical map to the coffee table object (Hotbox | Edit Polygons | Texture | Cylindrical Mapping). Right-click over the table, and choose Face. Shift-select the faces on the entire top of the table. Apply a planar map to this selection (Hotbox | Edit Polygons | Texture | Planar Mapping | option box). Select Y-Axis, and click Apply. Now, you'll reuse an earlier texture plantstands_chrome. Using the Outliner (hotkey: Alt+o), select couchlegs 1 through 16 and group them together with the hotkey Ctrl+g. Shift-select the sculpture on top of the coffee table, and apply the chrome material to the group and the sculpture at one time.
Tutorial: Creating the Remaining Base Materials So far, you've been creating a material and then immediately applying it to a designated object. In this tutorial, however, you'll see how to speed up your workflow to create the rest of the base materials and assign them to the walls and floors of the lobby. You need to create base materials for the following portions of the lobby: On the DVD  Chapter_09\movies\ch09tut04.wmv |
Because you're just creating materials, you don't need to have the other viewports visible. With the Hypershade view active, tap the spacebar to maximize it. Increasing the workspace can help improve your productivity. You can start where you left off with the preceding tutorial. On the DVD  Chapter_09\ch09tut04end.mb |
tip You can also hide the UI (user interface) to further increase the workspace (Display | UI Elements | Hide UI Elements). This removes everything from the Status Bar to the Help Line. You can turn the interface back on by selecting Restore UI Elements instead of Hide UI Elements.
The lobby floor needs a file texture node of a specific tile pattern that will repeat in the floor pattern. Create a new Blinn material and name it floortiles. Open the Attribute Editor (hotkey: Ctrl+a). Click the checkered button to the right of Color, and select the File node type. In the Image name bar, click on the folder to the right, and find the floortiles.jpg file noted next to the DVD icon. On the DVD  Chapter_09\sourceimages\floortiles.jpg |
After selecting the floortiles.jpg file, return to the floortiles material by clicking the Go to Output Connection button (see Figure 9.15). Figure 9.15. The base materials you'll build on for the scene. 
Now, set Eccentricity to 0.5 and Specular Roll Off to 0.4. Open the Color Chooser for the Specular Color and set the color to 32, 0.6, 0.45. Then, set Reflectivity to 0.1. Create a new Blinn material and name it Walls. Set Color to 44, 0.13, 0.86, Specular Roll Off to 0.1, Specular Color to 43, 0.13, 0.96, and Reflectivity to 0. In the Create All Nodes bar, select the Mountain type node by MMB-dragging it into the Work Area. MMB-drag from the Mountain node and release on the Walls node to create a connection to the Bump channel. Right-click and hold over the wall texture node, and select Graph Network. As the network repositions, you'll see the Bump node. Double-click on it and set Bump Value to 0.042. Select the Walls material and duplicate it, naming it wallsdarker. Set the color to 44, 0.2, 0.7. Now, you'll need three tan borders for the trim in the back of the lobby, so begin by creating a Blinn material. Name the Blinn material DarkTrim and set the color to 27.5, 0.45, 0.6. Set Specular Roll Off to 0.24, Specular Color to 43,0.14, 0.96, and Reflectivity to 0.1. Duplicate the DarkTrim material (hotkey: Ctrl+d), and name it MediumTrim. Set the color to 27.5, 0.54, 0.8. Now, duplicate MediumTrim and name it LightTrim. Set the color to 27.5, 0.33, 0.89. To make sure the glass can be tuned precisely to the front windows, select the glass material used for the doors. Duplicate it and name it glasswindows. To apply a reflection map to the front windows, click the checkered button next to the Reflected Color bar. In the Create Render Node dialog box, scroll down to the Environment Textures section and choose Env Sphere for the node type. A new window should pop up with an image attribute. Click the checkered button to the right, and when the Create Render Node dialog box opens, select the File node and import the GELsky.jpg file noted next to the DVD icon. On the DVD  Chapter_09\GELsky.jpg |
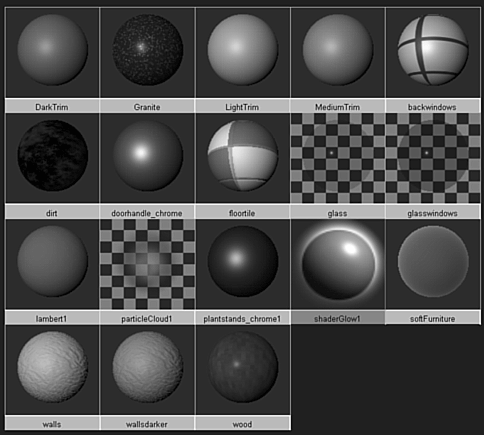
For the back lobby windows, create a new Blinn material, and open it in the Attribute Editor (hotkey: Ctrl+a). Name the material backwindows. Click the checkered button to the right of the Color bar, and select the Grid node type. Set Line Color to 12.9, 0.68, 0.36, Filler Color to 203, 0.36, 1, and Reflectivity to 0.2. The last material you need is a dark granite for the waterfall behind the planters at the front of the lobby. Create a new Blinn material and name it Granite. Click the checkered button to the right of the Color bar and select the Granite node type. Change Color1 in the attributes for Granite to 203, 0, 0.165 and change Filler Color to 15, 0.67, 0.18. Click the Go to Output Connection button to return to the Common Material Attributes. Finally, you need to turn down Eccentricity to 0.15, and set Specular Color to 198, 0.3, 0.7 and Reflectivity to 0.2. You have now set the foundation for the remaining materials in your scene, and can continue to apply these new materials to the corresponding objects in your scene. If you haven't saved your scene, now would be a good time because you've created quite a few materials. Your Hypershade should have all the materials shown in Figure 9.16. Figure 9.16. With Hypershade, you can create base materials for an entire scene at one time. 
If you got stuck in this tutorial, load the ch09tut05end.mb file, which contains the finished scene for this tutorial. On the DVD  Chapter_09\ch09tut05end.mb |
|
