Looking Through (and Breaking Out of) the Top Layer


When trying to grasp the concept of layer masks, it can help to think of them as windows to the layers below. Let's look at a literal window.

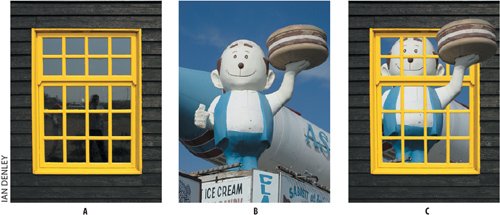
Figure 4.15. The source images (examples A and B) and the finished composition (example C).


1.

Open the Window and Burger Man images.

2.

Using the Move tool (v), drag the window image onto the Burger Man image, holding down the Shift key to align the two layers. Double-click the layer thumbnails to rename the layers.

3.

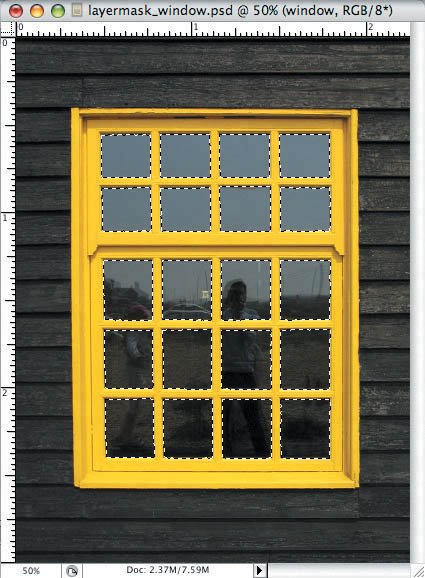
Make a selection of the window shapes. I used the Magic Wand, Shift-clicking to pick up each successive pane, and Shift-clicking again to pick up any stray areas. Make sure Contiguous is checked, otherwise your selection will spill outside the window shapes.


Figure 4.16. The windows selected.


4.

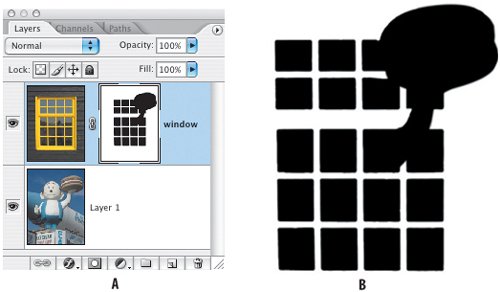
Inverse the selection; then click Add Layer Mask on the bottom of the Layers palette to convert your selection into a layer mask.

5.

Soften the selection edges and help them blend more convincingly with the layer below by choking the mask as outlined in the previous section, Choking a Mask.

6.

Now for the tricky bit: hide the window layer and make a selection of the burger man's arm. With this selection active, turn the visibility of the window layer back on and target the window layer mask. Make Black your foreground color and press Alt-Delete to fill the selection. The arm should now come through the window. You'll probably need to refine the window layer mask by painting in black to reveal more of the arm, or in white to reveal more of the window.

Figure 4.17. The Layers palette (example A) and the resulting layer mask (example B).


Adobe PhotoShop Unmasked. The Art and Science of Selections, Layers, and Paths
Adobe Photoshop Unmasked: The Art and Science of Selections, Layers, and Paths
ISBN: 0321441206
EAN: 2147483647
Year: 2004
Pages: 93
Authors: Nigel French

flylib.com © 2008-2017.
If you may any questions please contact us: flylib@qtcs.net