| Layer Comps is a great productivity tool. A snapshot of the state of your Layers palette, a layer comp lets you experiment with multiple versions of a layout in a single document, saving time and disk space, but most importantly freeing you from worrying about what layer went with what on which version, and what its exact opacity and blending mode were. A layer comp remembers the following layer options: Layer visibilitywhether a layer is shown or hidden. Layer position in the document. Layer appearancewhether a layer style is applied to the layer and the layer's opacity and blending mode.
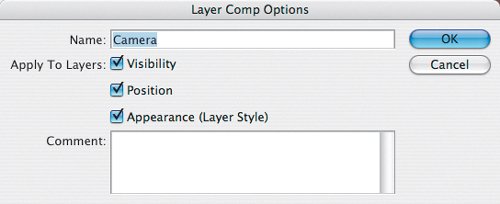
To create a layer comp, choose Window > Layer Comps to display the Layer Comps palette, and click the Create New Layer Comp button at the bottom of the Layer Comps palette. The new comp reflects the current state of layers in the Layers palette. You can add descriptive comments in the Layer Comp dialog box that appears and decide which options apply to the layers: Visibility, Position, and Appearance. To view a layer comp at any time, click the icon to the left of its name in the Layer Comps palette. A layer comp can't restore some actions, such as deleting or merging a layer, converting a layer to a background, or converting to another color mode. In such instances, a caution icon appears next to the layer comp name. You can either update the comp by clicking on the Update Layer Comp button at the bottom of the palette to capture these changes as a new state, or choose Clear to remove the alert icon and leave the remaining layers unchanged. Figure 3.29. In the Layer Comp Options dialog box, choose what you want the layer comp to remember. 
Figure 3.30. Using Layer Comps, I mocked up three versions of this book cover. Each layer comp remembers the visibility and position of the layers, their opacity and blending, and any layer effects applied. 
If you want to send your layer comps to a client, you can export them to separate files or to a Web Photo Gallery. Choose File > Scripts and then choose one of the following: Layer Comps To Files makes an individual file for each layer comp. Layer Comps To PDF exports all layer comps to a PDF file, with one page for each layer comp. Layer Comps To WPG exports all layer comps to a Web photo gallery.
Note In InDesign and Illustrator, you can access and choose layer comps that have been saved with a Photoshop (psd) file.
Layer Compositing Strategies First, a couple of logistical issues: For best results when combining images, use images with the same or similar pixel dimensions. Preferably use images in the same color mode. If they are in different color modes, the image you are copying will be converted to the color mode of the destination image. For example, dragging a CMYK image to an RGB image converts the CMYK image to RGB. The resulting conversion may be satisfactory, but if you want more control you'll need to handle the mode conversions yourself before compositing.
What strategy should you follow when compositing images? Should you assemble all your source images into one master document and make edits to the individual layers within that master layered document? Or should you work on the source images as independent files before collecting them into a master document? Both approaches have pros and cons; I often end up using a combination of the two. On one hand, it's not until you see all the images together in one document that you really know how they will interactand consequently what you need to do to them. On the other hand, combining all images in one document can result in a monster-sized document with a lot of redundant information. To simplify the process and to clarify your thinking, I suggest that you begin every project with a pencil sketch. Using Adobe Bridge, view the thumbnails of all the files you have short-listed for your project. Consider making a Contact Sheet for use as a visual reference. From within Bridge, select the files you want to include and then choose Tools > Photoshop > Contact Sheet II. Referring to the contact sheet, sketch as many different compositions as you can think of, experimenting with the scale and placement of the different elements. Don't skip this step; no matter how rough or embarrassing your sketches, they help you to quickly evaluate whether certain ideas are worth pursuing. Once you have a clearer idea of where you're going with your composition, then you can crop your source images accordingly. There's no point in working with image data that you're certain you don't need. I would suggest doing any masking in the master document, but if you have already masked the individual images using a layer mask, the layer mask will travel with the image when you drag it into the master document. |
|

