Compositing Images
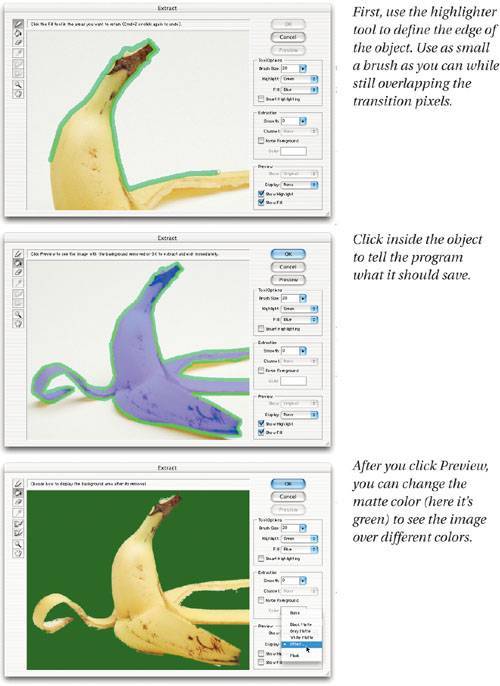
| The number one problem in making selections and compositing images together is edge spill, where some of the background color gets picked up as fringe along the edges of your selection. Of the considerable number of methods for getting rid of edge spill, most involve cutting away at the edge pixels rather than removing the background color from the mix. Now, to the rescue, comes the Extract feature, which is designed to search out edges, erase pixels, andmost importantperform edge-color decontamination, where Photoshop distills out background colors while leaving the foreground colors. It's almost like magic, and would be extraordinary if it really worked for more than a handful of images. Note that Photoshop also has a Magic Eraser and Background Eraser tools, which erase to transparencythe Magic Eraser is like clicking with the Magic Wand tool and then pressing Delete. But both of these tools are blunt instruments, so we just generally ignore them. But Photoshop has other tools for compositing images together, from Layer Blending to the Photomerge feature (for creating panoramas). Let's take a look at just a few. Tip: Layer Blending Is Fast Blending One of our favorite compositing techniques doesn't involve making selections or using Extract. It's the little-known and less-understood Blending Options feature in the Layer Style dialog box. If your image stands out well from its background on any one channel, layer blending is often the fastest way to composite it into a different background (see Figure 12-36). Figure 12-36. Compositing an image with layer blending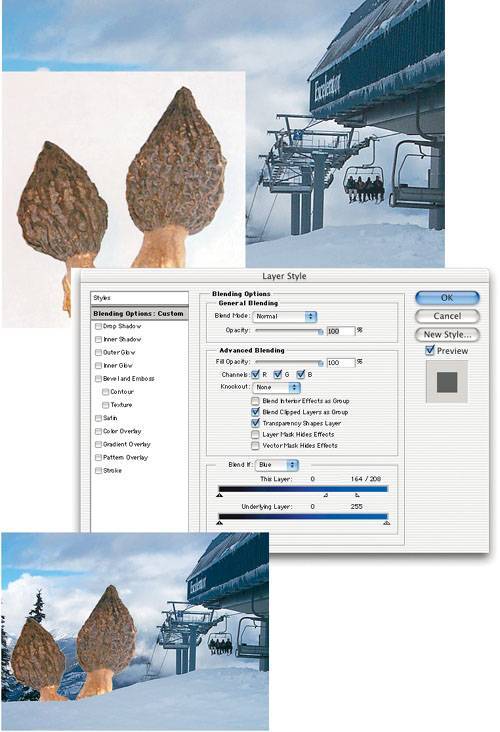 When you set the right "This Layer" slider in the Layer Style dialog box to 20 percent gray, you're telling Photoshop not to include any pixels in the layer that are lighter than 20 percent. The problem: this creates a hard edge, so you get a jaggy composite. The solution: Option-click on each of the sliders to break it into two half-triangles. This provides a smooth blend between what is included and what is not. Tip: Alignment via Opacity and Mode When compositing images together, we prefer to place selected pixels on a separate layer for accurate positioning (see Figure 12-37). You can do this by pressing Command-J (or choosing New Layer via Copy from the Layer menu). Say you're working on a group portrait of a family where everyone's expressions are great except the teenage son's, whose eyes are closed. You have another shot in the same basic pose where he looks good, so you decide to replace the head in image A with the one from image B. Figure 12-37. Aligning floating selections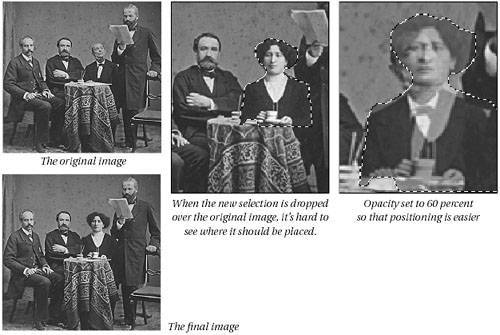 With this kind of massive editing, it's often difficult to align the new image with the old. One way is to change Opacity in the Layers palette to 50 percent or less, so you can see the image underneath. In this example, we align the new head's eyes with the original image's eyes (nudging one pixel at a time with the arrow keys). Finally, we set the Opacity to 100 percent, and retouch the overlying layer's edges. Note that instead of changing the opacity, you can change the overlying layer's blending mode. When trying to align two objects in an image, we often set the mode to Darken or Lighten. Then we watch the pixels darken and lighten, to give us clues. Extract: Quick 'n' Dirty MaskingThe good news is that Adobe is listening to its customers: The People said that they were tired of buying plug-ins that built high-quality selections and masks, so Adobe created the Extract feature. The bad news is that you'll probably still want to go buy a plug-in. Don't get us wrong: The Extract feature is reasonably good at what it does, but what it does is not nearly as powerful as most people want. Nonetheless, Extract is what we've got for nowassuming that you don't have another plug-in, such as OnOne's MaskProand so Extract is what we're going to talk about. When to use ExtractThere is a temptation to use Extract for any and every selection. Don't. Remember that Color Range or any of the other selection tools may provide a better, faster result. It depends entirely on the image and what you mean to do with it. Extract works best with images that display significant contrast between foreground object and background color, and where the edges aren't too detailed. For instance, your best friend photographed against a bright-blue sky would work well. On the other hand, you're going to have more trouble with an image of the typical blond model, hair shimmering against golden sand. The best reason to use Extract is its edge-color-decontamination. If you're just trying to make a selection, and you're not planning on compositing an object on top of some other background (one with a very different tonal or color range than its original), then you'll probably find more peace of mind with another selection method. Tip: Always Work on a Duplicate Note that the Extract feature does not result in a mask or selection. Instead, it actually changes and deletes pixels in your image (it has to do this because of how it performs color decontamination). Because Extract is a relatively blunt instrument, you almost always have to clean up afterward. Therefore, before using Extract, it behooves you to work on a duplicate layer, or take a snapshot of your document, or save the document, or something, so that you don't mess up your original data. We tend to use a duplicate layer; then we can transform the result of Extract into a layer mask by loading the duplicate layer's transparency mask (Command-click on the layer), switching to the original layer, and clicking on the New Layer Mask button in the Layers palette. (Of course, if the original layer is a Background layer, you'll have to turn it into a regular layer first by double-clicking on it.) Step-by-step extractionOnce you've identified an appropriate image, open the Extract dialog box by choosing Extract from the Filter menu (in earlier versions, it was in the Image menu). Better yet, just press Command-Option-X to open the Extract dialog box. The Extract interface is still pretty clunky and unlike the rest of Photoshop (see Figure 12-38). But it's not too bad once you know the steps you need to take. Figure 12-38. The Extract dialog box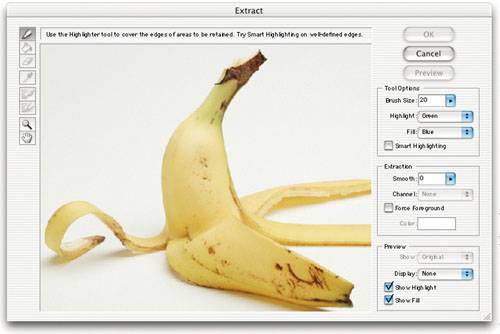
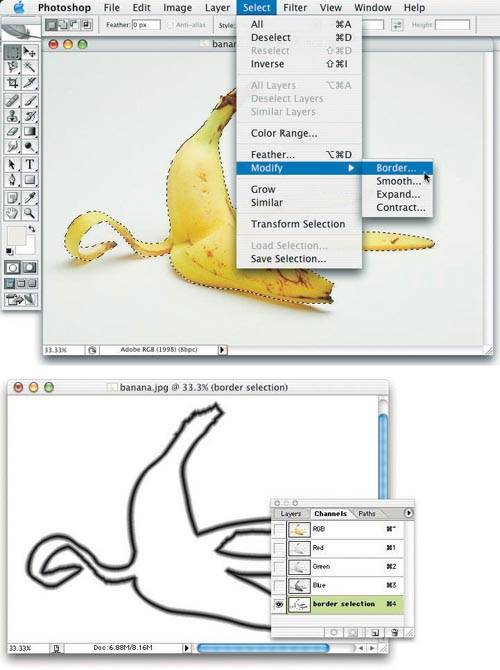
Tip: Draw Faster Edges Neither of us has particularly steady hands, so when it comes to drawing out the edge of the image with the Highlighter tool, we tend to use the Shift-click approach: Click once on the edge, then Shift-click someplace else, and Photoshop draws a straight line between the two points. These straight lines are often perfect for tracing the edge of an image. Tip: Use Prebuilt Channels As we said earlier, the best thing about the Extract feature is its edge-color decontamination. Sometimes it's easier to select the object with other methods (the Magic Wand, the Channels trick we describe in Chapter 8, Making Selections, and so on). You can use these techniques together to get the best of both worlds.
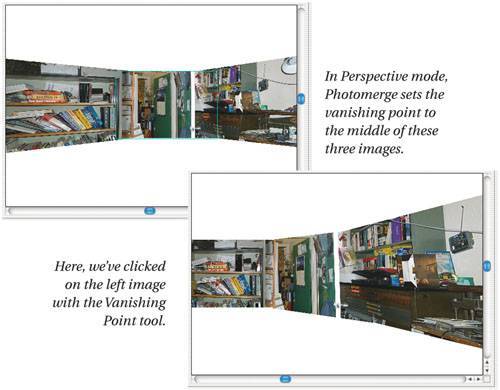
This still isn't a perfect system, but it's sometimes easier than drawing the outline yourself. In our opinion, the Extract feature earns an "A" for effort, a "B" for final results, and a "C" for interface. Ultimately, however, no one ever said extracting images was going to be easy. Just easier. PhotomergeEven the widest-angle lens can't capture every scene you'll ever want to capture; sometimes you need to shoot several photographs and attempt to match them up for a panorama. Enter the Photomerge feature. Technically this is an automation tool, but it has both brains and brawn behind it. To merge two or more images together, select Photomerge from the Automate submenu (under the File menu). You can choose which images to merge by picking from the Use popup menu: Open Files (if your images are already open), Files (to pick the files from disk), or Folder (to pick a whole folder of images). Note that after adding files to the list in the Photomerge dialog box, you can remove any of them by clicking the Remove button. You can also select two or more images in Adobe Bridge and select Photomerge from the Photoshop submenu (in the Tools menu). When you click OK, Photoshop goes to work: It opens both images, resamples them if necessary to make them match, merges them as layers in a single file, and then opens the Photomerge dialog box (see Figure 12-41). Photoshop compares the edge detail to find matches, and then attempts to stitch the images together by blending from one into the next. Adobe's marketing team likes using the term "seamless," when describing Photomerge's results, but unless you were mighty careful about the lighting when you shot the images you'll almost certainly be able to find the seams where one image blends into the next. The seams are often at an angle, so they're less obvious to the eye. You can usually get a slightly better effect by turning on the Advanced Blending option in the Photomerge dialog box. Click the Preview button to see the difference between regular and advanced blending. Figure 12-41. Photomerge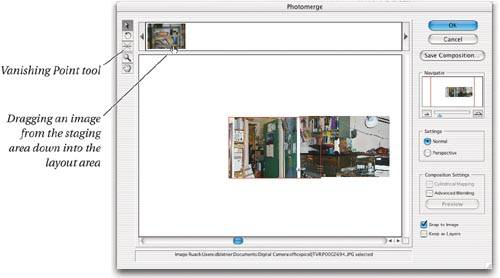 Tip: Shooting Panoramas When shooting images destined for Photomerge, try to capture each using the same exposure and the same lighting, using a tripod when possible to keep the camera level. With some point-and-shoot cameras, you may have to work a bit to ensure you're getting the same exposure. Keep as LayersThe Keep as Layers checkbox tells Photoshop not to flatten the image when it's done compositing, so each image remains on its own layer. Unfortunately, it also removes all the blending from one image into the next, so you're forced to do that part yourself. Manually compositingIf Photomerge fails to figure out how images should be stitched together, you can drag the images from the panel at the top of the Photomerge dialog box down into the main compositing area. Drag the images around in this window until you get a reasonably good overlap. If you need to, use Photomerge's Rotate tool to rotate each selected image for a better fit. We recommend leaving the Snap to Images checkbox turned on so that Photoshop will try to snap one image to the other. When you turn this off, Photoshop acts just as though you moved images around using the Move tool in a Photoshop document. PerspectiveThe problem with panoramas is that they typically ignore perspective. For a more lifelike panorama, click the Perspective button. By default, Photoshop designates the middle image as the vanishing point and the images to the left and right (or above and below) splay out, as though the edges were closer to you, the viewer. You can override this by clicking on any other image with Photomerge's Vanishing Point tool (that's the third tool down; see Figure 12-42). Note that the vanishing point image has a blue outline when you click on it with the Select Image tool; non-vanishing point images have red outlines. Figure 12-42. Photomerge perspective Saving CompositionsIf it took you more than a minute or so to build your photomontage, it's probably worth saving the composition to disk by clicking (you guessed it) the Save Composition button. Compositions are very small files that reference the full-resolution files and how they're blended together. Later, if you decide to make changes, select Photomerge from the Automate submenu and click the Load Composition button instead of selecting files. |
EAN: N/A
Pages: 220
