| Now it's time to initialize your storage system and turn it into a usable volume. You have two options. If you're initializing a striped array of separate drives, or aggregating the two controllers (called logical unit numbers or LUNs) of an Xserve RAID, use the first method that follows, "Creating RAID Sets." However, if you're simply mounting a device that will appear as a single device to the OS, such as a bridge array or a single controller of an Xserve RAID, use the second method, "Creating Volumes from Single-Host RAIDs." Creating RAID Sets Creating RAID sets with Apple's Disk Utility is a breeze. The hard partinstalling the appropriate hardware and driversis behind you. When you launch Disk Utility, you should see the devices, which means that the OS recognizes them. Then, you simply need to do a little dragging and dropping to create the RAID volume. We'll use this technique to create a volume from two scenarios: RAIDing together a series of devices to create a striped RAID 0, or RAIDing together a few host RAIDs, such as the two 7-drive LUNs of an Xserve RAID, to create a RAID X-0 configuration. 1. | Launch Disk Utility, found in /Applications/Utilities.
 Observe the device and volumes that show up in the left column of the interface.
| 2. | Click any one of the devices that you intend to place into the RAID.
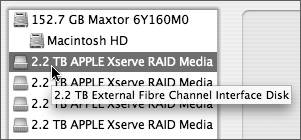 Note If you are putting together a FireWire-based RAID, or are using disks that already have formatted volumes, remember two things: first, any data on that volume is about to be destroyed, and second, you need to click the device name, not the volume name, in order to get to step 3. The device name is the weird one; it starts with its size in gigabytes and usually includes the manufacturer's name and the model number of the mechanism. | 3. | In the upper right of the Disk Utility window, click the RAID tab.
 | 4. | Drag the device that you selected in step 1 into the Disk window in the lower-right portion of the interface.
 | 5. | Drag each additional device that you want to use in the RAID set into the window as well.
 Note It doesn't really matter in what order you drag each device into the Disk window, since the OS will figure out how to send data to each device. But if you're cautious, drag the devices, one by one, in the order that they appear in the list at left, from top to bottom. Now let's set up the particulars for the set.
| 6. | Set the RAID Type to "Striped RAID Set."
| 7. | In Volume Format, choose Mac OS Extended. Do not choose Mac OS
Extended (Journaled), or any of the other settings.
| 8. | Keep the RAID Scheme set to Stripe, since that's what you want.
Tip Avoid journaling media storage, since it slightly reduces the volume's performance. The RAID Set Estimated Size number tells you the projected size of the volume once it's created.
 | 9. | Click Create.
 You'll be prompted to confirm this decision.
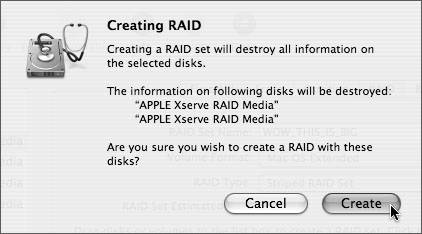 | 10. | Click Create.
In a moment, you should see the RAID volume appear on your Desktop.
 | 11. | Quit Disk Utility.
|
Creating Volumes from Single-Host RAIDs In the case of storage devices with internal RAID controllers, these units will present only one device to the OS, through the host adaptor that they are attached to. For example, popular SCSI-to-ATA/SATA and Fibre-to-ATA/SATA units have internal RAID controllers, and as a result, will show up as a single device only through either the SCSI or Fibre Channel HBA card installed in your Mac. These drives are also easy to configure. Again, using Apple's Disk Utility, let's format this single-unit device into a Mac OS Extended volume. 1. | Launch Disk Utility, found in /Applications/Utilities.
 Observe the new device(s) that show up in the left column of the interface.
| 2. | Click the device that bears the name of your single host.
 Note Different hosts have different names. In most cases, the device you are looking for will be the only one that doesn't have a volume name nested underneath it. | 3. | In the upper right of the Disk Utility window, click the Erase tab.
 | 4. | From the Volume Format pop-up menu, choose Mac OS Extended. Do not choose Mac OS Extended (Journaled).
 Tip Avoid journaling media storage, since it slightly reduces the volume's performance. | 5. | Name your volume in the Name box.
Common names are WHERE_MY_MEDIA_GOES or GIANT_VOLUME.
| 6. | Deselect the "Install Mac OS 9 Disk Driver" check box, since you don't need that.
| 7. | Click Erase.
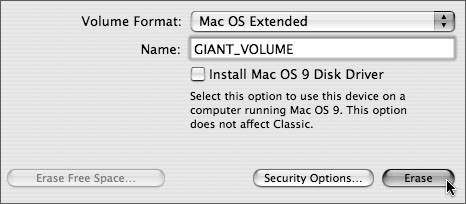 You'll be asked if you really want to proceed.
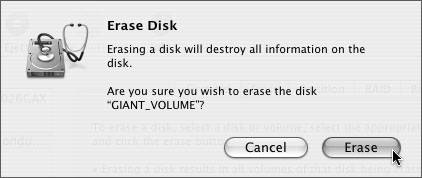 | 8. | Click Erase.
In a moment, you should see the volume appear on your Desktop.
 | 9. | Quit Disk Utility.
|
Testing Read and Write Speeds Right now is a good time to test the throughput, or read and write speeds of your newly created volume. What's critical here is to make sure that your volume will handle the speeds for the highest data rate of video you intend to work with. AJA and Blackmagic supply excellent drive speed test programs with their driver software, but there are other third-party programs such as Intech Software's Speed Tools (www.speedtools.com) and Lloyd Chambers' DiskTester (www.llc4.com/software/disktester/), which runs only in the Terminal but is quite versatile. |


