Recording Audio
| [ LiB ] |
Recording Audio
At this point, let's assume that you have already configured your studio for audio recording and that you understand how audio goes into your computer through the sound card and comes out of it into an external audio monitoring system (self- powered studio monitors or headphones, for example). If you have not configured your audio connections already, you should do so before proceeding because you might want to test things out as you read the information found below.
Before you begin recording audio, you should configure the project's sample rate and format through the Project Setup dialog box (the default key command is Shift+S) if you haven't done so already. After you start recording in one sampling rate, you can't change it. All audio files in a project have to be recorded (or imported) at the same sampling rate. You should also make sure that the digital clock of the audio card is set up correctly if you are using a digital input to record your audio. The digital clock defines the exact sampling frequency of the sound card. If your sound card is receiving its digital clock information from an external digital audio device, your sound card should be set to follow this device's sampling frequency.
How To
To configure the digital clock on your sound card:
-
Select the Device Setup option in the Devices menu.
-
In the Device Setup dialog box, select the VST Multitrack option.
-
In the VST Multitrack option, click the Control Panel button to access your sound card's configuration panel.
-
In your sound card's configuration panel, set the master clock (digital clock) appropriately. If your external device is set as master (or internal), you should set your sound card to follow the external device's digital clock by using the appropriate option for your card (you might have to consult your sound card's documentation if you are unsure how to do this). Remember that it is better to have your sound card's digital clock control other devices rather than have other devices control your sound card. In this case, make sure that the external digital audio devices follow your sound card's digital audio clock by setting them appropriately. You will find more information in Chapter 14.
-
When done, close your sound card's configuration panel.
-
Back in Cubase, click Apply.
-
Click OK to close the Device Setup dialog box.
Note that if you don't have any digital connections with other devices in your studio setup, you probably don't have to worry about the digital clock of your sound card because it is probably set appropriately to follow its internal clock.
How To
To record a single track of audio in Cubase:
-
Right-click(PC)/Ctrl-click(Mac) in the Track List area and choose Add Audio Track from the context menu. If you already have audio tracks in your project, you don't need to create a new one; just select an existing empty audio track.
-
Select the appropriate audio track configuration to determine the channel format of audio files that will be recorded onto that track.
-
Click OK to close the Add Audio Track dialog box.
-
In the Name field for the new track, or the existing track if you didn't create one, name your track appropriately.
NOTE
 TIP
TIP When audio is recorded, Cubase names the audio file according to the name of the track. This makes it easier to manage audio clips later on.
-
Click on the Enable Record button in the audio track. You can do this either through the Track Setting section in the Inspector or in the Track List area.
-
Select the Input Bus from the track's In field. This tells Cubase where the audio for this track comes from.
-
Select the Output Bus from the track's Out field. This tells Cubase which audio outputs will be used to monitor the recorded signal.
-
In the Inspector area of the selected track, open the audio channel section.
-
Enable the Monitor button to monitor the input level of the audio signal (see Figure 7.6).
Figure 7.6.

-
Start playing as you would during recording to adjust the input level of the audio. Remember that the fader in the audio channel does not influence the input level, only the output ( monitored ) level. If you need to adjust the input level, you need to use one of the following alternatives: Adjust the level coming out of your instrument, adjust the level coming out of the mixer (if your signal passes through a mixer before heading to Cubase), or adjust the input level from your sound card's control panel applet if it allows it. Cubase SX users may want to adjust the input channel first as it offers phase reverse and up to 48.2 dB of gain or cut within the mixer.
NOTE
 TIP
TIP The longer an audio chain is, the more likely it will pick up noise along the way. Increasing the audio's amplitude level later in the audio chain will also increase the noise that has been added before in this chain. As a rule of thumb, it's always better to increase a signal's amplitude at the source than it is at the input bus level (once it has already been converted) or passed through electronic components .
-
In the Transport panel, select the appropriate recording mode. When recording audio, Normal is usually the appropriate choice.
-
If you want to start a recording at a specific point in time and stop recording at another specific point in time, adjust the left and right locators appropriately and enable the Punch-in and Punch-out buttons on the Transport panel.
-
If you want to hear a metronome click while you are recording (but not in the recording signal), make sure that the metronome click is not routed into the recorded signal. You can configure your metronome click through the Metronome Setup dialog box. After your settings are made, close the dialog box and enable or disable the metronome click from the Transport panel (the default key command is C).
-
Place your play line at the position where you want your recording to begin.
-
Click the Record button and begin recording the audio.
-
Click the Stop button to manually stop the recording if you haven't enabled the Punch-out button.
Recording Audio in Cycle Mode
Working in Cycle mode allows you to run a section of your song over and over again. While this section plays, you can try different things out and record them. When you're done, you can try either to reproduce the best ideas you had while practicing, or simply use portions of the different takes you've just made if you were recording what you just did. That's the whole point behind cycle recording.
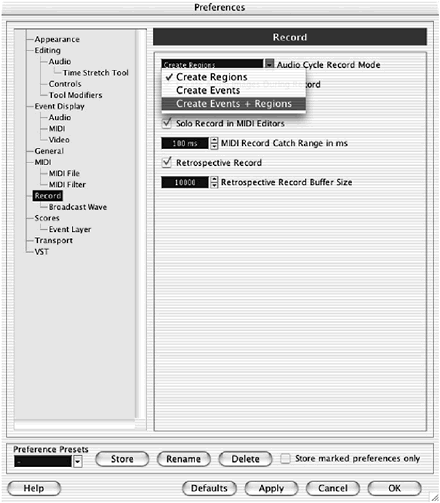
In Cubase, when you are recording in Cycle mode, you are looping a portion of the project found between the left and right locators. When you record audio in this mode, Cubase records a long audio file, but can define events and/or regions associated with each lap that was recorded during the cycle mode recording process. What it actually defines depends on the current setting found in Cubase's preferences (see Figure 7.7).
Figure 7.7. The Cycle Record Mode options found in the Cubase Preferences dialog box.

Cubase can identify each recorded lap in two different ways when you record in Cycle mode: events or regions (or both).
-
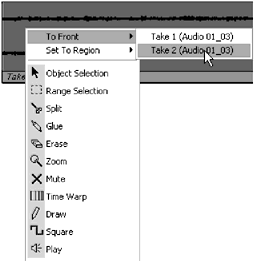
When you record in Cycle mode and create events, Cubase creates a single, long audio clip, but each time a lap (a cycle) is completed, an event is inserted on the track. The event that appears when you stop recording is the one recorded during the last lap (or cycle). All the other events are still on the track but under this last event. Because you can only hear one event at a time on a track, you need the To Front option found in the project window's context menu as shown in Figure 7.8. This option appears when you right-click(PC)/Ctrl-click(Mac) over the overlapping events. You should create and work with events when you want to split the events up to create an edited version using parts of each take.
Figure 7.8. Selecting which take you want to bring to the front after a cycle recording.

-
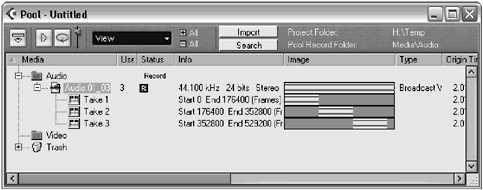
When you record in Cycle mode and create regions, Cubase creates a single, long audio clip where a region defines each lap (cycle). The difference here is that there is only one event on your track, but using the Set To Region option (also displayed below the To Front option in Figure 7.8), you can choose which region you want to display in this event. Because regions are created, you can also see the defined regions in the Pool (see Figure 7.9) and in the Sample Editor. You should create and work with regions when you want to select an entire region as the desired take for the event.
Figure 7.9. The Regions created during cycle recording are named Take *, where the asterisk represents the number of the lap/take.

-
Finally, you can set Cubase to create both events and regions. This places a number of overlapping events on your track and creates identical regions in the Media Pool. By doing this, if you decide to go back to a take and modify it, you can place the region from the Pool onto a track. However, beware of mixing both methods of editing (events and regions) when working on a track. When using the Scissors tool to split an event, you split all the overlapping events. Selecting an event in one portion and a region in another might not give you the result you were going for.
How To
To change your Cycle Recording Mode Preferences:
-
Select Preferences in the File (PC)/Cubase(Mac) menu.
-
Select Audio in the Preferences dialog box.
-
Select the desired option in the Cycle Record Mode drop-down menu (see Figure 7.7).
-
Click Apply and then OK to close the dialog box.
How To
To choose which event you want to hear when editing a track:
-
Start by listening to each take one after the other, identifying the segments you want to keep in each take. To bring a different take to the front, right-click(PC)/Ctrl-click(Mac) over the track and select the appropriate take from the list as shown in Figure 7.8.
-
Adjust your Grid setting in the project toolbar to the desired value, especially if you don't want to be restricted to splitting at bar intervals.
-
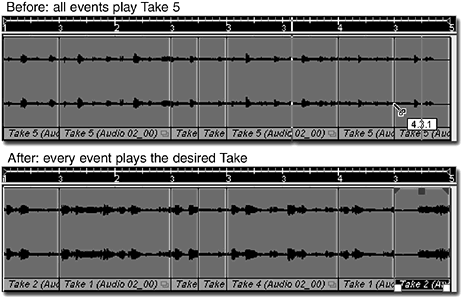
Select the Scissors tool and split the event where you want to switch from one event to another (see the top part of Figure 7.10).
Figure 7.10. Using the Scissors tool splits all overlapping events on a track, allowing you to create a new version using different takes.

-
Select the Object Selection tool from the toolbar or the project window's context menu.
-
Right-click(PC)/Ctrl-click(Mac) on each new event to select the appropriate take to bring to front (see the bottom part of Figure 7.10).
| [ LiB ] |