| With your project created, start off by saving the scene (File Save Scene) and naming the file ch04oceanScene . As you go through the following tutorials, you can save as often as you like. Usually, it's a good idea to save after performing several operations on an object or the scene. The next time you open this saved file, choose File Project Set on the menu. This specifies the project you're working with and points Maya to the correct location of files in the project. You can also choose File Recent Projects to choose from a list of the most recent projects you have worked on. With the project set, and your initial scene file saved, you're ready to begin modeling the scene! You'll start by creating the water and then adding some motion to the water to bring some life to the scene. This is the outline of steps for creating the water: -
Choose your geometry (in this case, a NURBS plane). -
Specify the density (number of patches) of the geometry. To make the water's little peaks appear smooth and detailed, you'll need more density than the default. -
Change the plane into a soft body so that you can have a "ripple" effect for the water. -
Add dynamics to "shake" the plane to create motion for the water. Tutorial: Creating the Water's Plane The first step in creating the water is deciding which type of geometry to use. For water, a plane is good because water doesn't need volume; by simply creating the water's surface with a plane, you can get the right visual effect. For this tutorial, you'll use a NURBS plane instead of a polygon-based plane because a NURBS surface can automatically subdivide to provide more detail at render time. Because the water will have all those little wavelets, this is a good thing.  note The Hotbox is often a faster way to create objects in your scene. To see all the features in Maya in the Hotbox, click Hotbox Controls Show All. All the menus are displayed so that you don't have to press keys to switch between animation, rendering, modeling, and so forth. For now, however, leave the Hotbox at its default settings.
-
Go ahead and turn on the Incremental Save feature so that you'll have files to fall back on if you run into a problem. Choose File Save Scene option box to open the Save Scene Options dialog box, and select the Incremental Save check box. tip Professional users usually save with incremented filenames as they build a scene. The filenames have an inserted number, such as "bob_smile.004.mb." Saves are advisable after major edits, deletions, or history clearing. This allows you to import an earlier version of an object if necessary, or revert to an earlier scene file if a disk becomes corrupted. If you limit the number of saves, Maya will overwrite the oldest file once the limit is reached. -
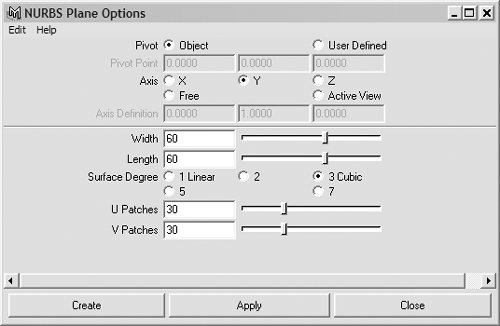
To create a NURBS plane, first make sure you're in Modeling mode (hotkey: F3 ). Using the menu bar or the Hotbox, click Create NURBS Primitives Plane option box to open the NURBS Plane Options dialog box. Later you'll be changing the plane into a soft body and then adding a dynamic force to it to produce a wavelike water effect. To have enough dynamic particles to add motion to the water, you'll need to increase the number of patches to have more CVs, which define the location and number of particles for the soft body you will create; enter 30 in both the U Patches and V Patches text boxes (see Figure 4.2). Figure 4.2. Using the NURBS Plane Options dialog box to change values used in creating a surface.  -
Next, you need to define the plane's size. In the Length and Width text boxes, enter 60 and then click the Create button. By default, the newly created object will be selected. In the Channel Box, name the NURBS plane WaterPlane . tip At this point, you should hide the default grid so that you can see the plane more clearly (choose Display Grid on the main menu, or on the panel's menu bar, choose Show Grid).
Converting the Plane into a Soft Body -
By converting your NURBS plane into a soft body, you get a particle-based replica with particles placed at each of the CVs of the NURBS plane. This enables you to add dynamic effects to the plane to achieve a more realistic water effect. To work with soft bodies, you need to switch to Dynamics mode (hotkey: F4 ). With the plane selected, open the Hotbox and click Soft/Rigid Bodies Create Soft Body option box. -
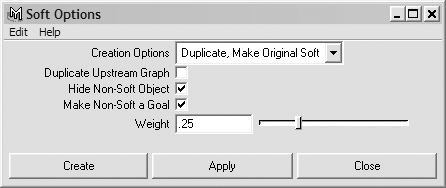
In the Soft Options dialog box (see Figure 4.3), change the following settings: In the Creation Options drop-down list, select Duplicate, Make Original Soft; select the Hide Non-Soft Object and Make Non-Soft a Goal check boxes; and enter . 25 in the Weight text box. Click the Create button. This creates a hidden duplicate of WaterPlane and converts the original plane to a soft body. Figure 4.3. Use the Soft Options dialog box to specify how you want the soft body to be created.  The particles from the soft body will be attracted to the hidden plane, which keeps the water's surface from deforming too much. The goal weight controls the particles' attraction to the goal. Without setting a goal, the plane would distort uncontrollably after you applied a dynamic field to it. Setting a value of 1 causes the particles to immediately jump to the goal, and a value of 0 has no effect on the particle position. Values from 0 to 1 create a bounce-like effect that's good for rolling waves. -
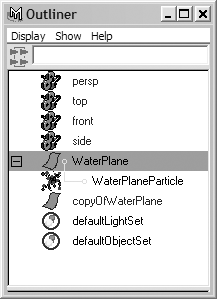
Open the Outliner (Window Outliner on the menu) and look for the new group called WaterPlane. Expand this group by clicking the + next to its name, and you'll see the particle soft bodyWaterPlaneParticlethat was created. Below the original WaterPlane is the goal surface, copyOfWaterPlane (see Figure 4.4). To see the particles for the soft body, select WaterPlaneParticle in the Outliner. The plane in the viewport will clearly show all the particles. Figure 4.4. The Outliner clearly shows the structure and components of the scene. WaterPlane is now a soft body.  -
Before adding motion to WaterPlane, you should figure out how long you want your animation to be. By default, animation is set to play at 24 frames per second (fps). You'll be playing the animation for 15 seconds, which means a total of 360 frames will be created. Go to the Range Slider at the bottom of the Maya window, under the Play buttons (Time Slider), and enter 360 for the end time of playback and animation. If you click Play on the Time Slider, however, nothing happens because no dynamics are affecting the soft body particles yet. In the next tutorial, you'll see how to add dynamics so that you can see the water moving the next time you play the animation. If you have had trouble with this tutorial, you can copy the scene file (noted below the CD icon) from the Maya Fundamentals CD-ROM and use it to continue to the next tutorial.  Tutorial: Adding Motion to the Water The ocean plane is now set to "jiggle" because you made it a soft body, but to set it moving, you have to do something to it. One option is to animate it shaking back and forth, to get water motion like rocking a tub of water. It would probably look just like a tub of water being shaken, though! Luckily for this project, Maya provides "influences," such as wind and gravity, that you can apply to soft bodies to make them do something even when they're standing still. To create dynamic water motion, you'll use the one called turbulence. Turbulence creates a "noise field" that causes random motion. There are two settings you'll change to modify the turbulence field: its magnitude , which represents the strength of the turbulence field, and its attenuation , which affects how the turbulence is distributed across the surface of the plane. For instance, an attenuation value of 0 causes the turbulence to be spread evenly across the surface. If the value is increased, you get strong waves in the middle that die out around the edges of the water plane. -
In the Outliner, under the expanded WaterPlane item, select the WaterPlaneParticle soft body.  note When you select WaterPlaneParticle, notice that the information in the Channel Box changes. That's because the Channel Box is displaying all the particle attributes that can be modified by default. You can also display these properties by opening the Attribute Editor (hotkey: Ctrl+a ) and clicking the WaterPlaneParticleShape tab. -
Make sure you're in Dynamics mode (hotkey: F4 ). With WaterPlaneParticle selected, open the Hotbox and click Fields Turbulence to attach a Turbulence field to the soft body particles. You should see a small circular icon appear at the scene origin, indicating that the field has been created. With the turbulence field selected, go to the Channel Box, and name the field WaterWavesField . tip You can also attach the turbulence field to the soft body particles with the Dynamic Relationships Editor (Window Relationship Editors Dynamic Relationships). For more information on this, see Chapter 14, "Particle Systems and Dynamics." -
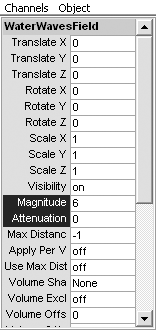
Now try playing the animation again to see the plane move ("deform"). If you don't see it moving, try zooming in closer to the plane. It doesn't move the way you expect an ocean to move, so to fix that, you need to modify the settings for the turbulence field. In the Outliner, select WaterWavesField. In the Channel Box, set Magnitude to 6 to create a stronger force on the soft body. Set Attenuation to , as shown in Figure 4.5, to distribute the turbulence evenly across the surface. Figure 4.5. Changing settings for turbulence in the Channel Box.  -
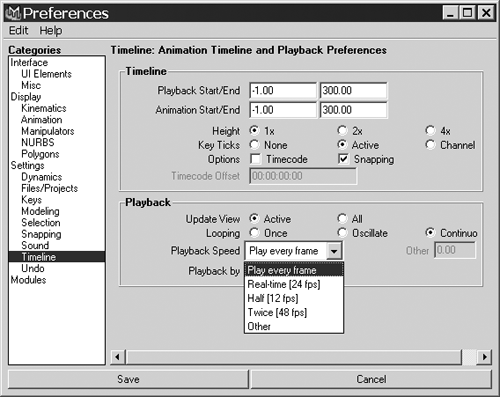
Play the animation again and look at the difference. The soft body deformation is much more evident now that the turbulence is evenly distributed. If you haven't done so already, save your scene. warning In some cases, instead of rippling water, you'll see a progressively chaotic tsunami! If this happens, the water is becoming unstable because the turbulence that was added to the water calculates the motion based on the previous frame of animation. This means that the playback speed in Windows Settings/Preferences Preferences Timeline needs to be set at "Play Every Frame" in order to get the correct calculation for animation.
Going Further You might want to try adding other fields such as Air (for a wind effect) or Vortex (a whirlpool !) to the scene and play the animation to see the results. Also, you can achieve some interesting results by tweaking just a few settings in your turbulence field. Try modifying values for the Frequency, Attenuation, and Magnitude settings. | If your animation plays back slowly or choppily, you might need to change the animation playback speed or your computer might not be powerful enough to play the animation smoothly. Click the Animation Preferences button to the right of the Range Slider or choose Window Settings/Preferences Preferences to open the Preferences dialog box. In the Categories list, scroll down to Settings, and click the Timeline entry (see Figure 4.6). Under the Playback section, select Play Every Frame in the Playback Speed drop-down list, and then click the Save button to save these preferences. These changes should have the animation playing more smoothly. Figure 4.6. Changing the playback setting in the Preferences dialog box.  tip If your animation still plays back very slowly, you can playblast your scene (Window Playblast option box). Playblasting takes a copy of each frame from your viewport and plays it back in your default media player or the FCheck utility. It's an accurate method for testing the playback speed of your animation.
Tutorial: Creating the Ground In this tutorial, you'll learn how to create a layer, which allows you to organize scene elements so that they're easier to manage. You'll also see how grouping objects makes it easier to select items in the Outliner or Hypergraph because you wind up with fewer objects cluttering the windows. You can continue from the previous tutorial, or load the scene file noted. -
To create the ground, you need another NURBS plane. On the menu bar, choose Create NURBS Primitives Plane, with the same settings you used for the water.   -
In the Channel Box, name the plane GroundPlane . Because it's created at the scene origin (the 0,0,0 point), it's in the same position as WaterPlane. The ground needs to be under the water, however, so you need to move it in the -Y direction.To do that, enter -2 for Translate Y in the Channel Box. -
Because the ground is created from a plane, it's completely flat. To get a more realistic bumpy surface and add a small island, you'll sculpt the NURBS plane. It's difficult to do that with the water in the way, so you need to hide it or create a layer. You'll use the Layer Editor at the bottom of the Channel Box (see Figure 4.7) to create a layer for the water. Make sure the water plane is selected, and on the Layer Editor's menu bar, choose Layers Create Layer. Figure 4.7. Use the Layer Editor to organize your scene elements.  note Remember to set the Time Slider back to zero for your scene if you have been playing an animation. The leftmost playback button (double left arrows) is the quick button for this. Don't forget to stop playback first! Some geometrical deformations will remain unless you "rewind." The water is a good example of this. -
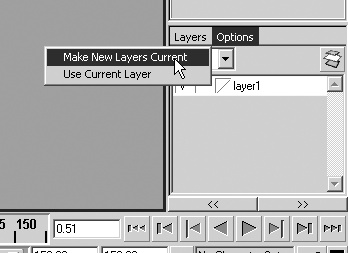
Double-click on the new layer to open the Edit Layer dialog box where you can change settings for the layer (see Figure 4.7). Name the layer WaterL , and change the color of the layer to blue; any objects associated with this layer will now be blue in Wire frame mode. Click the Save button to keep changes to the layer. Then toggle visibility of the layer. note Sometimes hiding a layer causes all newly created objects to disappear. This is caused by a toggle in the layer options. Look at the Layers panel, in Options, as shown in Figure 4.8, and note that if you have either option checked, it will cause newly created objects to fall into the current layer. Turn off both options to keep new objects from being inadvertently assigned to a hidden layer. Figure 4.8. Enabled layer options can be a source of confusion when layer visibility is toggled off, so make sure both options are unchecked.  -
Before adding the water to the layer, you'll group all the parts of the water together so that they appear as one object (which reduces clutter in the Outliner). In the Outliner, Ctrl+click to select WaterPlane, copyOfWaterPlane, and WaterWavesField. -
In the Hotbox, click Edit Group, and name the group WaterGroup . Check the Outliner, where you'll see the water components under WaterGroup. tip If you now select WaterPlane in one of the viewports, the other components of the water group wouldn't be selected. However, you can click any one component of the group and then press the up arrow to easily select the entire group. Grouping the objects creates a hierarchically higher "group node," instead of bundling all the objects into a single object. You can also use the arrow keys You'll see the highlighted selection move to other parts of WaterPlane. The left and right arrow keys let you move to navigate to other hierarchically arranged objects in the Outliner. For example, expand WaterGroup, select WaterPlane, and press the left and right arrow keys.to siblings of the selected object, the up arrow takes you to the parent, and the down arrow takes you to a child. -
Next, you need to assign WaterGroup to the layer. Make sure WaterGroup is selected in the Outliner, right-click on WaterL in the Layer Editor, and click Add Selected Objects on the shortcut menu. WaterGroup is added to the water layer, so it's no longer visible. Because the layer is hidden, you can view and modify the ground plane easily. -
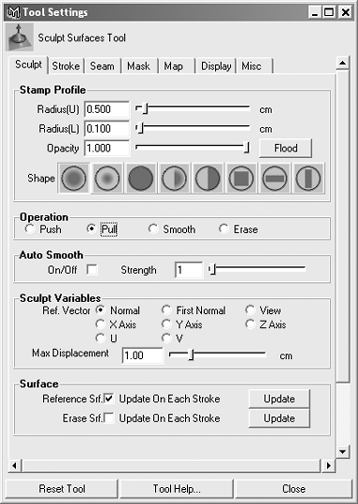
Now you can sculpt GroundPlane to give it some shape: Select GroundPlane, and in the Hotbox, click Edit NURBS Sculpt Surfaces Tool option box to open the Tool Settings window for the Sculpt Surfaces Tool (shown in Figure 4.9). Click the Sculpt tab if it's not displayed. Figure 4.9. The Tool Settings window for the Sculpt Surfaces Tool.  tip If you have a pressure-sensitive graphics tablet (such as Wacom Intuos or Graphire), this would be a good time to use it because you'll have more control with the Sculpt Surfaces Tool. In the Tool Settings window for the Sculpt Surfaces Tool, click the Stroke tab. Under the Stylus Pressure section, set the pen to be sensitive to Opacity, Radius, or Both. -
Under the Operation section, click the Pull radio button, and leave everything else at the default settings (see Figure 4.9). Minimize this window, and move the mouse cursor across the ground plane. You should see a red circle that represents the area to be sculpted. -
If you don't see the red cursor moving across the plane, you probably don't have the ground plane selected. Press q to get the selection cursor, click on the plane, and then press y to get the last-used tool. As you click and drag across the ground plane to make it look like an ocean floor, you should see the surface being pulled upward (in the Y direction). Switch to Shaded mode (hotkey: 5 ) to make it easier to see changes to the surface. The radius of the Sculpt Surfaces Tool is a little too small, however, so adjust it by pressing b and LMB-dragging left and right. -
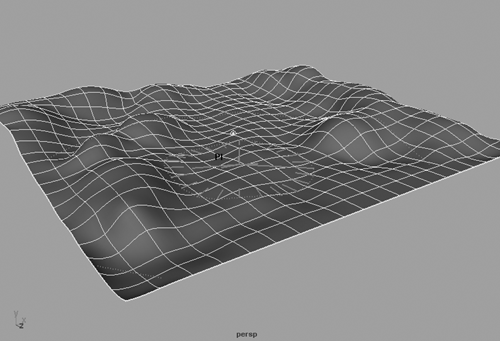
Continue sculpting the surface, occasionally switching the operation to Push in the Tool Settings window or with the u hotkey for the marking menu. Pull up some to edges of the ground plane, but don't pull them up so much that the ground penetrates the water plane. Eventually, you should have a surface similar to Figure 4.10. You can display the water layer to get an idea of which portions of the ground will be above the water line. In the Layer Editor, double-click WaterL and select the Visible check box in the Edit Layer dialog box. You can also toggle the visibility by clicking on the square to the far left of the layer's name in the Layer Editor. When you click on the square, it should display a V for "visible." Figure 4.10. Using the Sculpt Surfaces Tool on your ground plane.  tip You can interactively change the current function of the Sculpt Surfaces Tool by pressing u and clicking on the surface you're sculpting. This displays a marking menu with options for the tool. -
To exit the Sculpt Surfaces Tool, press q. Just as you did for the water, you need to create a layer for the ground plane. Create a new layer, name it GroundL , set the color to brown, and assign GroundPlane to it. -
If you haven't done so already, save your scene. Tutorial: Creating the Boat Finally, you get to create the boat that will float through your scene. You'll construct the boat from NURBS. Hide all the layers in your scene, and then switch into Four View mode. You can continue from the previous tutorial, or load the scene file noted here. -
The boat you'll create resembles a split cone, so first create a NURBS cone by choosing Create NURBS Primitives Cone option box. In the NURBS Cone Options dialog box, click the Z radio button to change the axis, and enter 180 in the End Sweep Angle text box (this tells Maya to create a surface that's only half-spun180 degrees). Next, select the Bottom radio button for Caps, select the Extra Transform on Caps check box, and enter 4 in the Number of Spans text box.   -
Click the Create button to create half a cone with a cap on one end. If the cone seems too far away, select it (by clicking on the cone, not the end cap) and press f. Name the cone BoatOutside . -
Next, you need to shape the cone to resemble a small boat. Maximize the Side view by placing your cursor over it and tapping the spacebar. Make sure the cone is still selected, and in the Channel Box, set Scale X to 0.5 , Scale Y to 0.75 , and Scale Z to 1.5 to begin shaping the cone. tip Because viewports are sensitive to mouse cursor location, place the mouse cursor over the view you want to focus on. You can then press f to affect that particular viewport. -
In the Perspective view, the cone doesn't look like the curved bottom hull of a small boat. To correct this, you need to move and scale CVs. With the cone selected in the Side view, switch to Component Selection mode (hotkey: F8 ). Right-click on the cone, and select Control Vertex. You will see columns of CVs sloping down toward the back of the cone. -
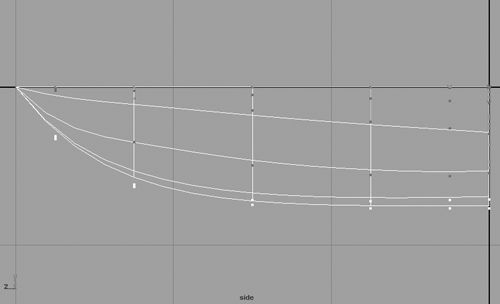
The CVs control the shape of the cone. In the Side view, marquee-select each bottom set of CVs (two CVs are visible, but you're selecting three), and switch to the Move tool (hotkey: w ). Start with the CV pair at the far right, and work forward until the cone has a flat bottom that suddenly curves up to shape the front of the boat, as shown in Figure 4.11. Note that in the figure all the modified CVs are selected, but the CVs were moved only as groups of three for each "rung" of the boat. Figure 4.11. The CVs at the bottom of each column of CVs have been moved down to shape the profile of the boat.  -
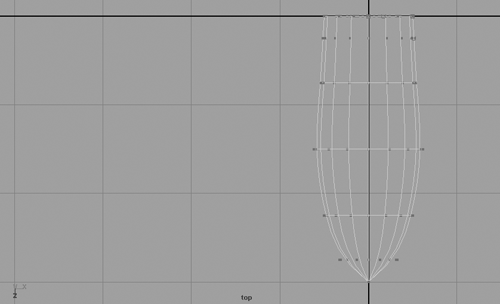
Switch to the Top view and maximize that viewport. You can see that the cone is still too narrow at the front. Make sure you're still in Component Selection mode with the CVs selected so that you can scale rows of CVs to further shape the cone. Starting with the row at the cone's wider end, marquee-select all the CVs in that row. Then scale them along the X axis (the red arrow) by switching to the Scale tool (hotkey: r ) and sliding the red X axis handle sideways . Referring to Figure 4.12 as a guide, scale the CVs to achieve a smoothly rounded boat shape. Figure 4.12. In the Top view, you can see how the CVs have been scaled in the X axis to shape the cone.  -
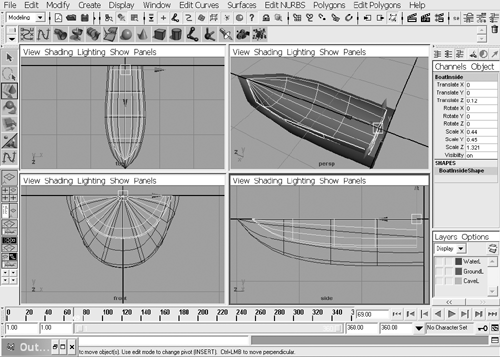
Now you can work on the inside of the boat. Exit Component Selection mode (hotkey: F8 ), and restore the Top view so that you have all four viewports visible. Select BoatOutside and duplicate it by clicking Edit Duplicate (hotkey: Ctrl+d ). The duplicate will be automatically selected. In the Channel Box, name it BoatInside , and set Scale X to 0.44 , Scale Y to 0.45 , and Scale Z to 1.321 so that it fits inside BoatOutside. The back side of BoatInside is still on the same plane as Boat Outside, however, so move BoatInside forward by setting Translate Z to 0.12 . You should now have the outside and inside of the boat created from the original cone (see Figure 4.13). Figure 4.13. The inside of the boat is now positioned within the boat's outside "shell."  -
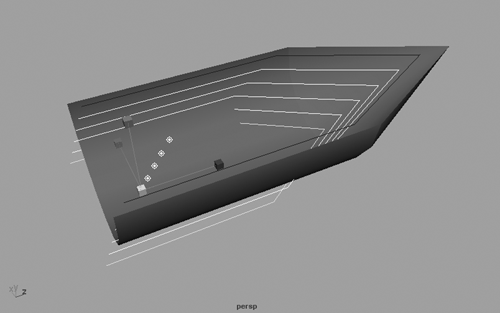
To close the gaps between BoatInside and BoatOutside, you'll use a loft. Return to Component Selection mode (hotkey: F8 ), RMB-click on BoatOutside, and choose Isoparm on the shortcut menu. BoatOutside's wireframe will turn blue. Select the isoparms at the edge of one side of BoatOutside (a yellow line appears to represent the isoparm you have selected). Next, you need to select an isoparm on the parallel edge of BoatInside. Right-click on BoatInside, choose Isoparm, and Shift+click on the edge isoparm parallel to the isoparm you selected on BoatOutside. With both isoparms selected, go to the Hotbox and click Surfaces Loft to fill the gap, as shown in Figure 4.14. Figure 4.14. Lofting isoparms together to close gaps between BoatOutside and BoatInside.  -
Repeat on the other side of the boat, selecting the isoparms at the edges and then lofting them together. -
Just as you did with the two sides of the boat, you need to loft the end caps at the back of the boat together. Select the edge isoparm on the inner and outer end caps, and then loft them together. You will have to do this twice on each side of the boat. When you're finished with the lofts, switch out of Component Selection mode (hotkey: F8 ). tip Remember that you can change the display's level of detail by selecting the boat and pressing 1 , 2 , or 3 . -
If you click to select the boat, only portions of the surface instead of the entire boat are selected because you constructed the model from two separate objects: the cone you started with and the duplicate you made for the inside. You need to group them together to appear as one surface. Before doing that, though, you need to delete the construction history. If any history remains, scene elements can still be influenced by the objects that created them, meaning you could get random changes you don't expect. Select all surfaces of the boat, and choose Edit Delete by Type History. Next, group the surfaces by clicking Edit Group. The boat turns into one selected object called Group1. Change the name of Group1 to BoatG in the Channel Box. If you deselect the boat and click it again to select it, you're still selecting only part of the surface because the surfaces have been placed in a hierarchy under the group's parent. Press the up arrow to move up the hierarchy until BoatG is the name at the top of the Channel Box; now the BoatG group is selected. tip With the Outliner, you can easily clean up a lot of clutter in your scene. Look at all the objects listed in the Outliner, which include unused remains of objects and other elements created earlier in this chapter. With all the layers visible in your viewports, click on a surface in the Outliner that you don't recognize. By having all the layers visible, you can see if something is selected when you click the surface. You might want to press f to focus in a viewport in case the object isn't in the viewable area. If no actual surface is selected, feel free to delete that surface from the Outlinerjust be careful that you don't delete a vital part of your scene! -
Hide all the layers again and create one for your boat. Name the layer BoatL , and add BoatG to the new layer. Be sure to save your scene again. |
