Using Outlook
| As part of the Microsoft Office suite, Microsoft Office Outlook (see Figure 11.1) is the most widely used Exchange client in SBS networks today. It provides personal and shared access to email, calendars, contacts, tasks, notes, journals, and public folders. With the addition of third-party plug-ins, Outlook can be extended to include support for blogs, RSS feeds, and newsgroup readers. Microsoft even offers a mini-CRM plug-in for Outlook called Business Contact Manager Update as a free download at http://www.microsoft.com/office/outlook/contactmanager/prodinfo/default.mspx. Because a great many bookstoo many to mention herededicated to the features and functionality of Outlook are available today, this chapter focuses on a few key features, setup, and connectivity. Figure 11.1. Outlook 2003 sports a new look over previous versions and offers vast technological improvements such as Cached Exchange Mode.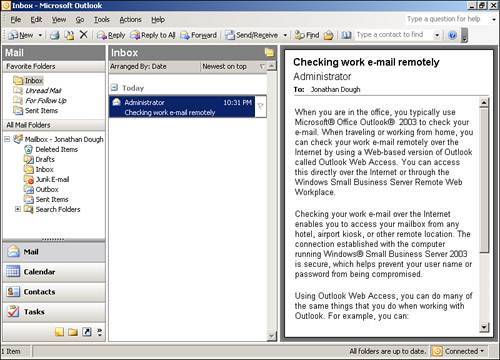 Installing OutlookOutlook is included in all versions of Microsoft Office 2003, and it also comes bundled in both SBS 2003 Standard and Premium Editions. During the initial installation of SBS, the Outlook files are copied into a folder on the server for later distribution to client computers. By default, those files are located in the C:\ClientApps\outlook2003 directory. Caution It is important to note that even though the Outlook files reside on the server for distribution to client machines, the Outlook application itself should never be installed on the SBS server. Microsoft doesn't support installing Outlook and Exchange on the same machine, due to conflicts with the Messaging Application Programming Interface (MAPI). See Microsoft KB article 266418 for more details (http://support.microsoft.com/?id=266418). After the Outlook install files have been successfully copied onto the SBS server during installation, you can put away the original Outlook disc and yellow 25-digit product key sticker for safekeeping. The only time you will need the 25-digit code is when manually installing Outlook 2003 on a client workstation from the CD. All further Outlook 2003 installs can be initiated from the server using the built-in wizards. If the workstation needing Outlook installed is new to the network, run the Set Up Client Computers Wizard. Or if the workstation is already a member of the SBS domain, run the Assign Applications to Client Computers Wizard. To run either of these wizards from the Server Management MMC console, open Server Management, click Standard Management, click Client Computers, and select the wizard from the task pane on the right. Alternatively, if you need to install or reinstall Outlook 2003 from a client workstation, installation can be initiated manually by browsing to \\servername\ClientApps\outlook2003 and double-clicking the Setup.exe program. Cached Exchange ModeCached Exchange Mode in Outlook provides access to employee mailbox information normally stored in Exchange, even in the event of a network outage or if the Exchange server is unavailable. This is accomplished by storing a copy of the user's data from the Exchange mailbox on the local user's machine in an Offline Folder (OST) file. A copy of the address book is also stored locally as an Offline Address Book (OAB) file. The client's mailbox still resides on the Exchange server, but most of the traffic takes place between Outlook and the OST file, even when network conditions are normal.
Outlook automatically synchronizes the local OST file with the Exchange server. If you watch the lower right corner of the Outlook status bar carefully, you can see it flash a message when synchronization occurs, followed by a message that says "All folders are up to date." The OAB file synchronization also happens automatically, but only once per day. Note If necessary, users can manually initiate synchronization of the OST file by clicking the Send/Receive button in Outlook. Likewise, the automatic once-per-day synchronization of the OAB file can be initiated manually by clicking on Tools, Send/Receive, and Download Address Book. However, manual synchronization of the OST and OAB files is rarely necessary when Cached Exchange Mode is enabled. In fact, as the network administrator you may want to disable manual and scheduled synchronization to minimize unnecessary traffic on the Exchange server, unless the user is also using POP3, IMAP, or HTML-based webmail accounts such as Hotmail or Gmail. Obviously, storing all this information in the OST and OAB files increases Outlook's footprint on the local machine. But there are several trade-off benefits such as a reduction in network traffic and reduced load on the Exchange server. It also gives users the ability to continue to access their data if the Exchange server goes offline. This data is available even if they disconnect from the network intentionally, which is especially beneficial for laptop users who often move between various wireless access points. While disconnected from the network they can compose email, look up contacts, and make schedule changes with no Internet or LAN access whatsoever. When they eventually reconnect to the network, the folders and contents can be synchronized with the Exchange server. Newly composed email and calendar updates on the laptop are sent up to the Exchange server, and new messages, schedule changes, and other mailbox updates are brought down to the OST file on the local machine. Caution Desktop search engines installed on client machines such as MSN Desktop Search can negatively affect performance of the Exchange Server. When these desktop search engine applications interact with Outlook and MAPI clients they can increase CPU usage, cause I/O spikes on the Exchange Server, and create bottlenecks for Remote Procedure Calls (RPC). For more detailed information on locating these client applications installed on workstations on the network and minimizing their negative effects, see Microsoft KB article 905184 (http://support.microsoft.com/?id=905184). Note Some features such as new email notification, uncached public folder access, free/busy lookup, and delegate support work with Outlook in Cached Exchange Mode, but only when Outlook has a live network connection to the Exchange server. If the network connection drops, these features cease to function until network connectivity is reestablished. A detailed explanation of the various synchronization modes and folder states available in Outlook is located in the "Troubleshooting Cached Exchange Mode" section found later in this chapter. When Outlook 2003 is initially installed on a client machine, Cached Exchange Mode in enabled by default. But when upgrading a client machine from a previous version of Outlook to Outlook 2003, Cached Exchange Mode is not enabled automatically. You may need to enable it yourself manually. To enable Exchange cached mode in Outlook 2003, follow these steps:
To disable Cached Exchange Mode in Outlook, simply uncheck the Use Cached Exchange Mode in step 4 in the preceding list. Also, Cached Exchange Mode can be disabled on the Exchange server by the network administrator. Note For an in-depth explanation of how Cached Exchange Mode works, including Registry keys that control synchronization timing, the order in which folders are synchronized, issues that affect performance degradation, and best practices, see Microsoft KB article 870926 (http://support.microsoft.com/?id=870926). Disabling Cached Exchange Mode negatively affects network performance because of the increase in traffic between Outlook and Exchange. But it is more secure in the event of a computer theft because sensitive company information is safe back on the Exchange server and not stored in an OST file on the stolen machine.
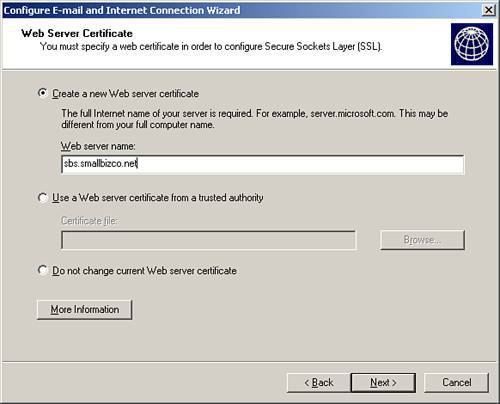
Configuring Outlook Via the Internet, or RPC over HTTPIf you take a poll of SBS administrators and consultants and ask them what their favorite features of SBS are, Outlook via the Internet (also called RPC over HTTP) will definitely be in the top five of that list. It allows users outside the network firewall to use Outlook remotely to access their mailbox and public folders, and remote workers can access that information without the need for a Virtual Private Network (VPN) or dial-up remote access into the server. This is a huge cost savings from hardware and administrative standpoints. It also improves security because you no longer need to open up your entire network via VPN or dial-up just to give a remote worker access to his inbox. If you enable Cached Exchange Mode in Outlook, this minimizes the required bandwidth and offers an improved end-user experience, especially over slow Internet connections such as dial-up or busy Wi-Fi spots. What Is RPC over HTTP?First, to disassemble the acronyms, RPC over HTTP stands for Remote Procedure Call over HyperText Transport Protocol. To break that down even further, a Remote Procedure Call (RPC) is a command issued to a remote computer. In this instance, those RPC commands are related to processing email. The "over HTTP" in basic terms means that Outlook is communicating with the Exchange server over the Internet the same way a web browser views web pages. This makes it easier to establish a connection to the Exchange server, even if you are behind a firewall. How RPC over HTTP WorksBecause you don't want anyone on the Web executing commands on your server or reading your email as it passes by, all RPC traffic is wrapped in HTTP packets and encrypted in Secure Sockets Layer (SSL). Although it is technically possible to send RPC over HTTP without encryption, it poses a major security risk. So the default implementation of RPC over HTTP in an SBS environment includes SSL encryption. Stick to the default SBS settings, and you'll be fine. The mention of SSL should clue you in that you'll need a certificate. You can go out and buy a certificate from a third-party vendor, but SBS has the capability to generate its own certificates, and those are free. So Outlook takes the certificate from the SBS server and uses it to encrypt the RPC packets with the public key before sending them across the Web. The SBS server then receives the encrypted packets and uses its private key to decrypt the packets and processes the RPC information inside. If an unauthorized computer on the Web intercepts the packets, they're useless because they're encrypted and can't be opened without the private key. Preparing the Server for Outlook Via the InternetBefore configuring the client to use Outlook via the Internet, some configurations and items need to be put in place to prepare the SBS server:
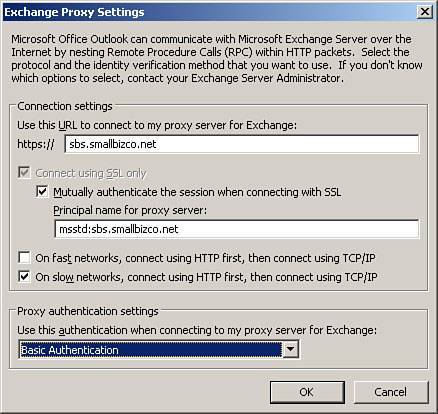
Configure Outlook Via the Internet on the ClientBecause installing Outlook via the Internet is not especially intuitive in nature, Microsoft has included a dynamic page on the RWW that walks users through the install process. Not only does it outline the process step-by-step, but because the page is created dynamically, it inserts the correct answers to all the questions you'll come across, such as the name of your proxy server. To review this document, open Internet Explorer and go to https://server/remote; then click on Configure Your Computer to Use Outlook over the Internet. As you'll notice, before delving into the actual install process itself, the instructions on that page walk the user through a self-conducted "pre-flight" check of sorts. The user needs to have three things: either Windows XP Service Pack 1 with KB #331320 patch or Windows XP Service Pack 2 (without the patch), Outlook 2003, and the SSL certificate. When you browse to https://server.domain.com/remote, you are prompted to install the server's certificate; install it now. If you aren't prompted, that means that the certificate is already installed and trusted on this machine. Important: Without this certificate installed, RPC over HTTP won't work. After those conditions are met, the user is ready to install Outlook via the Internet. Here is a succinct, but complete, version of the two-page ASP setup document found on RWW:
You can now test your configuration by starting Outlook and entering your username and password. Outlook via the Internet is picky about the username format, and more detailed information about this can be found in the "Troubleshooting Outlook Via the Internet" section later in this chapter. |
EAN: 2147483647
Pages: 253