Managing Computers in SBS 2003
| For users to get the full experience of SBS, their computers must be joined to the domain. But adding the workstation to the domain through the Network Identification Wizard or just joining the domain through the System control panel is not sufficient to receive all the benefits of SBS domain membership. To get the full effect, you must rely on the wizards. Just like with the user management wizards discussed at the beginning of the chapter, not all computer management wizards are available to domain power users in the Server Management Console. Table 16.4 lists the tasks related to computer management and their availability to administrators and power users.
In addition, the power user version of the Server Management Console has only one grouping of tasks for computer management. The administrator version has nodes for Client Computers and Server Computers. The only item from Table 16.4 that is present in the Server Computers node is the View Services task, which brings up the Services console for the selected server computer. Getting computers joined to the SBS network is a two-step process. The first step is to create the computer object in Active Directory and configure the settings on the network for the computer object. The second step is to join the computer to the domain and complete the configuration processes on the computer. These two steps are broken down in the next two sections. Adding Computers to the NetworkThree different methods can be used to create a computer account on the domain. Two of them are wizards; the third is a manual process. Using the Add User WizardAt the end of the Add User Wizard is a page where you can configure a computer for the user being added. In the Set Up Client Computer page of the Add User Wizard, you can specify the name of the computer to add for the user. If you choose to add the computer, whose default name will be the user's logon name with "01" added to the end, the next page in the wizard is the Client Applications page. In this page, you select which of the predefined applications are pushed out to the workstation when it logs in to the network. For more information about managing client applications, see the "Assigning Applications to Computers" section later in the chapter. Table 16.5 lists the default applications on this page. Some of these applications are mandatory, and, although the check box next to them can be disabled, you will get an error that the installation cannot be removed or modified.
The next page in the Add User Wizard is the Mobile Client and Offline User page. In this page, you can select to install the Connection Manager or ActiveSync 3.8 on the workstation. The Connection Manager allows the workstation to connect to the SBS network from an external network. The ActiveSync 3.8 install not only installs the ActiveSync 3.8 client on the workstation, but it also copies the self-signed SSL certificate, created by the CEICW, to the workstation so that the user can access the server using a secure connection from a PDA synched with the workstation. Using the Set Up Client Computers WizardThe Set Up Client Computers Wizard allows you to create a new computer account not specifically associated with a user account. You would use this wizard if you are adding a new workstation to the network but not adding a new user at the same time. You might also need to run this wizard if an existing computer account had to be removed from the domain for some reason. In the second page of the wizard, shown in Figure 16.9, you can add one or more computer names to the network. Simply enter the name of the computer in the Client Computer Name field and click Add for as many computer objects as you want to add. Figure 16.9. Multiple computer objects can be added at one time in the Set Up Client Computers Wizard.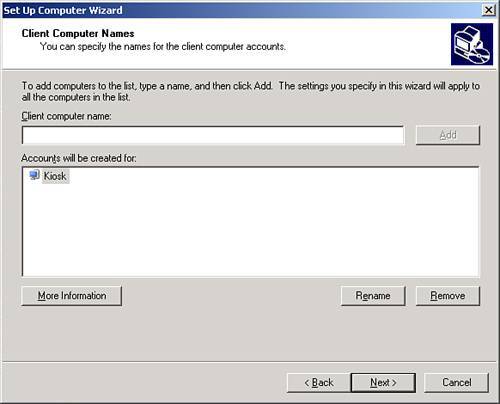 The next two pages of the wizard are exactly the same as the Client Applications and Mobile Client and Offline User pages in the Add User Wizard. Table 16.5 discussed the default applications available in this page, and the "Assigning Applications to Computers" section later in the chapter covers how to customize the list of applications available. One other group of settings can be modified in this page by clicking on the Advanced button. This brings up the Advanced Client Computer Settings dialog where you can enable or disable application settings for the client computer. The settings are listed and described in Table 16.6.
Using Active Directory Users and ComputersClient computers can be set up manually in Active Directory Users and Computers, but there are a few catches to this method. First, you need to add the computer to the Active Directory tree in the My Business, Computers, SBSComputers organizational unit. If you add the computer object to the Computers container immediately below the root of the domain, the computer object will not be able to be fully managed by SBS. Second, you have to manually configure applications for the computer using the Assign Applications to Client Computers Wizard, discussed in more detail in the next section, "Assigning Applications to Computers." This step is handled automatically by the Add User and Set Up Client Computer Wizards. Third, if the computer account is set up manually, you may encounter problems running the Connect Computer Wizard, described in the "Using the Connect Computer Wizard" section later in the chapter. If you manually create the computer object and do not run the Connect Computer Wizard with a domain admin-level account, you will not be able to join the workstation to the domain. The bottom line here is that unless you have a workstation that you do not want to be managed by SBS and you want to take care of every aspect of managing that computer account manually, use one of the wizards to set up the client workstation. You will save yourself time up front and avoid headaches down the road. Assigning Applications to ComputersThis chapter already introduced the client application setup process used during the client computer setup wizards. But beyond the steps in the wizards, what exactly does the assign application process do? When the assign applications process runs, it creates a set of files and folders on the SBS server that will be accessed by the workstations when the user logs on. Table 16.7 lists the key components, their locations, and a brief description of their functions.
When the Set Up Client Computer Wizard is run, the wizard creates a folder for each workstation under \\servername\clients\response. Then the apps.dat file is built for the workstation, indicating which of the applications stored in \\servername\ClientApps should be installed on the workstation. The content of a sample apps.dat file is as follows:
Although the file data may seem a little difficult to read at first, after you have analyzed a few of the files, it becomes easier to process. In this sample, two applications are defined for the workstation. The first is identified as application ID {F28193FE-08F8-4eae-B714-D425838F46FE}. It needs approximately 950MB of free disk space to install, and it needs a reboot when complete. The name of this piece is the Client Operating System Service Pack, and it executes the installation from a command-line provided by the script. The second application needs only 75MB of disk space to install and also requires a reboot. This application is Internet Explorer 6.0, and the setup program at \\SBS\ClientApps\IE6\ie6setup.exe uses the command-line parameters identified in the <cmdline> tag. The <miscdata> tag tells the setup application not to automatically log the user off at the end of the install, not to allow the user to change any of the settings for the installation, and that the workstation does not need the connection manager or ActiveSync installed. Adding Other Client Applications for InstallationIf you have additional applications that need to be added to all workstations in the domain, you can add entries for those applications to show up in the Set Up Client Computers Wizard. Doing this is a two-step process. Preparing the Applications for InstallationThe first step to adding applications for client installation is to prepare the application installer on the network. The application installer ideally resides in the ClientApps share along with the other application installers, but you can locate the installer elsewhere on the network. If you choose to put the installer in a different location, you need to create a new share that points to the path where the installer is located, and you need to set Full Control permissions on the share for domain users and add Read and Execute permissions for appropriate users and groups on the folder, and those permissions must be applied to all subfolders as well. When you have the installation path ready, you need to copy the installer information into that path. For some applications, this may be as simple as copying the contents of the installation CD to the share. For other applications, such as Office-related installs, you may need to do an administrative install to build the installer directory on the server for the application. After the install data has been put on the server, you are ready to move to the second step. Caution Before adding new client applications for the entire network, make sure that you understand and are compliant with the licensing restrictions for the software. Running the Set Up Client Applications WizardThe last step to adding the application to the Client Applications list is to run the Set Up Client Applications Wizard. This wizard is found in the Client Computers node of the Server Management Console. Follow these steps to complete the wizard:
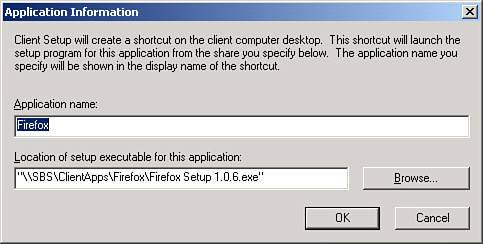
As you can see in Figure 16.10, the new application appears as a shortcut on the user's desktop. The shortcut points to the application installer listed in the Application Information dialog box. The user still has to double-click on the shortcut to install the application. Using the Connect Computer WizardThe real magic of adding the client computer to the network is done in the Connect Computer Wizard. Each time you add a workstation to the domain using the Add User or Set Up Client Computers Wizard, the wizard displays a dialog box telling you to run the Connect Computer Wizard to complete the computer setup process. This particular wizard is a web tool, not a program that is run locally. In addition, not all of the wizard runs in the web interfacesome of the last steps of the wizard are included in the SBS logon script. This section of the chapter breaks down the parts and pieces of the Connect Computer Wizard. The Web ComponentThe Connect Computer Wizard is accessed from the SBS server at http://servername/connectcomputer, which launches the first part of the wizard. The first page of the wizard provides a single link, Connect to the Network Now, which can be selected. When the link is clicked, the workstation downloads an ActiveX control from the server, and an installation prompt appears. After the ActiveX component is downloaded and run, the Small Business Server Network Configuration Wizard starts. In the first page of the wizard, you enter the username and password of a user on the network, usually the name of the user who will be using the workstation. In the next page of the wizard, shown in Figure 16.11, you can select which users on the network will be assigned to the workstation and whether a local profile needs to be copied into that user's new profile on the workstation. Figure 16.11. The Connect Computer Wizard allows you to select which network users will be assigned to the workstation.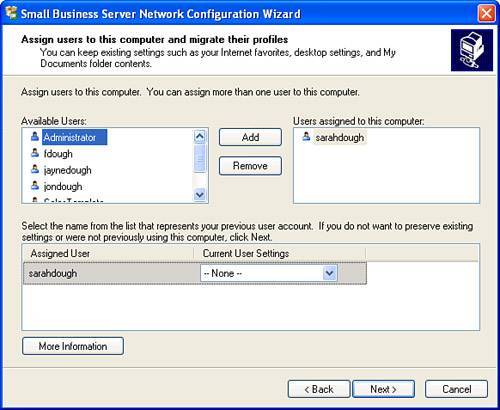
The next page of the Connect Computer Wizard is where you select the name for the computer. The page lists the available workstation names in the domain. If you logged in with the username that had a workstation assigned to it during the Add User Wizard, that workstation name will be selected automatically. The final page of the wizard summarizes the activity that will take place. After you click Finish, the workstation reboots and moves on to the next phase of the process. The Reboot CycleWhen the web portion of the wizard completes, the workstation reboots. When the workstation comes back up, it automatically logs in with the user object created in the web section of the wizard and makes changes to the network settings of the workstation. This is where the workstation name is changed and the join to the domain is complete. This is also the point in the process where the new domain user profile is created and the settings from the old profile are copied, if a source profile was selected in the web section of the wizard. After these steps have been completed, the wizard reboots the computer one last time. The Logon ScriptAfter the last reboot completes, the user is presented with a standard logon window. At this point, the user can log in with his domain username and password, and the domain logon script completes the wizard process. The user sees a dialog box prompting the user to run the Client Setup Wizard. When the user clicks the button to start the installation, the \\servername\clients\setup\setup.exe wizard program is launched. This wizard collects the name of the workstation and opens the appropriate apps.dat file in the \\servername\clients\response folder. After this information is collected, the wizard begins. The second page of the wizard allows the user to enter his password so that when the workstation reboots after the completion of the wizard, the user will be automatically logged back in. The wizard then begins the installation of the server packages. The latest operating system service pack is installed first, followed by Internet Explorer 6.0 (if it is not already installed), followed by any other applications selected during the Set Up the Client Workstation Wizard. After the wizard has completed the installation, the workstation reboots. The next time the user logs in, the workstation is ready for use. Note The logon script runs every time the user logs in, but the user generally only sees the Client Setup Wizard screen once. On subsequent launches, the Client Setup Wizard compares the contents of the apps.dat file to the applications already installed on the workstation, and if there are no differences, the Client Setup Wizard completes silently, and the user is none the wiser. When additional applications have been added using the Set Up Client Applications Wizard, the Client Setup Wizard creates a shortcut on the user's desktop that points to the installer for the new application(s). Adding ServersThe process of adding servers to the SBS network is similar to the process for adding client computers but does not have as many options. There are two main methods for adding servers, discussed in the following sections. Using the Set Up Server Computers WizardThe best way to set up a new server and connect it to the network is to run the Set Up Server Computers Wizard in the Server Computers node of the Server Management Console. The first page of the wizard asks for the name of the computer. The second page of the wizard determines whether the server will get a dynamic IP address through DHCP or whether it will have a static IP address and what that address will be. The last page of the wizard summarizes the setup for the server computer and instructs you to run the Connect Computer Wizard to complete the process. Caution There is a known issue with the IP address information not getting set correctly if the server name has capital letters in the Set Up Server Computers Wizard. See KB 889029 (http://support.microsoft.com/?id=889029) for more information. On the SBS server side, the wizard creates the computer object in the MyBusiness, Computers, SBSServers OU. If you give the server a static IP address, the wizard also modifies the DHCP settings to exclude the IP address assigned to the new server from the DHCP scope, if the address is not already within an excluded range of addresses. When the new server runs the Connect Computer Wizard, it goes through a similar process to a client computer. The wizard comes up, asks for a username and password (which should be a domain admin account), and then asks the user to select which computer name to use for the server. Then the wizard finishes and restarts the server. The server logs in with the SBS account created in the wizard, changes the name and domain affiliation of the server, and makes changes to the network configuration, if needed. The server then reboots again, and the server is now ready to participate as a member of the SBS domain. Manually Joining the Server to the DomainBecause much less configuration is done to a server during the Connect Computer Wizard than for a client workstation, you may opt to join the server to the domain manually. You still need to perform a couple of manual configuration items if you choose to go with this option. First, when you join the domain from the member server console, the computer object is placed in the Computer container in Active Directory. You need to move the computer object into the appropriate OU after the computer has been joined. Member servers go into the MyBusiness, Computers, SBSServers OU. Domain controllers should already be in the Domain Controllers OU as a result of the dcpromo process, but you should confirm this. Second, if the server is using a static IP address, you need to make sure that the IP address has been excluded from the DHCP scope on the SBS server so that a conflicting address is not handed out to a workstation by the DHCP server process.
|
EAN: 2147483647
Pages: 253