Processor ReplacementUpgrades
Processor Replacement/UpgradesIt's possible to upgrade the processor in most x86-based servers to obtain better performance, either by adding a faster version of an existing processor or, in some cases, by moving to a new processor family (such as upgrading from a single-core to a dual-core processor). To maximize the performance of a single-processor server, you can almost always upgrade to the fastest processor your particular board will support. Because of the varieties of processor sockets and slotsnot to mention voltages, speeds, and other potential areas of incompatibilityyou should consult with your motherboard or system manufacturer to see whether a higher-speed processor will work in your board. Usually, that can be determined by the type of socket or slot on the motherboard, but other things, such as the voltage regulator and BIOS, can be deciding factors as well. For example, if your motherboard uses Socket 604, you might be able to upgrade to the fastest version of the Intel Xeon. Before purchasing a new CPU, you should verify that the motherboard has proper bus speed, voltage settings, and ROM BIOS support for the new chip. Caution If you are upgrading processors in a multiple-processor server, the replacement processors must have identical steppings or at least have been tested for proper operation in a multiple-processor environment. See "Upgrading to Multiple Processors," earlier in this chapter, for links to vendor documentation with specific recommendations for mixing steppings. If a BIOS upgrade is available for your server or server motherboard, you should install it before installing an additional processor or upgrading the processor. Otherwise, the system might not recognize the processor. If you are unable to install a faster processor directly into your system, you can try one of the available third-party solutions, including adapters that can help first-generation Socket 423 Pentium 4 motherboards use Socket 478 processors, faster Socket 370 processors for older Slot 1 motherboards, and so on. Rather than purchase processors and adapters separately, you should generally purchase them together in a module from companies such as PowerLeap (see Appendix C). Caution If you want to use an adapter-based solution for upgrading a multiple-processor server, you need to make sure the adapter has been designed to work in a multiple-processor mode. For example, the PowerLeap PL-P3/SMP upgrade for Slot 1 Pentium II/Pentium IIIbased systems is designed to work in dual-processor systems, but the PowerLeap PL-iP3/T is designed for use in single-processor systems. Upgrading the processor can, in some cases, double the performance of a system. However, if you already have the fastest processor that will fit a particular socket, you need to consider other alternatives. In that case, you should look into a complete motherboard change, which would let you upgrade to a motherboard that supports the latest version of your preferred server processor. If your chassis design is not proprietary and your system uses an industry-standard ATX, BTX, or SSI motherboard design, you should change the motherboard and processor rather than try to find an upgrade processor that will work with your existing board. Tip If you want to upgrade to a dual-processor configuration by replacing your motherboard, you need to be sure to compare the form factor of the new motherboard to the space in your current case. Many dual-processor motherboards use the Extended ATX form factor, which supports a motherboard up to 12 inches wide by 13 inches long. Some ATX cases can't handle boards of this size or might not offer adequate cooling or clearance for processors and heatsinks. Also, make sure your existing power supply matches the ATX or SSI standards. If not, you might not be able to replace the motherboard.
Processor Installation ProceduresIf you are installing a processor or processors into a new motherboard, you should install them before you install the motherboard into the system. If you are upgrading a system with a replacement or additional processor, you should remove the motherboard from the system before performing the upgrade. There are two reasons to work with the motherboard out of the system for processor upgrades:
Some older motherboards have jumpers that control both the CPU speed and the voltage supplied to it. If these are set incorrectly, the system might not operate at all, might operate erratically, or might even damage the CPU. If you have any questions about the proper settings, you should contact the vendor that sold you the board before making any jumper changes.
With some processors, especially those that use Socket 370 or Socket A (Socket 462), you need to use a great deal of force to clip the heatsink to the socket or release the heatsink from the socket. The amount of force required can damage the motherboard if the motherboard is not removed from the system and placed on a surface that supports the processor socket area of the motherboard. Newer processors use different heatsink installation methods that require less force. To install a processor and heatsink, you can use one of the procedures described in the following sections, depending on your processor type. Installing Socketed ProcessorsTo install socketed processors, follow these steps:
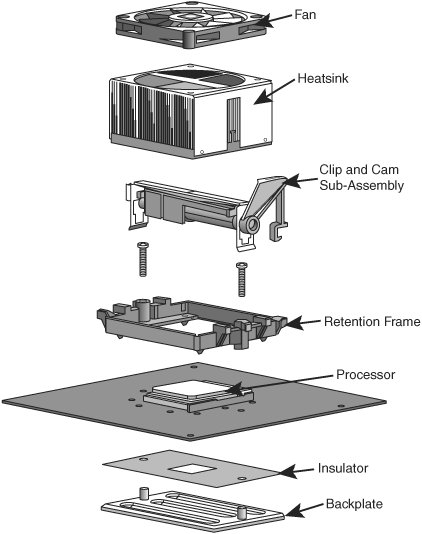
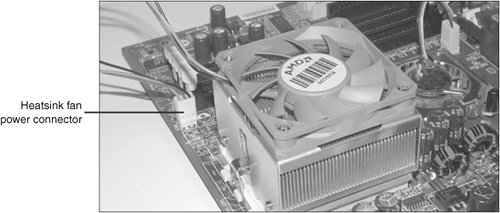
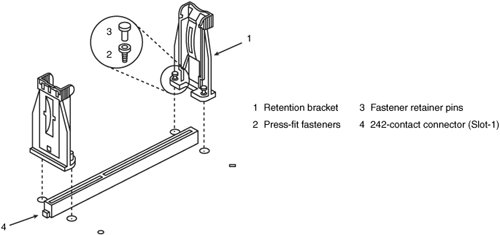
Heatsinks made for Socket 370, Socket A, and Socket 423 clip to the socket itself (see Figure 2.43), and heatsinks made for Socket 478, Socket 775, Socket 603/604, Socket 939, and Socket 940 clip to various types of retaining mechanisms built in to the motherboard or case (see Figure 2.44). Figure 2.43. Attaching a heatsink to a socketed processor. The retaining clip is spring-loaded, so it must be positioned with a screwdriver or similar tool that can push the clip down and swing it into place.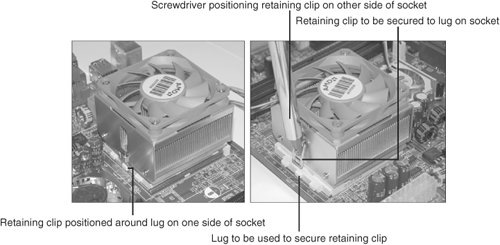 Figure 2.44. The Socket 754/939/940 active heatsink uses a clip and cam subassembly and retention frame to hold the heatsink in place. You need to be careful when attaching the clip to the socket, especially with Socket 370 or Socket A heatsink clips; you don't want it to scrape against the motherboard, which can damage circuit traces or components. You also need to keep the heatsink steady on the chip while attaching the clips, so you should not move, tilt, or slide the heatsink while you attach it. Most heatsinks have a preapplied thermal pad (also known as a phase-change pad); to prepare this type of heatsink, you remove the protective tape before installing the heatsink. For heatsinks that don't include a thermal pad, you need to put a dab of heatsink thermal transfer compound (normally a white-colored grease; some vendors of high-performance heatsinks use a silver-based compound such as Arctic Silver instead) on the CPU before installing the heatsink. This prevents any air gaps and enables the heatsink to work more efficiently. If the CPU has an active heatsink (with a fan), you need to plug the fan power connector in to one of the fan connectors supplied on the motherboard (see Figure 2.45). Optionally, some heatsinks use a disk drive power connector for fan power. Figure 2.45. Attaching the heatsink fan power connector to the motherboard. Installing Slot-Based ProcessorsTo install slot-based processors, follow these steps:
After installing either type of processor, you should refer to the motherboard manufacturer's manual to set the jumpers, if any, to match the CPU you are going to install. Look for the diagram of the motherboard to find the jumper location, and look for the tables for the correct settings for your CPU. If the CPU supplied was already installed on the motherboard, the jumpers should already be correctly set for you, but it is still a good idea to check them. Note Most recent systems use a BIOS-based configuration method instead of jumper blocks or DIP switches to configure the processor. To complete the configuration process, you start the computer, start the BIOS Setup program, and select the correct options for clock multiplier, frequency, voltage, and other settings required by the particular system BIOS in use. You need to be sure to save the changes when exiting the BIOS Setup program. Some systems, particularly those that use rack-mounted form factors or blade-based components, use passive heatsinks and cooling ducts instead of heatsinks with integrated fans to cool the processor(s). When installing or upgrading processors in such systems, you need to be sure to remove the cooling duct before attempting to remove the existing processor. If you are installing an additional processor, you should contact the vendor to determine whether you need to install an additional cooling duct for the second processor. Some multiprocessor servers use terminator boards (essentially a processor cartridge with special circuits inside instead of a processor) to fill empty processor slots on a multiprocessor motherboard. With these servers, you need to remove the terminator board before attempting to install a new processor. |
EAN: 2147483647
Pages: 240