Understanding Constraints
Within most businesses, data often must adhere to a certain set of rules and restrictions. For example, companies typically have a specific format and numbering sequence they use when generating purchase orders. Constraints allow you to place the logic needed to enforce such business rules directly in the database rather than in applications that work with the database. Essentially, constraints are rules that govern how data values can be added to a table, as well as how those values can be modified once they have been added. The following types of constraints are available:
-
NOT NULL constraints
-
Default constraints
-
CHECK constraints
-
UNIQUE constraints
-
Referential integrity constraints
-
Informational constraints
Constraints are usually defined during table creation; however, constraints can also be added to existing tables using the ALTER TABLE SQL statement.
NOT NULL Constraints
With DB2, null values (not to be confused with empty strings) are used to represent missing or unknown data and/or states. By default, every column in a table will accept a null value. This allows you to add records to a table when not all of the values that pertain to the record are known. However, there may be times when this behavior is unacceptable (for example, a tax identification number might be required for every employee who works for a company). When such a situation arises, the NOT NULL constraint can be used to ensure that a particular column in a base table is never assigned a null value; once the NOT NULL constraint has been defined for a column, any operation that attempts to place a null value in that column will fail. Figure 6-1 illustrates how the NOT NULL constraint is used.
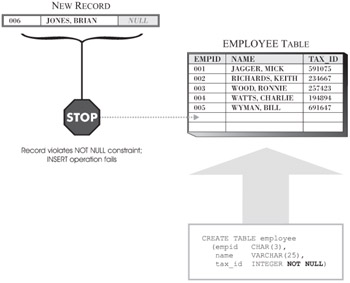
Figure 6-1: How the NOT NULL constraint prevents null values.
Because NOT NULL constraints are associated with a specific column in a base table, they are usually defined during the table creation process.
Default Constraints
Just as there are times when it is objectionable to accept a null value, there may be times when it is desirable to have the system provide a specific value for you (for example, you might want to automatically assign the current date to a particular column whenever a new record is added to a table). In these situations, the default constraint can be used to ensure that a particular column in a base table is assigned a predefined value (unless that value is overridden) each time a record is added to the table. The predefined value provided could be null (if the NOT NULL constraint has not been defined for the column), a user-supplied value compatible with the column's data type, or a value furnished by the DB2 Database Manager. Table 6-2 shows the default values that can be provided by the DB2 Database Manager for the various DB2 9 data types available.
| Column Data Type | Default Value Provided |
|---|---|
| Small integer (SMALLINT) | 0 |
| Integer (INTEGER or INT) | 0 |
| Decimal (DECIMAL, DEC, NUMERIC, or NUM) | 0 |
| Single-precision floating-point (REAL or FLOAT) | 0 |
| Double-precision floating-point (DOUBLE, DOUBLE PRECISION, or FLOAT) | 0 |
| Fixed-length character string (CHARACTER or CHAR) | A string of blank characters |
| Varying-length character string (CHARACTER VARYING, CHAR VARYING, or VARCHAR) | A zero-length string |
| Long varying-length character string (LONG VARCHAR) | A zero-length string |
| Fixed-length double-byte character string (GRAPHIC) | A string of blank characters |
| Varying-length double-byte character string (VARGRAPHIC) | A zero-length string |
| Long varying-length double-byte character string (LONG VARGRAPHIC) | A zero-length string |
| Date (DATE) | The system date at the time the record is added to the table. (When a date column is added to an existing table, existing rows are assigned the date January 01, 0001.) |
| Time (TIME) | The system time at the time the record is added to the table. (When a time column is added to an existing table, existing rows are assigned the time 00:00:00.) |
| Timestamp (TIMESTAMP) | The system date and time (including microseconds) at the time the record is added to the table. (When a timestamp column is added to an existing table, existing rows are assigned a timestamp that corresponds to January 01, 0001, 00:00:00.000000) |
| Binary large object (BLOB) | A zero-length string |
| Character large object (CLOB) | A zero-length string |
| Double-byte character large object (DBCLOB) | A zero-length string |
| Double-byte character large object (DBCLOB) | A zero-length string |
| XML document (XML) | Not applicable |
| Any distinct user-defined data type | The default value provided for the built-in data type the distinct user-defined data type is based on (typecast to the distinct user-defined data type) |
| Adapted from Table 11 on page 67 of the DB2 SQL Reference - Volume 2 manual | |
Figure 6-2 illustrates how the default constraint is used.
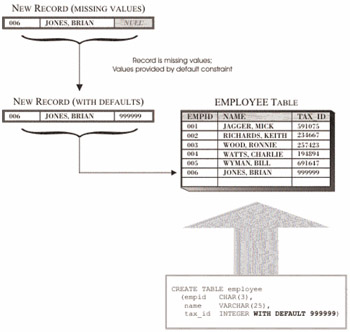
Figure 6-2: How the default constraint is used to provide data values.
Like NOT NULL constraints, default constraints are associated with a specific column in a base table and are usually defined during the table creation process.
CHECK Constraints
Sometimes, it is desirable to control what values will be accepted for a particular item and what values will not (for example, a company might decide that all nonexempt employees must be paid, at a minimum, the federal minimum wage). When this is the case, the logic needed to determine whether a value is acceptable can be incorporated directly into the data entry program being used to collect the data. A better way to achieve the same objective is by defining a CHECK constraint for the column in the base table that is to receive the data value. A CHECK constraint (also known as a table check constraint) can be used to ensure that a particular column in a base table is never assigned an unacceptable value-once a check constraint has been defined for a column, any operation that attempts to place a value that does not meet specific criteria into that column will fail.
CHECK constraints consist of one or more predicates (which are connected by the keywords AND or OR) that collectively are known as the check condition. This check condition is compared with data values provided, and the result of this comparison is returned as the value TRUE, FALSE, or Unknown. If the CHECK constraint returns the value TRUE, the value is acceptable, so it is added to the database. If, on the other hand, the CHECK constraint returns the value FALSE or Unknown, the operation attempting to place the value in the database fails, and all changes made by that operation are backed out. However, it is important to note that when the results of a particular operation are rolled back because of a CHECK constraint violation, the transaction that invoked that operation is not terminated, and other operations within that transaction are unaffected. Figure 6-3 illustrates how a simple CHECK constraint is used.
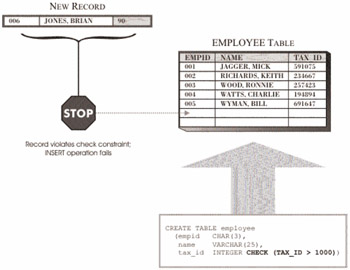
Figure 6-3: How a CHECK constraint is used to control what values are accepted by a column.
Like NOT NULL constraints and default constraints, CHECK constraints are associated with a specific column in a base table and are usually defined during the table creation process.
UNIQUE Constraints
By default, records that are added to a base table can have the same values assigned to any of the columns available any number of times. As long as the records stored in the table do not contain information that should not be duplicated, this kind of behavior is acceptable. However, there are times when certain pieces of information that make up a record should be unique (for example, if an employee identification number is assigned to each individual who works for a particular company, each number used should be unique-two employees should never be assigned the same employee identification number). In these situations, the UNIQUE constraint can be used to ensure that the value(s) assigned to one or more columns when a record is added to a base table are always unique. Once a UNIQUE constraint has been defined for one or more columns, any operation that attempts to place duplicate values in those columns will fail. Figure 6-4 illustrates how the UNIQUE constraint is used.
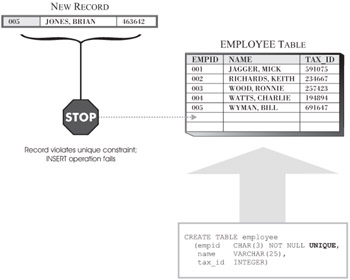
Figure 6-4: How the UNIQUE constraint prevents the duplication of data values.
Unlike NOT NULL constraints, default constraints, and CHECK constraints, which can only be associated with a single column in a base table, UNIQUE constraints can be associated with an individual column or a group of columns. However, each column in a base table can only participate in one UNIQUE constraint, regardless of how the columns are grouped. Like the other constraints, UNIQUE constraints are usually defined during the table creation process.
Regardless of when a UNIQUE constraint is defined, when it is created, the DB2 Database Manager looks to see whether an index for the columns to which the UNIQUE constraint refers already exists. If so, that index is marked as being unique and system-required. If not, an appropriate index is created and marked as being unique and system-required. This index is then used to enforce uniqueness whenever new records are added to the column(s) for which the UNIQUE constraint was defined for.
| Tip | Although a unique, system-required index is used to enforce a UNIQUE constraint, there is a distinction between defining a UNIQUE constraint and creating a unique index. Even though both enforce uniqueness, a unique index allows NULL values and generally cannot be used in a referential constraint. A UNIQUE constraint, on the other hand, does not allow NULL values, and can be referenced in a foreign key specification. (The value NULL means a column's value is undefined and distinct from any other value, including other NULL values.) |
A primary key, which we will look at next, is a special form of UNIQUE constraint. Only one primary key is allowed per table, and every column that is used to define a primary key must be assigned the NOT NULL constraint. In addition to ensuring that every record added to a table has some unique characteristic, primary keys allow tables to participate in referential constraints.
A table can have any number of UNIQUE constraints; however, a table cannot have more than one UNIQUE constraint defined on the same set of columns. And because UNIQUE constraints are enforced by indexes, all the limitations that apply to indexes (for example, a maximum of 16 columns with a combined length of 255 bytes is allowed, and none of the columns used can have a large object or long character string data type) apply to UNIQUE constraints.
Referential Integrity Constraints
If you've worked with a relational database management system for any length of time, you are probably aware that data normalization is a technique used to ensure that there is only one way to get to a single fact. Data normalization is possible because two or more individual base tables can have some type of relationship with one another, and information stored in related base tables can be combined if necessary, using a join operation. This is where referential integrity constraints come into play. Referential integrity constraints (also known as referential constraints and foreign key constraints) are used to define required relationships between two base tables.
To understand how referential constraints work, it helps to look at an example. Suppose you own a small auto parts store, and you use a database to keep track of the inventory you have on hand. Many of the parts you stock will only work with a specific "make" and "model" of an automobile; therefore, your database has one table named MAKE to hold make information and another table named MODEL to hold model information. Since these two tables are related (every model must belong to a make), a referential constraint can be used to ensure that every record that is stored in the MODEL table has a corresponding record in the MAKE table. The relationship between these two tables is established by comparing values that are to be added to the MAKE column of the MODEL table (known as the foreign key of the child table) with the values that currently exist for the set of columns that make up the primary key of the MAKE table (known as the parent key of the parent table). To create the referential constraint just described, you would define a primary key, using one or more columns, in the MAKE table; then, in the MODEL table, you would define a foreign key for one or more corresponding columns that reference the MAKE table's primary key. Assuming a column named MAKEID is used to create the primary key for the MAKE table and a column, also named MAKEID is used, to create the foreign key for the MODEL table, the referential constraint created would look something like the one shown in Figure 6-5.
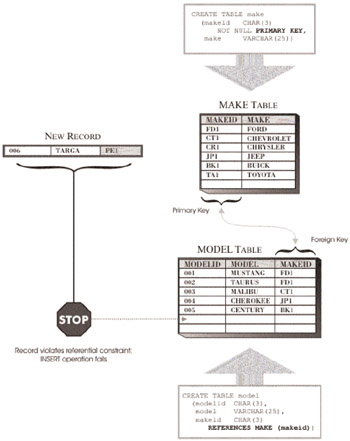
Figure 6-5: How a referential constraint is used to define a relationship between two tables.
In this example, a single column is used to define the parent key and the foreign key of the referential constraint. However, as with UNIQUE constraints, multiple columns can be used to define both the parent and the foreign key of a referential constraint.
| Tip | The names of the columns used to create the foreign key of a referential constraint do not have to be the same as the names of the columns used to create the primary key of the constraint (as was the case in the previous example). However, the data types used for the column(s) that make up the primary key and the foreign key of a referential constraint must be identical. |
As you can see, referential constraints are much more complex than NOT NULL constraints, default constraints, CHECK constraints, and UNIQUE constraints. In fact, they can be so complex that a set of special terms is used to identify the individual components that can make up a single referential constraint. You may already be familiar with some of them; the complete list of terms used can be seen in Table 6-3.
| Term | Meaning |
|---|---|
| Unique key | A column or set of columns in which every row of values is different from the values of all other rows |
| Primary key | A special unique key that does not accept null values |
| Foreign key | A column or set of columns in a child table whose values must match those of a parent key in a parent table |
| Parent key | A primary key or unique key in a parent table that is referenced by a foreign key in a referential constraint |
| Parent table | A table that contains a parent key of a referential constraint. (A table can be both a parent table and a dependent table of any number of referential constraints.) |
| Parent row | A row in a parent table that has at least one matching row in a dependent table. |
| Dependent or child table | A table that contains at least one foreign key that references a parent key in a referential constraint. (A table can be both a dependent table and a parent table of any number of referential constraints.) |
| Dependent or child row | A row in a dependent table that has at least one matching row in a parent table. |
| Descendent table | A dependent table or a descendent of a dependent table. |
| Descendent row | A dependent row or a descendent of a dependent row. |
| Referential cycle | A set of referential constraints defined in such a way that each table in the set is a descendent of itself. |
| Self-referencing table | A table that is both a parent table and a dependant table in the same referential constraint. (The constraint is known as a self-referencing constraint.) |
| Self-referencing row | A row that is a parent of itself. |
The primary reason referential constraints are created is to guarantee that data integrity is maintained whenever one table object references another. As long as a referential constraint is in effect, the DB2 Database Manager guarantees that, for every row in a child table that has a value in any column that is part of a foreign key, there is a corresponding row in the parent table. So what happens when an SQL operation attempts to manipulate data in a way that would violate a referential constraint? To answer this question, let's look at what could compromise dataintegrity if the checks and balances provided by a referential constraint were not in place:
-
An insert operation could add a row of data to a child table that does not have a matching value in the corresponding parent table. (For example, using our MAKE/MODEL scenario, a record could be added to the MODEL table that does not have a corresponding value in the MAKE table.)
-
An update operation could change an existing value in a child table such that it no longer has a matching value in the corresponding parent table. (For example, a record could be changed in the MODEL table so that it no longer has a corresponding value in the MAKE table.)
-
An update operation could change an existing value in a parent table, leaving rows in a child table with values that no longer match those in the parent table. (For example, a record could be changed in the MAKE table, leaving records in the MODEL table that no longer have a corresponding MAKE value.)
-
A delete operation could remove a value from a parent table, leaving rows in a child table with values that no longer match those in the parent table. (For example, a record could be removed from the MAKE table, leaving records in the MODEL table that no longer have a corresponding MAKE value.)
The DB2 Database Manager can either prohibit (restrict) these types of operations from being performed on tables that are part of a referential constraint, or attempt to carry out these actions in a way that will safeguard data integrity. In either case, DB2 uses a set of rules to control the operation's behavior. Each referential constraint has its own set of rules (which consist of an Insert Rule, an Update Rule, and a Delete Rule), and the way each rule is to be enforced is specified as part of the referential constraint creation process.
The Insert Rule for Referential Constraints
The Insert Rule guarantees that a value can never be inserted into the foreign key of a child table unless a matching value can be found in the corresponding parent key of the associated parent table. Any attempt to insert records into a child table that violates this rule will result in an error, and the insert operation will fail. In contrast, no checking is performed when records are added to the parent key of the parent table.
The Insert Rule for a referential constraint is implicitly created when the referential constraint itself is created. Figure 6-6 illustrates how a row that conforms to the Insert Rule for a referential constraint is successfully added to a child table; Figure 6-7 illustrates how a row that violates the Insert Rule causes an insert operation to fail.
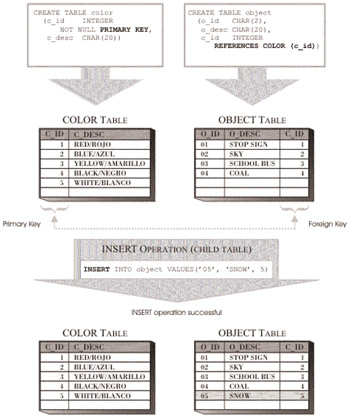
Figure 6-6: An insert operation that conforms to the Insert Rule of a referential constraint.
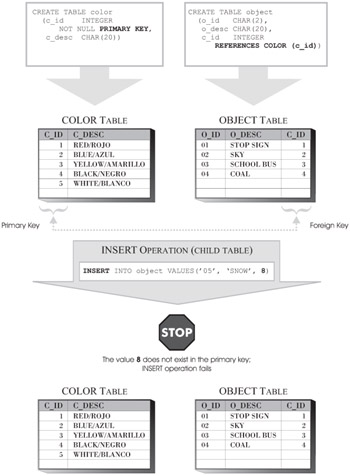
Figure 6-7: An insert operation that violates the Insert Rule of a referential constraint.
It is important to note that because the Insert Rule exists, records must be inserted in the parent key of the parent table before corresponding records can be inserted into the child table. (Going back to our MAKE/MODEL example, this means that a record for a new MAKE must be added to the MAKE table before a record that references the new MAKE can be added to the MODEL table.)
The Update Rule for Referential Constraints
The Update Rule controls how update operations performed against either table (child or parent) participating in a referential constraint are to be processed. The following two types of behaviors are possible, depending upon how the Update Rule is defined:
-
ON UPDATE RESTRICT: This definition ensures that whenever an update operation is performed on the parent table of a referential constraint, the value for the foreign key of each row in the child table will have the same matching value in the parent key of the parent table that it had before the update operation was performed.
-
ON UPDATE NO ACTION: This definition ensures that whenever an update operation is performed on either table in a referential constraint, the value for the foreign key of each row in the child table will have a matching value in the parent key of the corresponding parent table; however, the value may not be the same as it was before the update operation occurred.
Figure 6-8 illustrates how the Update Rule is enforced when the ON UPDATE RESTRICT definition is used; Figure 6-9 illustrates how the Update Rule is enforced when the ON UPDATE NO ACTION definition is used.
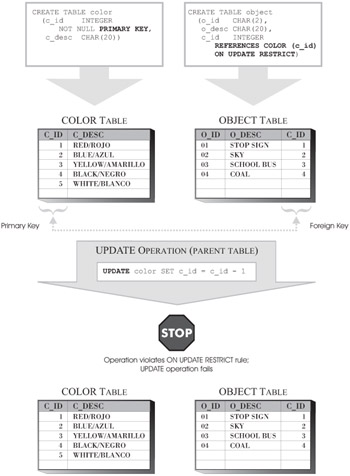
Figure 6-8: How the ON UPDATE RESTRICT Update Rule of a referential constraint is enforced.
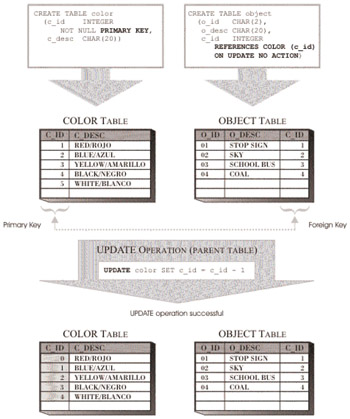
Figure 6-9: How the ON UPDATE NO ACTION Update Rule of a referential constraint is enforced.
Like the Insert Rule, the Update Rule for a referential constraint is implicitly created when the referential constraint itself is created. If no Update Rule definition is provided, the ON UPDATE NO ACTION definition is used by default. Regardless of which Update Rule definition is used, if the condition of the rule is not met, the update operation will fail, an error message will be displayed, and any changes made to the data in either table participating in the referential constraint will be backed out.
The Delete Rule for Referential Constraints
The Delete Rule controls how delete operations performed against the parent table of a referential constraint are to be processed. The following four types of behaviors are possible, depending upon how the Delete Rule is defined:
-
ON DELETE CASCADE: This definition ensures that when a parent row is deleted from the parent table of a referential constraint, all dependent rows in the child table that have matching primary key values in their foreign key are deleted as well.
-
ON DELETE SET NULL: This definition ensures that when a parent row is deleted from the parent table of a referential constraint, all dependent rows in the child table that have matching primary key values in their foreign key are located, and their foreign key values are changed to NULL (provided the foreign key columns are nullable). Other values for the dependent row are not affected.
-
ON DELETE RESTRICT: This definition ensures that whenever a delete operation is performed on the parent table of a referential constraint, the value for the foreign key of each row in the child table will have the same matching value in the parent key of the parent table that it had before the delete operation was performed.
-
ON DELETE NO ACTION: This definition ensures that whenever a delete operation is performed on the parent table of a referential constraint, the value for the foreign key of each row in the child table will have a matching value in the parent key of the parent table after the other referential constraints have been enforced.
Figure 6-10 illustrates how the Delete Rule is enforced when the ON DELETE CASCADE definition is used; Figure 6-11 illustrates how the Delete Rule is enforced when the ON DELETE SET NULL definition is used;
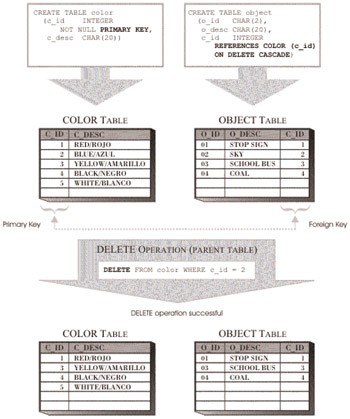
Figure 6-10: How the ON DELETE CASCADE Delete Rule of a referential constraint is enforced.
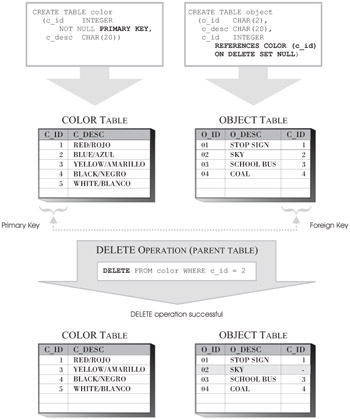
Figure 6-11: How the ON DELETE SET NULL Delete Rule of a referential constraint is enforced.
Figure 6-12 illustrates how the Delete Rule is enforced when the ON DELETE RESTRICT definition is used; and Figure 6-13 illustrates how the Delete Rule is enforced when the ON DELETE NO ACTION definition is used.
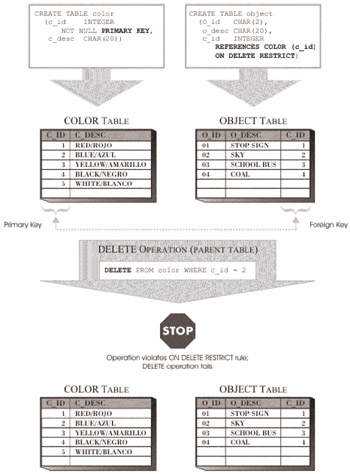
Figure 6-12: How the ON DELETE RESTRICT Delete Rule of a referential constraint is enforced.
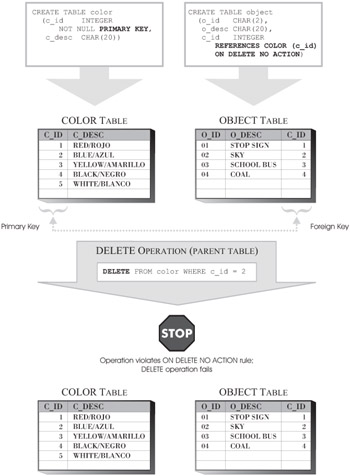
Figure 6-13: How the ON DELETE NO ACTION Delete Rule of a referential constraint is enforced.
Like the Insert Rule and the Update Rule, the Delete Rule for a referential constraint is implicitly created when the referential constraint itself is created. If no Delete Rule definition is provided, the ON DELETE NO ACTION definition is used by default. No matter which form of the Delete Rule is used, if the condition of the rule is not met, an error message will be displayed, and the delete operation will fail.
If the ON DELETE CASCADE Delete Rule is used and the deletion of a parent row in a parent table causes one or more dependent rows to be deleted from the corresponding child table, the delete operation is said to have been propagated to the child table. In such a situation, the child table is said to be delete-connected to the parent table. Because a delete-connected child table can also be the parent table in another referential constraint, a delete operation that is propagated to one child table can, in turn, be propagated to another child table, and so on. Thus, the deletion of one parent row from a single parent table can result in the deletion of several hundred rows from any number of tables, depending upon how tables are delete-connected. Therefore, the ON DELETE CASCADE Delete Rule should be used with extreme caution when a hierarchy of referential constraints permeates a database.
Informational Constraints
The DB2 Database Manager automatically enforces all of the constraints that we have looked at so far whenever new data values are added to a table or existing data values are modified or deleted. As you might imagine, if a large number of constraints have been defined, a large amount of system overhead can be required to enforce those constraints, particularly when large amounts of data are loaded into a table.
If an application is coded in such a way that it validates data before inserting it into a DB2 database, it may be more efficient to create one or more informational constraints, as opposed to creating any of the other constraints available. Unlike other constraints, informational constraints are not enforced during insert and update processing. However, the DB2 SQL Optimizer will evaluate information provided by an informational constraint when considering the best access plan to use to resolve a query. (Informational constraints are defined by appending the keywords NOT ENFORCED ENABLE QUERY OPTIMIZATION to a normal constraint definition.) As a result, an informational constraint may result in better query performance even though the constraint itself will not be used to validate data entry/modification. Figure 6-14 illustrates the behavior of a simple informational constraint.
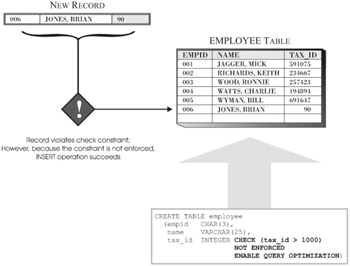
Figure 6-14: Behavior of a simple informational constraint.
It is important to note that because the DB2 Optimizer evaluates informational constraints when selecting the best data access plan to use to resolve a query, records that have been inserted into a table that violate one or more informational constraints may not be returned by some queries. For example, if the query "SELECT * FROM employee WHERE tax_id = 90" were to be executed against the EMPLOYEE table shown in Figure 6-14, no records would be returned because the access plan chosen would assume that no records with a TAX_ID value that is less than 1000 exist in the table.
Temporarily Suspending Constraint Checking with the SET INTEGRITY SQL Statement
Although constraints provide a means of ensuring that some level of integrity is maintained as data is manipulated within a base table, their enforcement can prevent some types of operations from executing successfully. For example, suppose you want to bulk-load 10,000 rows of data into a base table using the LOAD utility. If the data that is to be loaded contains values that will violate a constraint that has been defined for the table into which the data is to be loaded, the operation will fail. Or suppose you wish to add a new constraint to an existing table that already contains several hundred rows of data. If one or more rows in the table contain data values that violate the constraint you wish to add, any attempt to add the constraint will fail. In situations like these, it can be advantageous to suspend constraint checking just long enough to perform the desired operation. However when constraint checking is suspended, at some point it must be resumed, and at that time, rows in the table that cause a constraint to be violated must be located and dealt with.
Constraint checking for a table can be suspended temporarily by executing the SET INTEGRITY SQL statement. When used to suspend constraint checking, the syntax for the simplest form of this statement is:
SET INTEGRITY FOR [TableName, ...] OFF <AccessMode>
where:
| TableName | Identifies the name of one or more base tables that constraint checking is to be temporarily suspended for. |
| AccessMode | Specifies whether or not the table(s) specified can be accessed in read-only mode while constraint checking is suspended. The following values are valid for this parameter: NO ACCESS and READ ACCESS-if no access mode is specified, NO ACCESS is used as the default. |
Thus, if you wanted to suspend constraint checking for a table named EMPLOYEES temporarily and deny read-only access to that table while constraint checking is turned off, you could do so by executing a SET INTEGRITY statement that looks something like this:
SET INTEGRITY FOR employees OFF
When constraint checking is suspended for a particular table, that table is placed in "Check Pending" state to indicate that it contains data that has not been checked (and that it may not be free of constraint violations). While a table is in "Check Pending" state, it cannot be used in insert, update, or delete operations, nor can it be used by any DB2 utility that needs to perform these types of operations. Indexes cannot be created for a table while it is in "Check Pending" state, and data stored in the table can only be retrieved if the access mode specified when the SET INTEGRITY statement was used to place the table in "Check Pending" state allows read-only access.
Just as one form of the SET INTEGRITY statement is used to suspend constraint checking temporarily, another form is used to resume it. In this case, the syntax for the simplest form of the SET INTEGRITY statement is:
SET INTEGRITY FOR [TableName] IMMEDIATE CHECKED FOR EXCEPTION [IN [TableName] USE [ExceptionTable], ...]
or
SET INTEGRITY FOR [[TableName][ConstraintType], ...] IMMEDIATE UNCHECKED
where:
| TableName | Identifies the name of one or more base tables for which suspended constraint checking is to be resumed. These are also the base tables from which all rows that are in violation of a referential constraint or a CHECK constraint are to be copied. |
| ExceptionTable | Identifies the name of a base table to which all rows that are in violation of a referential constraint or a CHECK constraint are to be copied. |
| ConstaintType | Identifies the type of constraint checking that is to be resumed. The following values are valid for this parameter: FOREIGN KEY, CHECK, MATERILIZED QUERY, GENERATED COLUMN, STAGING, and ALL. |
Thus, if you wanted to resume constraint checking for the EMPLOYEES table that constraint checking was suspended for in the previous example, you could do so by executing a SET INTEGRITY statement that looks something like this:
SET INTEGRITY FOR employees IMMEDIATE CHECKED
When this particular form of the SET INTEGRITY statement is executed, the table named EMPLOYEES is taken out of the "Check Pending" state, and each row of data stored in the table is checked for constraint violations. If an offensive row is found, constraint checking is stopped, and the EMPLOYEES table is returned to the "Check Pending" state.
If you want to be able to see the offending rows at a glance, the following form of the SET INTEGRITY statement can be executed:
SET INTEGRITY FOR employees IMMEDIATE CHECKED FOR EXCEPTION IN employees USE bad_rows
With this form, each row found that violates one or more of the constraints that have been defined for the EMPLOYEES table will be copied to a table named BAD_ROWS, where it can be corrected and copied back to the EMPLOYEES table if so desired.
And finally, if this form of the SET INTEGRITY statement is executed:
SET INTEGRITY FOR employees ALL IMMEDIATE UNCHECKED
the table named EMPLOYEES is taken out of the "Check Pending" state, and no constraint checking is performed. However, this is a very hazardous thing to do and should be done only if you have some independent means of ensuring that the EMPLOYEES table does not contain data that violates one or more constraints defined for the EMPLOYEES table.
EAN: 2147483647
Pages: 93